- Home
- Your Boats
- Mast
Wooden Mast and Spar Building
A mast or spar made from wood not only looks and feels good but it also takes advantage of the naturally ability that trees have developed over the centuries for creating a tall, strong, flexible pole.
Those tall straight pine and fir trees are able to grow to such heights and survive in wind storms because their natural elasticity absorbs the shock loads caused by gusting winds.
Timber

There are several reasons why soft woods are the chosen type of timber used in the making of masts and spars.
The first and most obvious is that so any soft wood trees grow exceedingly tall and straight.
And because they have grown so tall and straight they have developed the ‘elasticity’ to withstand all that the elements can throw at them.
Soft woods are also more likely to be lighter in weight.
Sitka Spruce (Silver, Tideland or Menzies Spruce) has long been the top choice for mast builders.
However many other spars have been built using whatever light, straight-grained wood was available, such as those shown below.
- Douglas fir (British Columbian, Oregon, Idaho, Red, pine also known as Red or Yellow fir)
- Scots pine (European redwood, Northern pine, Red pine, Redwood, Scots fir, Norway fir, Swedish fir, Finish fir)
- Port Orford cedar (Oregon cedar, White cedar, Ginger pine, Lawson’s cypress)
- Larch
When choosing a timber look for one that is as light and straight grained as possible with, hopefully few knots.
However, a few small ones knots can be acceptable.
The timber should ideally be seasoned, especially if you are building a hollow spar.
I have heard of solid masts being made from green poles.
But green timber is more likely to develop shakes and will be less able to absorb any preservative, oil, varnish or whatever you use as a finish.
affiliate linksStructural Considerations
A mast/spar needs both strength and stiffness and be able to resist fatigue.
Sometimes these characteristics can be conflicting.
Strength or resistance to breaking in wood involves its elasticity which allows the wood to bend to absorb stresses.
Whereas stiffness is the resistance to bending.
All spars need to be able to absorb the shock of a gust which the wood absorbs by bending but too much bend will spoil the sail shape so a happy compromise is needed.
And stresses will differ depending on the types of rig and whether the mast keel stepped, deck stepped or in a tabernacle.
Another consideration is weight aloft.
Keeping weight within reasonable bounds is just one of the reasons for using soft woods.
It is also one reason for building a hollow mast.
However, most spars taper towards the top, as the diameter becomes smaller so the weight becomes less.
For the average cruising yacht the weight differences between a solid and a hollow spar are hardly significant.
The other advantage of the hollow, built spar is that it can be made from easily available timber sizes, and with a minimum of waste.
Solid/Grown Spars
The simplest, easiest and least wasteful spars are produced from ‘grown’ timbers.
I theory it should be possible to acquire a trunk which has the length and taper needed for your spar.
In practice you will have to do some shaping, tapering and rounding.
While traditionally masts and spars were spherical, they don’t have to be.
However, in my opinion a spherical mast will produce the least turbulence to the air passing over the rig.

It is possible to make a spherical spar from one piece of square cross-section timber.
However, it will be much easier to source timers of smaller cross-section and then build the spar up from them.
And the advantage is that the grain can then be arranged in a radial fashion.
Building a spar from separate parts does require very careful attention to the gluing surfaces, they must be closely mating and the actual gluing must be precise.
If you are confident in your carpentry and gluing skills, short lengths can be scarffed to produce the required length.
Scarf joints are best at least ten times the thickness of the piece and when the various pieces are assembled the joints should be staggered.
And remember to never ever cut a piece of wood to its exact length until you absolutely have to.
Tapering
First determine the required diameter of your spar and then where you want your it to taper and by how much.
This will depend on the design of you rig.
You may want the spar to have no taper for some of its length/height, to just above the partners, then have a slight taper, perhaps as far as the spreaders, then a bit more of a taper up to the truck.
Always best to start with the wood a little wider, thicker, and longer than the finished dimensions.
Plane one surface flat and level with your longest plane, preferably a jointer.
Then mark the center line on this planed face.
Use a string stretched between tacks in the middle of each end, use this to make several center marks on the timber.
Then join the marks using a long, straight batten.
Repeat on the opposite face.
Now use the centreline as the datum from which to mark the width of your mast at intervals along its length.
Then back to the batten to connect these marks.
You can now cut the outline of your mast to this drawn profile but cut it oversized as you still need to plane the timer square.
Now plane these two sawn, tapered faces flat and square to the original planed surface.
Repeat the steps for marking the center line and profile on these two new faces.
Cut this outline and plane these sides flat and square to their adjacent sides.
You now have a spar tapered to your requirement but it is still square in cross-section.
Now you need to start rounding the square.
Rounding the Square
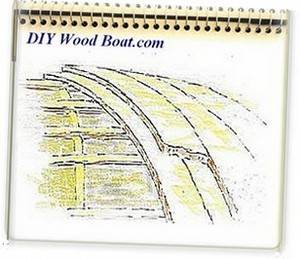
So now you’ve got a nicely tapered, planed but square, four sided spar.
Next job is to plane off the four corners to give you an eight sided spar.
Then plane off those eight corners to give you a sixteen sided spar, which can then easily be rounded using sandpaper.
But before you start taking off the corners you need to mark
the depth of the bevels.
The simple way is to draw a circle on the face of the timber with a compass.
The center of the circle will be on the centreline and the edge of the circle right on the edge of the face.
Then draw a line from the center of the circle, at 45 degree to the centreline and mark where it crosses the circle.
This mark is the edge of the bevel.
Do this for every transition point and as many points in between as possible, the more the merrier and do it foe both sides of the circle.
These marks can then be joined using your batten.
One you have planed the spar down to eight sides you can use the same method to mark it up for reducing it to sixteen sides.
But now the line from the center of the circle to the circumference needs to be 67 ½ degrees.
Now unless you are building a massive spar getting from 16 sides to 32 sides using the above measuring technique is going to become fiddly.
At this stage it is quicker to use your eye and your judgment to plane off the remaining corners.
Then the final rounding can be done by sanding.
Start with 60 or 80 grit paper for the initial shaping, then work the grits for finishing.
Use long strips of sandpaper wrapped around the spar and pull it backwards and forwards in a long, spiralling motion.
Occasionally sand along the length of the mast to help fair out any uneven spots.
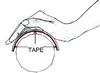
Here is an easy way to mark out a tapered octagon using only one setting of your compass.
Built Mast
Building a spar is obviously much more difficult than simply shaping a solid pole.
However, if a pole of the required dimensions is not available building the spar might be the only option.
Built spars can be either solid or hollow.

But if you are building one it is relatively simple to make it hollow and thus save weight aloft and create a central channel for masthead wiring.

Building a simple cylindrical spar as those shown above from ‘square’ timbers does require wasting quite a lot of that expensive wood when 'rounding the square'.
One can build an almost waste free hollow spar which would suit a conventional bermudan rig.
However, a ‘square’ section with rounded corners such as this would be unsuitable for any rig which uses mast hoops or parrel beads or a lug rig where the spar turns against the mast.

The next problem when creating a hollow spar is that unlike the solid mast the taper cannot be created afterwards.
Any taper to the finished spar needs to be cut from the staves before they are assembled.
There have been several configurations used to increase the gluing areas across the width of built staves.

And several configurations which attempt to reduce wastage and at the same time produce large gluing surfaces.

Unfortunately while they will produce superb, strong spars they call for increasingly complex carpentry.

The ‘Birdsmouth’ technique developed by Nobles of Bristol UK is perhaps one of the most successful of these techniques.

However, it is a technique which really requires access to woodworking machinery, such as profiling and planing machines.
Rigging
Setting up your standing rigging can be greatly simplified by using ‘Spectra’.
‘Spectra’ is virtually stretch free and can be tied off without much weakening.
It offers a real alternative to expensive swaged fittings, can be easily maintained and it is corrosion-free.
Previous posts
See What Others Have Posted
Rounding Timber Spars
Here my handy tip for rounding timber spars, oars etc.
Take a piece of plastic/PVC drain pipe slightly bigger radius than the work piece, and cut it …
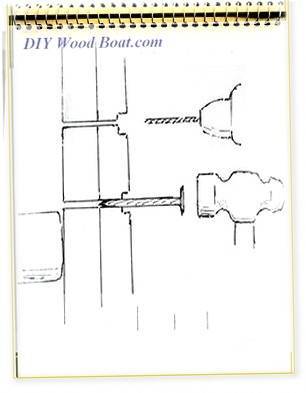
mast hoops
I am restoring an early 1970's Catboat that I believe is a Sturdee Cat.
I am wanting to convert the gaff rigged sail from the existing line around …


You might like these
Boat Books for Wooden Boat Builders
Boat Books a series of boat books based on some of the 1960's, classic, Free Boat Plans that were published in magazines such as "Popular Mechanics", "Popular Science" and the "Boat Builder Handbook".
Ring Nails for Marine Fastening.
Ring Nails sometimes call Gripfast or ring shank, silicon bronze boat nails are renowned for their holding power. but how to get them out?
The Ashcroft Method of Planking a Wooden Boat
The Ashcroft method of building small wooden boats, an early from of cold moulding using thin layers of wood with the layers all running same direction.
Knotty wood, problems with boat building timber.
Knotty wood, how to avoid structural problems with knots in lumber when using softwood timber for fitting out and boat joinery
Build a Boat, tips for the DIY Wooden Boat Builder.
How to Build a Boat, Wooden Boat Building methods for the DIY, backyard, self-builders explained, carvel, lapstrake and plywood
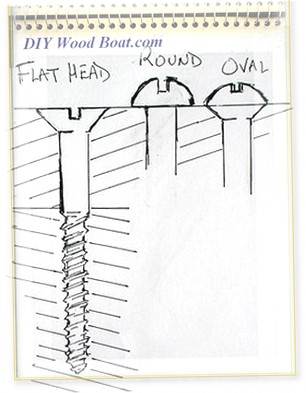
Wood Screws for Boat Building and Repair.
Wood Screws are the most widely used and versatile fasteners used on wooden boats. Which type to use and how to use them
Wood, Environmentally Friendly Boat Building Lumber.
Make sure that the Wood that you buy and use is sustainably grown and harvested.
Timber, Lumber for Boat Building.
A brief description of the most common Timber used for building Wooden Boats how to choose wood for your project boat
Timber Properties
A brief guide to timber properties and wood, characteristics such as strength, stiffness and elasticity for choosing lumber for wooden boat building and restoration.
Rivets and Copper Rove Wood Boat Fastenings.
How to use Copper Rivets and Roves construction guide to fasteners on your wooden boat.


Recent Articles
-
Reader's Boat Photos
Aug 23, 25 09:08 AM
 Gallery of Readers uploaded Photos
 -
The Sliding Bevel
Jun 19, 25 02:52 AM
 By Robin Gates
The Sliding Bevel: A Boatbuilder’s Tool for Precision
For angles other than the perpendicular of the try-square and 45 degrees of a mitre-square, the essential measuring tool is a slidin…
-
Winter Bilge Issues
Jun 18, 25 07:34 AM
 By Adrian Morgan
Winter Bilge Issues: Can a Classic Boat Spend Too Long Ashore?
Beware the score of too long ashore, Adrian Morgan warns us…
Continue reading "Winter Bilge Issues"
You might like these
The Dipping Lug Sail
The dipping lug sail, is perhaps the most efficient and cheapest, type of sailing rig especially for small sailboats however it isn't as handy as the standing lugger or the balanced lugsail.
UV Strip for Furling Sails
UV Strip, notes on repairing, fitting and replacing a sacrificial UV protection strip on furling sails using acrylic or UV protected Dacron.
Sailing Rigs, a Guide to Sail Shapes.
The basic shape of the Sailing Rigs most commonly found on wooden sailing boats of every size.
Sail Cloth
About sail cloth and the different materials for DIY sail making and the average leisure sailor.
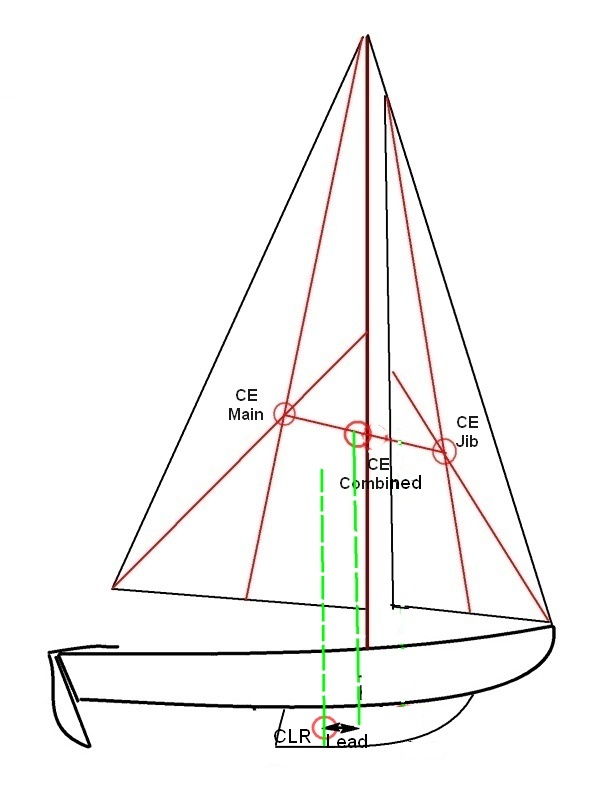
Sail Balance
Notes on Sail Balance, designing a sailing rig, how set the relationship between the center of effort and the center of lateral resistance.
Lug Rigs for large and small sailboats.
Sailors have been using Lug Rigs for centuries because of their unique sailing abilities.
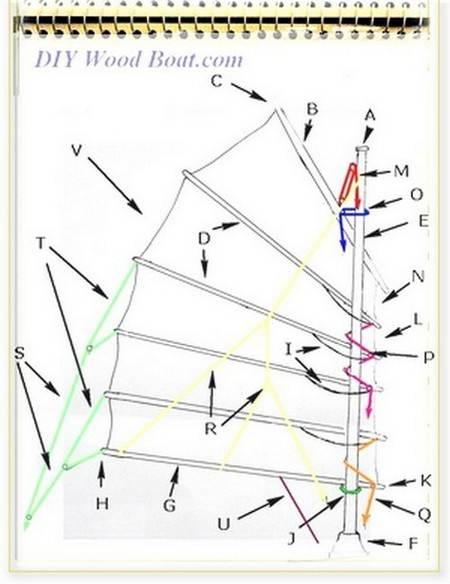
Junk Rig Conversion
Structural considerations for a Junk rig conversion of a wooden boat from bermudan rig to junk sail, where and how to site the mast.
Chinese Junk, the perfect cruising rig.
Chinese junk sail, why I rigged Mignonne with a Jukn Sail
The Balanced Lugsail
The balanced lugsail is one of the best traditional rigs for small boats, cheap and easy to rig and sail it is a practical alternative to more expensive bermudan rigs.
Junk Rig the ideal cruising sail.
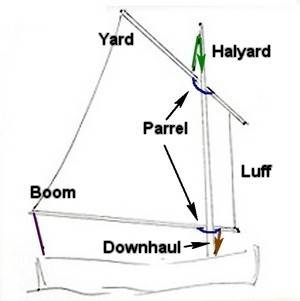
How to rig a western version of the Chinese Junk Rig the basic lines and controls.
Ropes and Rigs for Boating.
Boating ropes and rigs, knots, sailing, line handling and line care, what all boaters need to know.
Whipping Boat Ropes
Whipping marine ropes to prevent the ends fraying, how to use whipping twine to prevent rigging and yacht ropes from untwisting.
Splicing Three Strand Rope.
Splicing, tips and techniques, three strand eyes and rope ends, make your own dock lines why pay for something you can easily do yourself.
Rope types
Rope types, what types, construction and materials to use on your boat when to use three strand and braided marine lines.
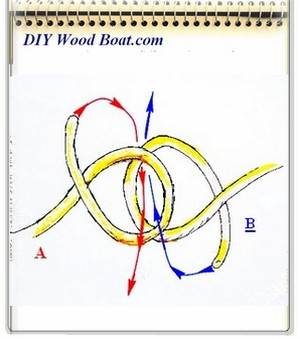
Knots for Sailors.
A brief description of and how to tie some of the most useful boating knots. Including some that every boater should know.
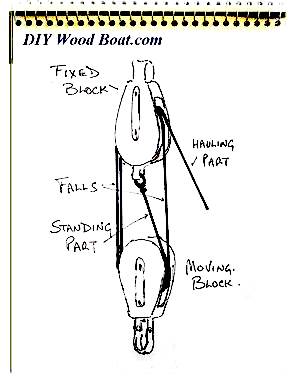
Blocks and Tackle lines and sheaves.
How Blocks and Tackle work to give mechanical advantage and how best to rig them.
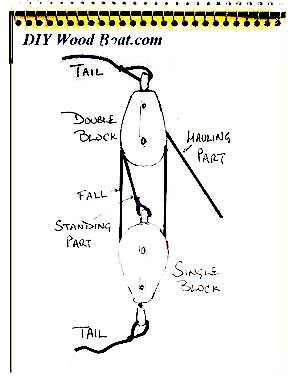
Handy Billy a traditional rope and sheave rig.
A Handy Billy made with two blocks and tackle can be used to give mechanical advantage wherever needed.


This work is licensed under a Creative Commons Attribution-ShareAlike 2.0 UK: England & Wales License.
I am perfectly aware that the majority of Wooden Boat aficionados are sensible folk.
However, I need to point out that I am an amateur wooden boat enthusiast simply writing in order to try to help other amateur wooden boat enthusiasts.
And while I take every care to ensure that the information in DIY Wood Boat.com is correct, anyone acting on the information on this website does so at their own risk.