- Home
- Your Boats
- Mast Boot
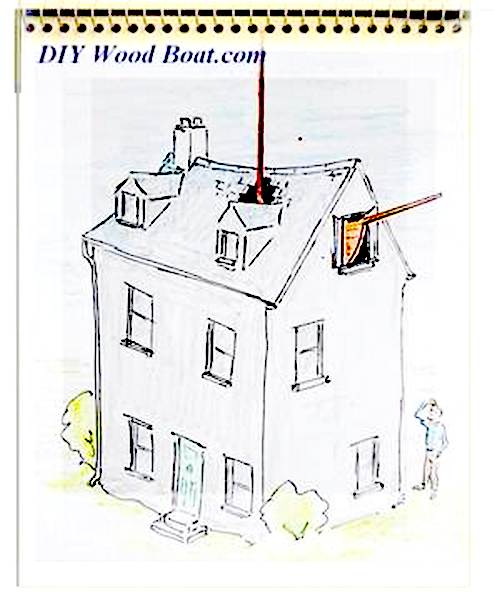
How to make a Mast Boot
A
mast boot,
skirt or coat is the traditional method for making a waterproof seal
between the deck and a keel stepped mast.
Despite modern advances in sealant technology, a flexible boot is still the most effective and best looking solution to preventing water leaking down the mast into the cabin.
A skirt is also a relatively simple, low tech, DIY solution, which can also be retrofitted.
Methods
It
is possible to simply caulk and seal around the wedges and partners but
this is unlikely to be very satisfactory and every time you need to
re-step the mast or adjust the wedges it will all have to be raked out,
and then resealed.
The next simplest method is to use a rigging and mast boot tape.
This is the self-amalgamating type of tape which can be bought in wide
rolls.
It is waterproof flexible and extremely simple to wrap on.
If that sounds too easy to be true, well it probably is.
First
it does need to be wrapped on to something, it is fine around the mast
and
wedges but getting it to cover the seam between the wedges and the deck
is the problem.
It will also show dirt and tends to peel after
time, and it isn’t all that cheap either, especially as you will need a
couple of rolls for the average mast diameter.
The next best DIY solution is the rubber mast boot.
These are made using inner tube material, if you can find any theses
days.
Wile
the inner tube and hose clamp system works well if done right it does
look pretty ugly and the rubber will degenerate over time in sunlight.
Another
option is to use a combination of the above methods, then
cover
with a wraparound cover of material such as ‘sunbrella’, which could
simply be attached with a ‘velcro’ strip.
But then if you are going to the trouble of cutting and sewing a cover why not make a proper mast boot in the first place.
Fittings
The top of the mast boot attaches directly
to the mast.
The bottom edge will also need to be attached to something.
So you will need a deck ring or flange.
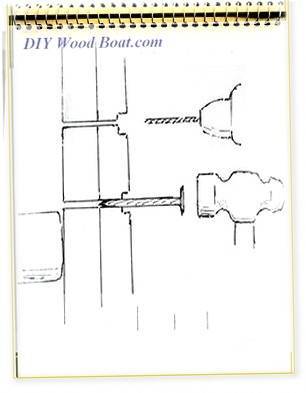
The
deck-ring should be well clear of the wedges and with a grove or lip
into which the bottom of the boot is securely fastened.
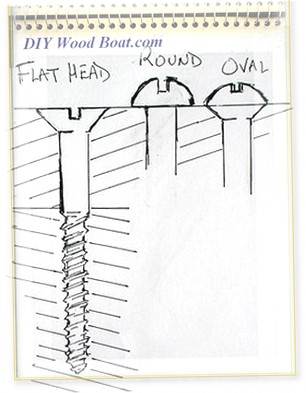
It will also be of the same profile as the mast, circular for a round mast, oval foe an oval mast and be positioned so as to allow the mast boot to have a runoff slope of somewhere in the region of 60 degrees.
Making a Mast Boot Pattern
The material for a mast boot should be
strong, such as proofed
acrylic
or painted canvas.
The best mast boot requires three separate pieces.
The top and bottom collars will simply be cylindrical so they are easy
to cut and sew.
The middle part is the cone shaped bit, so that’s the tricky one to
measure out and cut.
It is always best to start with a paper pattern which can be tried
against the mast before cutting the material.
And perhaps even before buying material so you know exactly what you will need.

In
order to draw the pattern you will need to take note of three
measurements.
- The circumference of the mast.
- The circumference of the deck ring.
- And the proposed height of the mast boot from the deck ring to the top position on the mast. (H).
This height should allow for the finished boot to have a slope of at least 60degrees and be clear of wedges and any mast fittings.
This
is for a circular mast and deck ring, for masts and rings which are not
perfectly circular add a bit extra to the height (H) then trim the
pattern to fit.
Take these measurements and write them down.

So,
lets start with the top and bottom collars, these are added to smooth
the transition from the cone shape of the boot to the cylindrical shape
of the mast and deck ring.
The collars are simple oblong strips cut to the respective circumferences of the deck ring and mast with an allowance all round for sewing.
The
width of the deck ring collar needs to allow for any tuck around the
lip, one and a half times the deck ring height should be sufficient,
plus the hem.
The mast collar needs to be wide enough to take whatever means of
fastening you decide on.
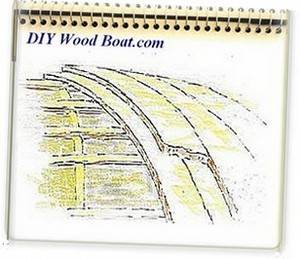
Now the next stage is to work out that ‘lampshade shape’ for the main part of the mast boot.
I
have tried to do this just by pinning paper against the mast and trying
to do it free hand, believe me it is easier and quicker to do the
simple maths first.
So, first, we need to
work out the diameters
of the mast (Bd) and the deck ring (Cd), which if you remember your
geometry is the circumference divided by 3.1416 ().
Now we need to draw two arcs both with their centres at A.
But first we need to work out the length of their respective radiuses.
To get R2, multiply H by the diameter of the deck ring (Cd), and then divide by the difference between the diameter of the deck ring (Cd) and the diameter of the mast (Bd).
| R2 = | (H × Cd) |
| (Cd - Bd) |
At this stage it is always best to round any odd numbers up,
the paper pattern can always be trimmed down later.
To get R1 simply subtract the height (H) from R2.
The lengths of the arcs should be the respective circumferences plus a
bit for trimming/sewing.
Now,
cut out your paper pattern, take it to your mast, pin it or hold it
against the mast to check how it fits and trim as necessary.
Once
you are satisfied with the fit you can take the pattern to your cloth
and mark it out, not forgetting to allow plenty of extra for seams and
overlaps.
Sew the top and bottom collars on to the ‘lampshade’ and hem the top and bottom edges.
affiliate linksFitting
Ideally the whole mast boot would be sewn
up, the seams sealed and then
fitted to the mast before the mast is stepped.
However,
it can be fitted to an already standing mast, it just means that the
final sewing is a bit awkward, though the overlap can be done with a
good sticky sealant.
Begin by placing the boot inside out and upside down around the mast
and securing the top collar to the mast.
The very large sized hose clamps are ideal for this.
Don’t seal it just yet as the position may need to be altered.
Then pull the boot down over the top collar so that it reaches the deck
ring without being too tight.
Make sure that the overlaps are tucked inwards.
Secure the bottom edge to the deck ring temporally so you can check and
if necessary alter the fit.
Mark where you want the overlap to be sewn.
You
can now release the bottom edge to make sewing a bit
easier, it
is still going to be a fiddly job but well worth taking you time and
getting it as neat as possible.
You can then run some sealant down the seams.
You could just glue that side seam but the problem is how to hold the edges together wile the glue or sealant sets.
When
it is all sewn up and ready to go run some sealant under the top
collar, tighten up its fastening, pull the boot down and do the same
for the bottom edge.
Then all you need to do is paint or proof the mast boot or if you've used a waterproof cloth just run some sealant along the outside of the seams.
And you now have a relitively leak free Mast Boot.
affiliate links


"Everyone, in some small sacred
sanctuary
of the self, is nuts."
(Leo
Rosten, 1908-1997)
You might like these
Boat Books for Wooden Boat Builders
Boat Books a series of boat books based on some of the 1960's, classic, Free Boat Plans that were published in magazines such as "Popular Mechanics", "Popular Science" and the "Boat Builder Handbook".
Ring Nails for Marine Fastening.
Ring Nails sometimes call Gripfast or ring shank, silicon bronze boat nails are renowned for their holding power. but how to get them out?
The Ashcroft Method of Planking a Wooden Boat
The Ashcroft method of building small wooden boats, an early from of cold moulding using thin layers of wood with the layers all running same direction.
Knotty wood, problems with boat building timber.
Knotty wood, how to avoid structural problems with knots in lumber when using softwood timber for fitting out and boat joinery
Build a Boat, tips for the DIY Wooden Boat Builder.
How to Build a Boat, Wooden Boat Building methods for the DIY, backyard, self-builders explained, carvel, lapstrake and plywood
Wood Screws for Boat Building and Repair.
Wood Screws are the most widely used and versatile fasteners used on wooden boats. Which type to use and how to use them
Wood, Environmentally Friendly Boat Building Lumber.
Make sure that the Wood that you buy and use is sustainably grown and harvested.
Timber, Lumber for Boat Building.
A brief description of the most common Timber used for building Wooden Boats how to choose wood for your project boat
Timber Properties
A brief guide to timber properties and wood, characteristics such as strength, stiffness and elasticity for choosing lumber for wooden boat building and restoration.
Rivets and Copper Rove Wood Boat Fastenings.
How to use Copper Rivets and Roves construction guide to fasteners on your wooden boat.


Recent Articles
-
Reader's Boat Photos
Aug 23, 25 09:08 AM
 Gallery of Readers uploaded Photos
 -
The Sliding Bevel
Jun 19, 25 02:52 AM
 By Robin Gates
The Sliding Bevel: A Boatbuilder’s Tool for Precision
For angles other than the perpendicular of the try-square and 45 degrees of a mitre-square, the essential measuring tool is a slidin…
-
Winter Bilge Issues
Jun 18, 25 07:34 AM
 By Adrian Morgan
Winter Bilge Issues: Can a Classic Boat Spend Too Long Ashore?
Beware the score of too long ashore, Adrian Morgan warns us…
Continue reading "Winter Bilge Issues"


This work is licensed under a Creative Commons Attribution-ShareAlike 2.0 UK: England & Wales License.
I am perfectly aware that the majority of Wooden Boat aficionados are sensible folk.
However, I need to point out that I am an amateur wooden boat enthusiast simply writing in order to try to help other amateur wooden boat enthusiasts.
And while I take every care to ensure that the information in DIY Wood Boat.com is correct, anyone acting on the information on this website does so at their own risk.