- Home
- Your Boats
- Splicing
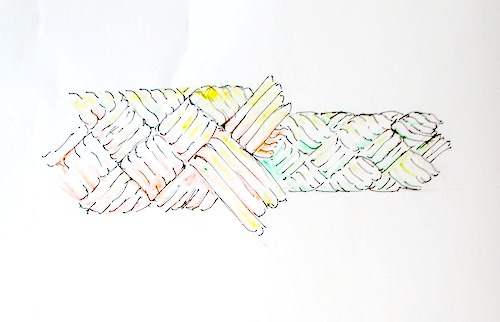
Splicing Three Strand Rope.
Not only is splicing a satisfying art, making up your own dock lines will save you money, why pay someone to do something that is so easy.
And you can tailor those lines to suit your own boat rather than having to buy stock lengths.
Once you have mastered the basic technique there are numerous other uses such as anchor lines that require an eye with a metal thimble to protect the line from chafe, rope ends that need tidying or lines that need joining.
Where a permanent join or eye is required in a line, splicing will not only look much neater and more seaman-like than a knot but will also be much stronger.
Tools
You
only need a few basic tools, a sharp knife with the emphases on ‘sharp’
so the ends can be cut cleanly and a marlinspike or fid to separate the
rope strands.
The marlinspike is a round pointed spike used to lift and separate the
individual strands.
A Swedish Fid will do the same thing with the advantage that the ‘hollow’ side makes it much easier to thread the strand to be tucked.
When
working with synthetic ropes a
heated rope cutter will hep seal
the ends and prevent unravelling, a cigarette lighter can be used but
this will have a tendency to blacken the ends if you are not careful.
On the other hand some tape such as the cheap electrical type is fine
for temporarily holding the yarns to stop the ends unravelling.
And as I will explain later I also use my ‘Handy-Stitcher’ and some whipping twine.
affiliate linksThe Basic Technique
It is always best to use good quality rope
on board and the better the
rope, the easier it is to splice.
The strength of any splicing will increase with the number and
tightness of the ‘tucks’.
However,
the first four or five are the most important, any subsequent ‘tucks’
will have a decreasing effect on the overall strength.
The first thing to do is to slice the rope end cleanly with
that
sharp knife, if you wrap the end with tape first then cut through the
middle of the tape it will hold the strands until you are ready to
unravel them.
Decide how much of the bitter end will be needed to give the required
number of ‘tucks’.
You should allow a length of three times the rope diameter for each
tuck, so for
five tucks allow a length of approximately 15 times the rope diameter.
I
am very much the amateur at this, I only do it on my own ropes, so
not very often.
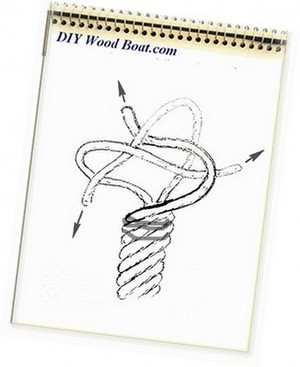
The trick I use to get started without the rope unravelling
too far is to tie a couple of whipping turns at the point where I want
the splice to start.
And I anchor the whipping by using my ‘Handy Stitcher’ to push one end
of the twine through the rope.
Then the rope can be un-laid as far as the whipping.
The ends of the strands now need to be either wrapped with tape or heated with a flame to prevent the strands from fraying.
Having the ends of each strand wrapped or heat sealed neatly
and
preferably with a point will make it easer to tread them through each
tuck.
When you begin ‘tucking’ try to keep the twist in each strand so it
will lie neatly.
The following is how I, as a right- handed person proceed, if you are
left-handed
you may find it easier to do it upside down, as it were.
So, right-handers begin with the un-laid
end towards you and the
standing part pointing away and remember all the ‘tucks’ will
go from right to left.
Now fan out the un-laid strands.
Use the fid to lift a strand on the standing-part of the rope as close
to the whipping as possible.
Now tuck the centre one of those un-laid strands under it.
Pull this first tucked strand through firmly, not so hard as to distort
the lay of the line.
Next take the left-hand strand.
The second tuck is always the left-hand ‘un-laid strand’, tuck it under
the ‘standing-part strand’ above the one you just tucked the centre
strand under.
Pull through firmly.
Now that remaining ‘un-laid strand’, the right-hand one, this wants to
be tucked under the ‘standing-part strand’ below the one used for the
center strand.
So it is center first, then left above, then right below.
Now that you have all three ‘un-laid strands’ tucked in once, pull them
all firmly to snug them down, then the rest is easy.
Just carry on tucking those ‘un-laid strands’ in turn, so that each
strand goes under a strand on the standing part, then over the next
then under again etc.
Turn the rope anti-clockwise a third of a turn for each tuck and tuck
the strands in sequence.
When you have the desired number of tucks, pull on the rope to
stretch it and roll it between your palms to smooth it out.
Then trim off the ends of the tucked strands and the splice is finished.
If the rope is synthetic you can melt the strand ends and press them
tight to the rope.
You can if you wish finish off with a few tapering tucks.
Trim a third or so of the yarns from the tails, then continue to give these trimmed strands a few more tucks, then finish as above.
Back.
The Back or End-Splice is used as a
permanent way to prevent the bitter
end of a line from unravelling.
However, a splice does results in a thickening of the line, so if it
has to pass through a block or such like then a whipping will be the
preferred option.
As the name suggests the strands are woven back along the line.
And as this splice is merely to prevent the bitter end unravelling it doesn’t require strength, so three or four tucks will be more than sufficient.
The
only departure from the technique above is
that it requires a ‘Crown Knot’ before starting with the tucks.
For the ‘crown knot’ hold the rope with the standing end towards you
and the ‘un-laid strands’ away from you.
Then, working anti-clockwise, take any strand and pass it over its
neighbour.
Bring that neighbouring strand down across the other two.
Now take the remaining strand over the second and through the loop made
by the first.
Tighten each strand by pulling towards you so the strands now lie along
the length of the line.
This is where a couple of ‘tapered tucks’ will be of some advantage should the line ever need to be hauled through a restriction.
Books
BooksEye
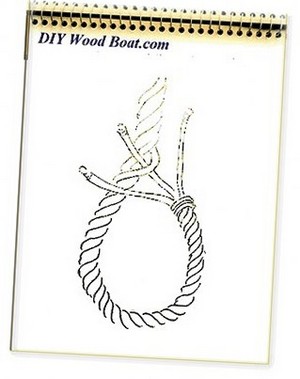
Tying a bowline is the quickest way to make an eye in rope.
However, for maximum strength nothing beats an eye splice.
And
with three strand rope it not only looks good but is an easy splice to
do.
You can buy lines with an eye already spliced into one end, but
naturally you have to pay for this service.
Personally I disagree with the concept of having dock lines with a
permanent eye in one end because the wear is always restricted
to that one
place on the rope.
However, when you do require a permanence loop at the end of a line,
putting in your own eye plait is a neat and easy option, especially
with
three strand rope.

Where
an eye is
subject to constant wear or chaffing such as where it is used to attach
a line to metal fitting then a thimble should be inserted in
the eye.
Again the technique is the same as above.
However, this is one instance where the start position of the plait must be really tight up to the thimble to prevent it falling out.
And it is where I find using the Handy Stitcher invaluable.
affiliate linksShort Splice
The short-splice is used to join two ropes of equal diameter and number
of strands.
weave the strands of each rope into the main portion of the other rope.

Start
by laying the strands of one rope between the strands of the other.
Make the fist set of tucks of one rope into the second rope, then
repeat for the second rope into the first.
Once the first set of tucks on each rope has been established the rest
can be done in any order.
However, as splicing increases both the diameter and stiffness of the
line the resultant join will not run through blocks and other fitting
which are the correct size for the original rope diameter.
For that reason this is unlikely to be seen on small boats
these days.
However, back and eye splices are worth the small effort not only for their strength and neatness but also as a testimony to your seaman like skills.


You might like these
Ropes and Rigs for Boating.
Boating ropes and rigs, knots, sailing, line handling and line care, what all boaters need to know.
Whipping Boat Ropes
Whipping marine ropes to prevent the ends fraying, how to use whipping twine to prevent rigging and yacht ropes from untwisting.
Rope types
Rope types, what types, construction and materials to use on your boat when to use three strand and braided marine lines.
Knots for Sailors.
A brief description of and how to tie some of the most useful boating knots. Including some that every boater should know.
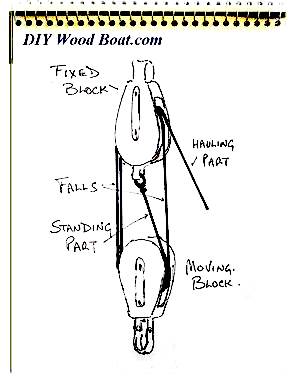
Blocks and Tackle lines and sheaves.
How Blocks and Tackle work to give mechanical advantage and how best to rig them.
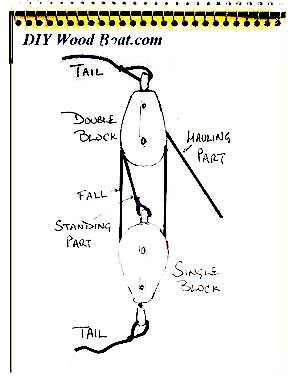
Handy Billy a traditional rope and sheave rig.
A Handy Billy made with two blocks and tackle can be used to give mechanical advantage wherever needed.
Recent Articles
-
Reader's Boat Photos
Aug 23, 25 09:08 AM
 Gallery of Readers uploaded Photos
 -
The Sliding Bevel
Jun 19, 25 02:52 AM
 By Robin Gates
The Sliding Bevel: A Boatbuilder’s Tool for Precision
For angles other than the perpendicular of the try-square and 45 degrees of a mitre-square, the essential measuring tool is a slidin…
-
Winter Bilge Issues
Jun 18, 25 07:34 AM
 By Adrian Morgan
Winter Bilge Issues: Can a Classic Boat Spend Too Long Ashore?
Beware the score of too long ashore, Adrian Morgan warns us…
Continue reading "Winter Bilge Issues"
Books
You might like these
Cold Water Boating
Safety precautions for cold water boating and winter sailing
How to Mooring Your Boat.
Avoid embarrassment when Mooring and Docking, learn how to get it right safely with the correct lines and at least appear competent.
Anchor Types
Anchor types, how to choose the type, size and style of ground tackle, chain and rode to anchor your boat safely.
Anchoring Techniques
Anchoring techniques, best practices to ensure the safety of you and your boat, and how to retrieve a snagged hook.
Boat Winches
Boat Winches, sheet, anchor, halyard and trailer winches for Wooden boats

The Dipping Lug Sail
The dipping lug sail, is perhaps the most efficient and cheapest, type of sailing rig especially for small sailboats however it isn't as handy as the standing lugger or the balanced lugsail.
UV Strip for Furling Sails
UV Strip, notes on repairing, fitting and replacing a sacrificial UV protection strip on furling sails using acrylic or UV protected Dacron.
Sailing Rigs, a Guide to Sail Shapes.
The basic shape of the Sailing Rigs most commonly found on wooden sailing boats of every size.
Sail Cloth
About sail cloth and the different materials for DIY sail making and the average leisure sailor.
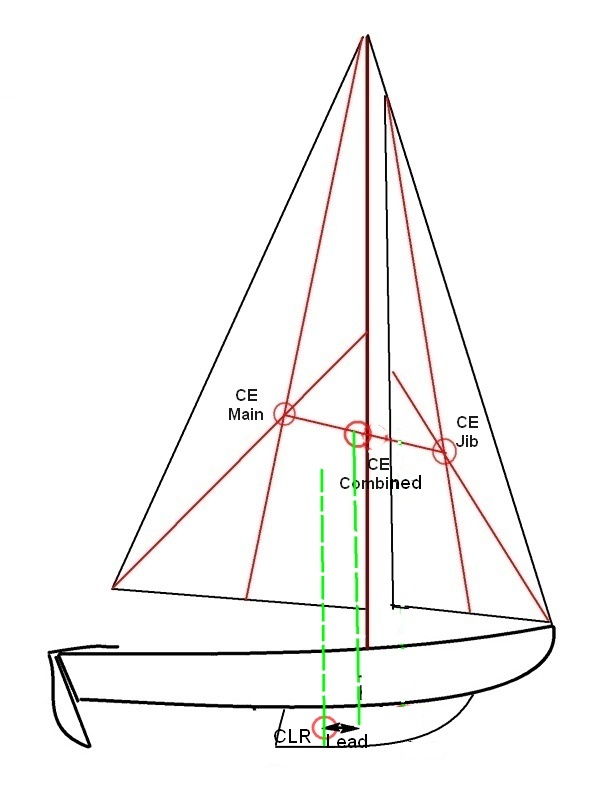
Sail Balance
Notes on Sail Balance, designing a sailing rig, how set the relationship between the center of effort and the center of lateral resistance.


This work is licensed under a Creative Commons Attribution-ShareAlike 2.0 UK: England & Wales License.
I am perfectly aware that the majority of Wooden Boat aficionados are sensible folk.
However, I need to point out that I am an amateur wooden boat enthusiast simply writing in order to try to help other amateur wooden boat enthusiasts.
And while I take every care to ensure that the information in DIY Wood Boat.com is correct, anyone acting on the information on this website does so at their own risk.