- Home
- Your Boats
- Decks
Wooden Boat Decks
The decks of wooden boats do much more than provide a platform for the crew.
They are an integral part of the structure and the type of covering used will affect how the loading is transferred through the beams.
The covering also needs to be watertight to prevent rain water seepage which cold cause underlying structures to rot.
Minor leaks in the hull providing they are kept under control are not a great concern.
However, a leak overhead can become extremely frustrating.

Sods law says that any deck leak will appear above the head of your bunk and will start to drip in the early hours of the morning.
Unfortunately, building this surface is not the simplest of construction jobs.
Not only is the surface made up of compound curves due to the sheer and camber but it will have numerous openings and have to cope with a considerable amount of wear and tear.
Plywood.
For the majority of amateur boat builders, plywood is the obvious choice as a deck covering because of its;
- Multi-directional strength
- Large sheets cover large areas quickly
- Less cutting and trimming than with traditional methods
- It can be cut from a pattern
- Fewer joints
- No seam caulking
- Strength to weight ratio.
However, I should point out at this stage that plywood when it goes wrong can be quite disastrous.
Which, is all the more reason to only use good quality marine grade ply and make sure the surface and edges are well sealed.
While I am wary of using epoxy on a traditionally built boat and it is becoming increasingly expensive.
I would certainly advocate using epoxy to seal the edges of the plywood panels.
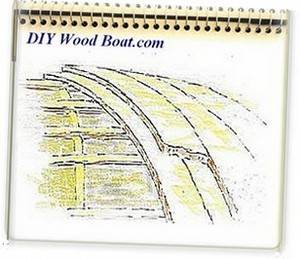
Because of the compound curvature of most decks, laying plywood in one thick panel can be a problem.
It will be much better to make up the required thickness in layers.
Sheets of thin ply will have enough flex to comply with most shapes.
Laminating the covering in this way also allows for substantial staggering of the joints and thus minimizing the risk of leaks.
When it comes to making patterns, try not to have any joints which align with stress points such as the corner of an opening.
And try to position joints where they can be hidden under a covering board or a king plank.
The easiest way, that I have found to make the patterns for deck panels, is with clear plastic sheet.
It wants to be reasonably stiff thick polythene sheet.
Not only can you see through it when positioning but you can easily cut it and mark out the pattern with a marker pen.
Having transferred the outline of the pattern to the panel, I like to cut it slightly over size.
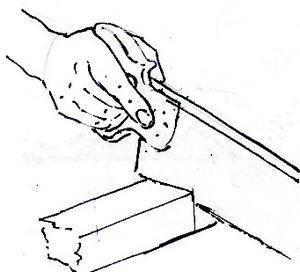
Then, having tried it for fit it can be trimmed with a sharp block plane, preferably one with a low angle blade, the concave edges can be trimmed with a spokeshave.
If you do not have a chisel-plane, inside corners can be trimmed with a sharp bevel-edged chisel.
Its a good idea to start with the larger panels covering the ends of the deck, leaving final fitting adjustments to be made on the smaller panels such as side decks.
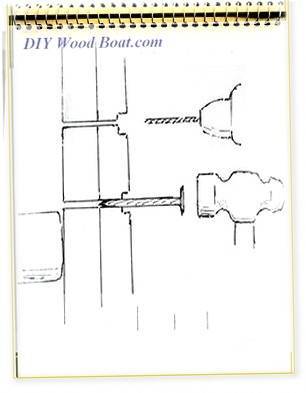
Fasten the panels directly on to the sheer strake / clamp and to beams and carlings.
If you plan to nail the panels, I would recommend silicon bronze gripfast nails rather than galvanized as the galvanizing can so easily be damaged when hammering and will eventually cause rust stains to show through.
My own preference for gluing layers would be a resorcinol glue, this will need plenty of weights such as sand bags to hold the top layer down during curing.
Another good alternative would be Aerolite as it does have some gap filling ability.
The glue needs to be evenly spread by squeegee or roller.
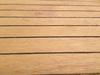
affiliate linksLaid Teak.
Genuine, laid teak is regarded as being the ultimate deck covering.
And certainly on a large boat they do look superb, if well done and maintained.
However, to my mind they can look a bit on the fussy side on a small boat.
And not only is this an expensive method but it does have other disadvantages.
Apart from all those caulked seams which will need to be maintained, any form of decking made up of planks running fore and aft will be lacking in athwart ship strength.
So, the framing will need extra diagonal reinforcing in the form of tie bars.
Some of these problems can be overcome by laying it on a substrate of plywood.
But you will still have a lot of work fitting the planking and nibbing the covering boards and king planks.
affiliate linksArtificial Teak.
There are a number of imitation laid teak products available, all of which claim to be incredibly life like.
But there is only one material which looks like real solid wood and that is real solid wood.
This imitation stuff is really aimed at plastic boat owners who want to pretend that they have a proper wooden boat.
Put it on your wooden boat along side some real wood and it will look like what it is, plastic floor covering, and expensive floor covering at that.
If you want to use a synthetic non slip covering there are many cheaper alternatives which do not purport to look like something they aint.
Tongue and Groove.
Many small boats have traditionally been decked with tongue and groove planking which was then covered with painted canvas.
This, if well done and maintained is an excellent no nonsense method.
However like the laid deck
it's fore and aft strakes have little or no diagonal or cross beam
strength so, it needs tie rods to strengthen the underlying framing.
Mignonne was originally constructed in this way and would have been covered with canvas.
At some time in her past the canvas had been replaced with a synthetic covering, Treadmaster.
But by the time I came to rebuild her even this had mostly gone.
So I cleaned off what was left and laid a marine grade plywood over the tongue and groove.
I spread a bedding compound of non hardening rubberized mastic over the tongue and groove and nailed the plywood panels using silicon bronze gripfast nails.
The plywood was then finished off with a good quality non slip deck paint.
Not only has this given her a durable waterproof surface but it has added to her stiffness.
Deck Leaks.
It is inevitable that a wooden boat, as it works and flexes when afloat, will eventually develop leaks.
Unfortunately, because of its complex structure it is rarely easy to be sure of the source of the leak.
The drip above the head of your bunk may have entered at the other end of the cabin to deck joint.
It might be tempting to try sealing the leak on the inside but this will only either trap the moisture within the structure or divert it elsewhere.
There are patent 'medicines' which are supposed to cure creeping cracks but they rarely do more than temporarily stop minor leaks.
The only true cure will be to strip off and re-caulk / seal all those deck / cabin side moldings, seals around portlights or even the covering boards if that is where the leak is likely to be.
In the meantime you can always sleep under that umbrella.
affiliate links
Previous posts
See What Others Have Posted
Deck Covering
Love the comment about fake teak being for plastic boaters who want to look like a wooden boater.
Thinking about it you really are spot on.
Will …
Striping Plywood Laminate Deck
1957 Cadillac cold moulded hull with veneer deck.
Factory stripping on deck needs to be redone post sanding.
There are no seams or caulk since …
Deck Varnish
Should I varnish the deck before I apply the caulk, or apply the caulk, sand, then apply varnish?
Deck Crown
I was reading a book and he mentioned some thing about "deck crown" what exactly is deck crown?
Thanks
stripping wooden decks to reasealing
The decks are pine tgv which have what looks like to to have been covered in a resin soaked material.
This has cracked in places and rain water has been …

What is best to do with a worn teak deck?
I have a boat with a teak deck on which so much material has worn away that the grooves are no longer deep enough to hold the caulking.
I understand …
Mourne Lass
The 'Lass' is a an ex-MFV, which we are working on in an attempt to give her a new lease of life in her retirement.
We need to replace the 60 year …


Every man's work, whether it be literature, or music or pictures or architecture or anything else, is always a portrait of himself.
(Samuel Butler, 1612-1680)
You might like these
Boat Books for Wooden Boat Builders
Boat Books a series of boat books based on some of the 1960's, classic, Free Boat Plans that were published in magazines such as "Popular Mechanics", "Popular Science" and the "Boat Builder Handbook".
Ring Nails for Marine Fastening.
Ring Nails sometimes call Gripfast or ring shank, silicon bronze boat nails are renowned for their holding power. but how to get them out?
The Ashcroft Method of Planking a Wooden Boat
The Ashcroft method of building small wooden boats, an early from of cold moulding using thin layers of wood with the layers all running same direction.
Knotty wood, problems with boat building timber.
Knotty wood, how to avoid structural problems with knots in lumber when using softwood timber for fitting out and boat joinery
Build a Boat, tips for the DIY Wooden Boat Builder.
How to Build a Boat, Wooden Boat Building methods for the DIY, backyard, self-builders explained, carvel, lapstrake and plywood
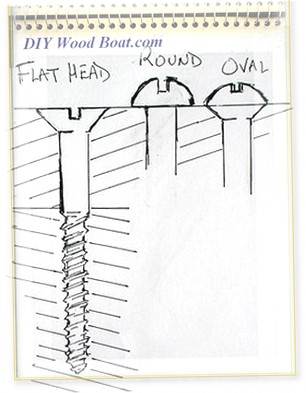
Wood Screws for Boat Building and Repair.
Wood Screws are the most widely used and versatile fasteners used on wooden boats. Which type to use and how to use them
Wood, Environmentally Friendly Boat Building Lumber.
Make sure that the Wood that you buy and use is sustainably grown and harvested.
Timber, Lumber for Boat Building.
A brief description of the most common Timber used for building Wooden Boats how to choose wood for your project boat
Timber Properties
A brief guide to timber properties and wood, characteristics such as strength, stiffness and elasticity for choosing lumber for wooden boat building and restoration.
Rivets and Copper Rove Wood Boat Fastenings.
How to use Copper Rivets and Roves construction guide to fasteners on your wooden boat.


Recent Articles
-
Reader's Boat Photos
Aug 23, 25 09:08 AM
 Gallery of Readers uploaded Photos
 -
The Sliding Bevel
Jun 19, 25 02:52 AM
 By Robin Gates
The Sliding Bevel: A Boatbuilder’s Tool for Precision
For angles other than the perpendicular of the try-square and 45 degrees of a mitre-square, the essential measuring tool is a slidin…
-
Winter Bilge Issues
Jun 18, 25 07:34 AM
 By Adrian Morgan
Winter Bilge Issues: Can a Classic Boat Spend Too Long Ashore?
Beware the score of too long ashore, Adrian Morgan warns us…
Continue reading "Winter Bilge Issues"
Using a Hand Saw
Using a hand saw, how to cut straight and square by hand with a wood saw.
Tool Care
Tool care, how to keep your boat tools rust free, shiny and sharp, especially those you keep onboard.
Sharpening and Honing
A guide to Sharpening and Honing woodworking tools, sharpening stones and strops for a keen edge.
Screwdrivers for DIY.
A bit about Screwdrivers and their use on wooden boat building projects.
Drilling Bits and Drills for Wooden Boat Building.
Drilling Bits, what you need to know about twist bits, augers, hole cutters, countersinks when building a wooden boat.
Clamps, for Boat Building
You can never have too many Clamps or Cramps when Wooden Boatbuilding. Or any other wood working project,extra hands for the woodworker.


This work is licensed under a Creative Commons Attribution-ShareAlike 2.0 UK: England & Wales License.
I am perfectly aware that the majority of Wooden Boat aficionados are sensible folk.
However, I need to point out that I am an amateur wooden boat enthusiast simply writing in order to try to help other amateur wooden boat enthusiasts.
And while I take every care to ensure that the information in DIY Wood Boat.com is correct, anyone acting on the information on this website does so at their own risk.