- Home
- Your Boats
- Stop Water
A Stopwater to Stop Water
The humble
stop water /
Stopwater is much over
looked but vital element in a
wooden boat.
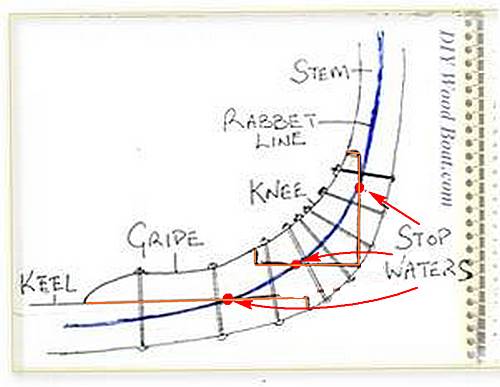
All well built traditional wooden boats will have these softwood dowels running across many wood to wood joints, especially those below the waterline.
The
idea is that the softwood will expand if wet, thus filling the hole
tightly, and preventing water from creeping further along the joints by
capillary action.
They should always be placed across the joints in the stem where they cross the plank rabbet line.
Very long scarph joints will often have two stop waters.
They are sometimes omitted by modern builder in the belief that modern
materials, bedding compounds and glues make them redundant.
However, there are areas which take a lot of abuse where they are still worth inserting.
Areas such as the stem, particularly at the forefoot, keel and the stern structure.
Stems are massively built because they tend to take the brunt of any groundings collisions as well from the tension exerted by forestays and bobstays.
These areas as well as being subject to rot also have to put up with wetting and drying, shrinking and contracting particularly at haul out which causes seams and joints to open.
Normally the holes would be drilled and the bung driven home before planking.
This is so the stopwater can be in the rabbet line, preventing leaks getting beyond the caulking.
Unfortunately this does mean
that they are almost
impossible to get to once the boat is planked.
They can be reached by unfastening the plank ends then opening a seam wide enough, however there is always the danger of damaging the nib ends.
Of course if you are changing any of the planks it is a good idea to renew any stop waters which are exposed.
They can however be placed outside the rabbet line and planks.
But if you do this you must caulk the joint between the stop-water and the plank seam.
The dowel or bung needs to be a softwood which will swell up to keep the joint tight.
And it should preferably be a reasonably rot resistant wood such as cedar.
A wood preservative can be used to prolong the stop water's life, particularly as the end grain is exposed.
Using something like creosote will help lubricate it while being tapped home.
Whether you cut the dowel to fit the hole or drill the hole to fit the dowel, it needs to be as tight a fit as you can make it yet allow the dowel to be tapped in without breaking.
The tricky part is drilling a hole which crosses the joint exactly.
To align the drill bit, so that it exits precisely on the joint, it’s a good idea to have an assistant help with the aligning.
The person drilling can watch the horizontal alignment while the assistant watches the vertical and do use a carpenter’s level.
I prefer to use a brace and bit, it may take more effort than using a power drill but I feel that I have more control over what is happening.
Be careful as the bit exits go slowly so as not to damage the surface.
And make sure the bit is not going to hit any bolts as it goes through.
Once the dowel is in cut it flush and paint.
So whether you are building or restoring don’t forget those stop-waters.
Regardless of whatever modern building methods you are using this simple, old fashioned technique will help keep leaks at bay.

