- Home
- Your Boats
- Fore Hatch
Fore Hatch for a Wooden Boat
How do you build a fore hatch which never leaks?

If I knew that my friends, I would patent it and make millions.
Wind and spray have a habit of seeping through even the narrowest of crevices.
Of course it all depends on the type of boating you intend doing and on your local weather patterns.
Another consideration for the DIYer is, it will be reasonably easy to build.
If the fore hatch is likely to be walked on it will need to be strong and the top non-slip.
You will also need to be able to dog it down tight when at sea and to make it burglar proof.
My personal preference is for a forward opening fore hatch which will funnel air below when at anchor and lying to the wind.
The forward edge tends to be the worst for leaks, however it is easier to seal the opening edge than the one with the hinges.
The top covering can be made from tongue and groove or laminated with plywood.
If you are using just tongue and groove, be sure that the wood is reasonably stable so the joints do not open and close as the wood wets and dries.
On Mignonne's hatch I used tongue and groove covered with plywood which was then painted with non-slip.
It is fairly simple to let an acrylic panel into the top to allow light below.
However, if this is likely to be walked on it will need support, such as brass rods underneath.
The acrylic will be slippery for walking on and will be a source of condensation underneath.
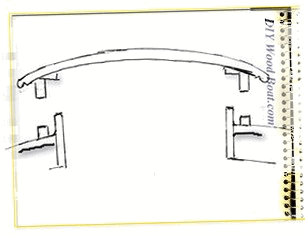
Rounded corners of the overhang will be both varnish and shin friendly.
And a curved top will always look so much better than a flat top.
The outer sides of a hatch opening should never be within the carlines as this is sure to lead to leaks getting into the beans and below the deck covering.
The outside rim of the opening should be fastened through the deck.
The corners of the hatch frame can be rebated however, these do need to be strong to prevent warping, they can be strengthened with doweling.
A box or finger joint will be stronger and look better.
Dovetail joints will look even better and can be quickly and accurately cut with a jig.
There are several types of hinge available however, piano hinges are fine.
There are also numerous types of stays for holding the hatch open, but some of these will extend below the lining when the hatch is closed, consider if these are likely to be a hazard.
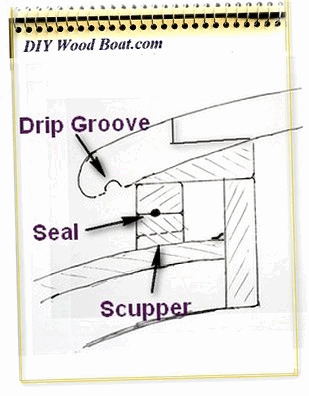
The hatch flange should have an overhang with a drip groove on the underside
The hatch design shown below has Weather strip, the sticky backed sponge seals are fine and they are cheap and easy to replace.
The facing of the opening, inside carlines extends above the level of the outer rim, these need to be well sealed to prevent any water which does get past the outer rim from seeping behind them.
I have shown the scuppers as being on the side however this will depend on the slope of your deck.
Scuppers are best placed on the trailing rim and certainly not on the front edge where green water might be forced through them.
I can not guarantee that this fore hatch design will never leak but so far it has worked well on Mignonne.
affiliate links


“When a great adventure is launched with a powerful thrust, fatigue in the muscles and doubts in the mind are swept away by a fullness that moves life along like a breath from the depths of the soul.”
(Bernard Moitessier)
You might like these
Boat Books for Wooden Boat Builders
Boat Books a series of boat books based on some of the 1960's, classic, Free Boat Plans that were published in magazines such as "Popular Mechanics", "Popular Science" and the "Boat Builder Handbook".
Ring Nails for Marine Fastening.
Ring Nails sometimes call Gripfast or ring shank, silicon bronze boat nails are renowned for their holding power. but how to get them out?
The Ashcroft Method of Planking a Wooden Boat
The Ashcroft method of building small wooden boats, an early from of cold moulding using thin layers of wood with the layers all running same direction.
Knotty wood, problems with boat building timber.
Knotty wood, how to avoid structural problems with knots in lumber when using softwood timber for fitting out and boat joinery
Build a Boat, tips for the DIY Wooden Boat Builder.
How to Build a Boat, Wooden Boat Building methods for the DIY, backyard, self-builders explained, carvel, lapstrake and plywood
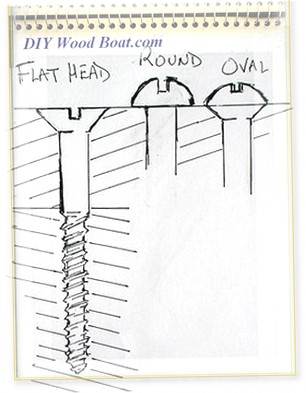
Wood Screws for Boat Building and Repair.
Wood Screws are the most widely used and versatile fasteners used on wooden boats. Which type to use and how to use them
Wood, Environmentally Friendly Boat Building Lumber.
Make sure that the Wood that you buy and use is sustainably grown and harvested.
Timber, Lumber for Boat Building.
A brief description of the most common Timber used for building Wooden Boats how to choose wood for your project boat
Timber Properties
A brief guide to timber properties and wood, characteristics such as strength, stiffness and elasticity for choosing lumber for wooden boat building and restoration.
Rivets and Copper Rove Wood Boat Fastenings.
How to use Copper Rivets and Roves construction guide to fasteners on your wooden boat.


This work is licensed under a Creative Commons Attribution-ShareAlike 2.0 UK: England & Wales License.
I am perfectly aware that the majority of Wooden Boat aficionados are sensible folk.
However, I need to point out that I am an amateur wooden boat enthusiast simply writing in order to try to help other amateur wooden boat enthusiasts.
And while I take every care to ensure that the information in DIY Wood Boat.com is correct, anyone acting on the information on this website does so at their own risk.