- Home
- Your Boats
- Rudder
Rudder Construction and Repair.
If my rudder were to break how would I get my boat back home?
That
is a question every boater should ask him or her self.
The next question of course, should be what can I do to prevent this happening, how to repair any damage or build a replacement?
When I began to rebuild Mignonne
it was clear
that the whole steering mechanism was beyond repair.
The simplest solution was to build a transom hung rudder with a tiller and on researching the subject I decided it was best to build it from solid wood.
Materials.
Many have been made quite successfully using plywood sealed with epoxy and glass cloth.
However, the blade can be subject to quite considerable twist and flex due to water pressure.
Plywood which is constantly flexing and twisting will eventually start to delaminate
as the bond between the piles breaks down.This flexing will also cause any glass/epoxy coating to separate from the surface.
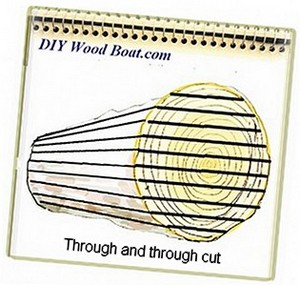
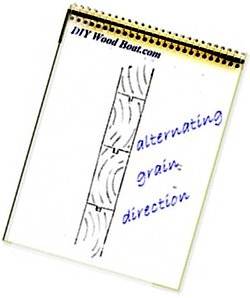 Alternating Growth Rings
The only way to prevent a plywood from flexing too much would to be make it overly thick.
The main problem with using solid wood is that the blade can warp.
However this can be countered if you build the blade up using several planks of flat-grained timber with the growth rings alternating in direction.
Although this will not prevent the individual planks from warping, the bow in one plank will counterbalance the bow in the next.
The use of strapping or drift bolts will also help prevent warping and strengthen the construction, they can also be used to repair and old rudder.
The best timber for rudder building will be one which doesn’t readily absorb water.
A resinous pine such as pitch pine would be ideal otherwise use a well-seasoned hardwood.
affiliate linksSize.
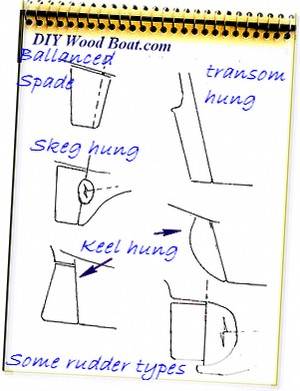 Rudder Types
If like me, you have to design a new rudder the big question is what size should it be?
If the wetted area is too big and it will cause unnecessary drag, too small and it won't have sufficient turning ability.
Finding a happy medium will depend on the style of hull and the underwater arrangement.
Below are some formulas which can be used to give a rough idea of the optimum size needed for some basic hull configurations.
- For a traditional Long Keel Sailboat with a full length keel, the rudder area should be equal to 0.068 x waterline length x draft.
- For a Long Keel Sailboat where the keel is less than full length; 0.058 x waterline length x draft.
- For a Deep Narrow Fin-Keel Sailboat ; 0.04 x the waterline length x draft including the keel.
- For a Displacement Motor Boat ; 0.03 to 0.01 x waterline length x draft.
- And for a Planning hull ; 0.018 x waterline length x draft.
These are however, very basic rules of thumb.
Rudder Design.
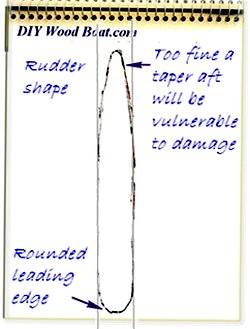 Rudder Shape
The style of rudder whether it's transom hung, balanced or whatever will depend largely on the type and configuration of the hull.
As for the profile of the blade, there has been much theorizing about shape.
The predominant thinking is that the blade should be of an aerofoil shape, especially for slow and moderate speed boats.
That it should be convex in cross section rather than straight and certainly not concave.
This, according to theory, will minimize drag and provides lift on the turn as well as reducing chatter or vibration.
It is accepted that a rounded rather than a sharp leading edge is more efficient.
It theory, a thin tapering trailing edge should be favorite but this is impractical as it would be vulnerable to damage.
However, despite the theory, wedge shaped rudders with a fine leading edge are often found on high-speed craft.
And many have a small flat plate metal blade.
However, that small blade while being effective at high speeds will be less effective at slow speed.
Like most things on a boat there is always a good deal of compromise.
For the average cruising boat less wetted surface and higher efficiency may not be as important as lower draft.
And there are many designers and designs which claim all sorts of advantages for their blade shapes.
The Chinese on their junks often used a flat blade with a slot cut through the mid section about a third of the width back from the leading edge.
This, it would seem, allowed it to create a pressure difference or perhaps turbulence which apparently increased efficiency at slow speeds.
But theorizing aside, the more common ‘classic’ rudder is a flat blade with the leading edge well rounded and with a small degree of taper towards the trailing edge.
It has also been suggested that a flat section blade will give greater control at slow speeds.
And it is when traveling slowly that accuracy is more desirable, such as when maneuvering in a restricted area.
There are some other considerations which will affect the efficiency of a rudder.
The farther aft it is placed, the more turning leverage it will have.
Powerboats will respond quicker and be lighter on the helm if the rudder is balanced, with about 15 percent of its surface area forward of the pivoting axis.
For sailing cruisers having the rudder hung from a skeg or a long keel will offer a cleaner flow of water and thus less resistance.
And a deep, narrow, rudder will be more efficient than a wide shallow one.
It is also worth remembering that a rudder, once it is pushed over by more than 35 degrees begins to have more of a braking effect than a steering one.
Pivots.
While rudder blades do occasionally fail most of the load is taken by the pivot points.
On the majority of transom hung rudders are attached to the hull by gudgeons and pintles it is usually the bottom ones which take the most load and fail first.
Spade rudders which have no protection from a skeg or deadwood are particularly vulnerable to damage.
So, the spade requires a stock of considerable strength to withstand those rudder forces.
Another issue which is subject to much theorizing is the size of the gap between the stern-post and the leading edge of the blade.
Most seem to agree that the gap can cause turbulence and drag however, there must be some gap to allow the blade to turn.
One solution is to fit flexible flaps to cover the gap.
But as I have never seen a boat with these fitted I cannot say if it is worth the effort.
Personally I prefer to have sufficient gap to allow me to be able to paint all around the stern-post and the blade.
When fitting pintles and gudgeons it is important that they are fastened securely.
It is also important that they are aligned perfectly to allow the blade to turn and prevent uneven wear.
affiliate linksBuilding.
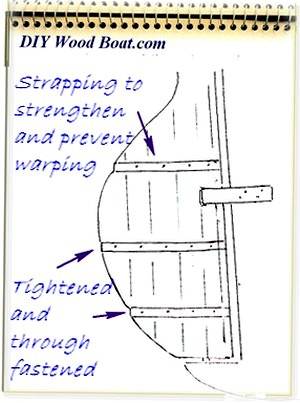
When I started to rebuild Mignonne there was very little of the original steering gear left and most of that was beyond repair.
I decided that the replacement would be outboard and transom hung, mainly as this would be the simplest to build.
The first job was to work out roughly the size I would need.
Next I built a full sized pattern using scraps of plywood glued with the hot melt gun.
I used thin ply so that the pattern would be light enough to be held up to the transom but stiffened with a baton so it didn’t wobble.
I then used a variation of the joggle stick to get the leading edge to fit the transom.
I also marked the position of the pintles and gudgeons on the pattern.
Next I glued together the blank using tongue and grove planks, making sure that it overlapped the pattern.
Once the glue was set the final shape was marked from the pattern and the blank cut and trimmed to the marks.
Then I rounded the leading edge and tapered and rounded the trailing edge.
When I was happy with the shape I gave it a good rub down primed it and gave it a couple of coats of undercoat.
The next job was to add some strapping to prevent warping and because I was reluctant to rely on the glued joints even though I had used resorcinol.
The strapping was wrapped right around the blade and through fastened with rivets and roves.
The rivets were fitted through the center of the planks to allow then to swell across their width.
The strapping was held a tight as possible with clamps before fastening.
However, if strapping is fitted when the wood is dry it will tighten when the wood takes up and swells.
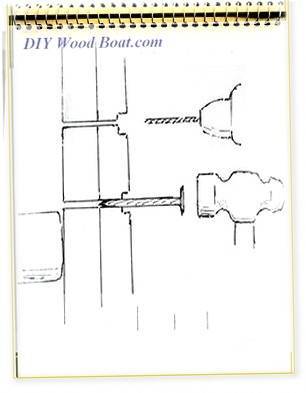
Another method of strengthening and preventing warp is to fit drift bolts through the blade.
The problem with this method is making sure that the holes for the bolts are perfectly centered, all the way through.
The external strapping can be rebated flush however, it is often left proud on old ships.
And one theory is that the strapping left proud actually helps with turning ability.
The final job was to fit the pintles and gudgeons making sure that they all aligned perfectly.
Tiller.
The simplest and therefore the most reliable way to control your rudder is the good old tiller.
I personally also prefer tiller steering as it gives me a more immediate feel for the trim of the boat.
There are several ways in which the tiller can be fitted to the rudder.
Metal cheeks fitted to the tiller can fit around the rudder post.
Or the tiller can fit into a slot in the head of the post.
The tiller doesn’t have to pivot in the vertical plane but it will certainly make life for the helms-person much easier if it does.
A tiller held in place with a pin or bolt through the cheeks will allow the person on the helm to easily steer either standing or sat.
And being able to fold the tiller out of the way will free up cockpit space when in port or at anchor.
It’s a good idea to experiment with some scrap timber before deciding on the finished length and shape.
And is better to make it over sized at first, you can always chop some off later if it needs it.
Unlike steering gear which uses quadrants, cables or worm gears there is little to go wrong with tiller and It requires very little maintenance.
affiliate linksEmergency Steering.
Do you have any back up should your steering gear break while you are at sea?
There are various methods which can be employed to steer a rudderless boat.
A sail boat can be steered by trimming the sails.
And the use of a bucket or other means of applying drag can be used over the quarter to change direction.
However the simplest, the oldest and perhaps the most effective emergency form of steering device is a large oar hung over the stern quarter.
And that large oar can also be used as an emergency form of propulsion.
The oar should preferably have a large blade and if storage is a problem the stock can be cut and some piping used to reassemble it.
A figure of eight lashing should be sufficient to attach it but pay some thought to where would be the most suitable attachment point.
Previous posts
See What Others Have Posted
Rudder construction and repair
A really well written article which gives loads of facts without being overly scientific.
A real boon to anyone trying to understand the way a rudder …
