- Home
- Your Boats
- Repair Plywood
How to Repair Plywood Boats.
To repair plywood boats is, fortunately, fairly easy.
Plywood
boatbuilding,
both with and without epoxy
has been a popular
method for boat building for quite a few years and it has produced many
sturdy
and beautiful boats.
Unfortunately, as with any method, there comes a time when repairs are
necessary.
Fortunately, the procedure is not that difficult.
The hardest part is deciding if the repair or restoration is going to be worth the effort.
Many home builders have been convinced that it is possible to use
really cheap
ply sealed with epoxy.
This type of plywood is laminated with non-waterproof glue and will have significant voids.
As soon as the epoxy coating is damaged in any way it will soon start to rot and delaminate.
If you suspect that a non-marine grade of ply has been used you should
consider
replacing the whole sheet rather than patching.
But don’t despair, it is actually quite a simple job to replace
complete
sheets.
On a small boat replacing the entire hull bottom is as easy as using a patch to repair plywood.
Cutting out the Rot.
The first objective is to identify and cut away all the damaged plywood.
If you mark out and cut the offending area along straight lines it will be easier to cut a replacement patch.
The particular shape doesn’t really matter, however a square or rectangle will be easier to cut and replace.
It is normal in plywood construction for the ply to be epoxied to any frames, stringers and bulkheads.
To repair plywood you will have to cut around these then remove the glued on ply later.
As it is easier to cut from the outside the hull, the positions of all the frames etc will have to be marked on the surface.
From the inside drill a few fine holes along side the framing so thy can be seen from the outside then draw a line to join them up.
To avoid cutting through or damaging any frames, stringers or bulkheads use a skilsaw or router with the depth set to the hull thickness.
If the boat has been skinned with fiberglass, you will need to use a carbide bit in the router.
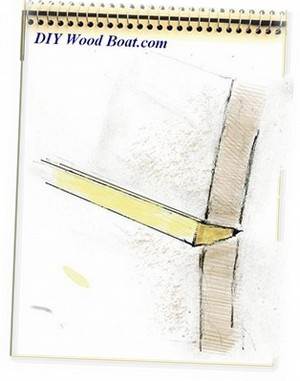
Now the ideal patch to repair plywood with would be one with beveled (scarfed) sides which would fit perfectly into a beveled hole.
Easy to say but very difficult to execute well enough.
It will be much easier to get a good fit if the hole and patch are cut with edges at right angles to the surface.
You will probably have to use a chisel or Japanese saw to finish and trim the corners.
This same method can be used to cut away whole chines, although on a small boat it may be simpler to replace the full sheet rather than patch.
Where the joints have been made by filleting, it will be necessary to cut away the old fillets so that the joint can again be stitched and glued.
If the damage was caused by rot, you might also want to think about treating the surrounding wood, to kill off any stray rot spores.
Preparing the Hull.
If you are using this method to insert a patch to repair plywood it will need to be supported on the inside by ‘but blocks’.
So, the inside surrounding edge of the hole will need to be sanded back to bare wood.
If it is possible cut the vertical edges of the hole so they center on underlying frames.
Once the damaged ply is cut away the remaining ply on the frames etc will have to be chiseled off.
A belt sander will get rid of most of the glue on the exposed frames and tidy up any edges.
But before you think of gluing in a patch the wood will require preparing properly.
A saw blade turned on its side can be used to scrape gashes into the wood to help create a good mechanical bond.
It may be time to get out your right angle sander/grinder with some 24 grit and take everything back to bare wood.
Then reseal all the wood with epoxy.
If any of the wood has been contaminated with oil or grease, this will have to be thoroughly de-greased.
If the oil has soaked in it will require repeated washing with degreaser and solvent over enough time to allow the oil to come to the surface.
Warming the wood might help bring the oil to the surface and fine sawdust will help to absorb it.
But it will take time for all the oil to come out before it can be successfully glued.
If you are replacing large areas on a small boat, the boat will need checking for any twist before gluing up.
This can be done by using a straight edge and eyeballing to make sure everything is true.
affiliate linksThe Repair Plywood Patch.
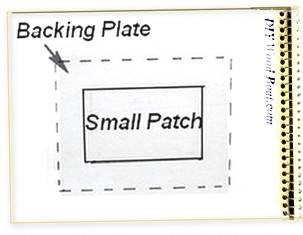 Plywood Patch
A patch to repair plywood should be the same thickness as the original plywood.
Make a template of the cut-out as a pattern for the patch.
Cut out the patch so that it fits the hole in the hull perfectly and lies flush with the surface of the hull.
Now if this patch were just edge (butted) glues in place it would not be very strong.
So, it will need to be supported with but blocks.
Before assembly the patch and backing blocks should be given several sealing coats of epoxy.
In the case of a small patch to repair plywood, this could be a backing plate larger than the patch which, has a good overlap.
Where the patch and its backing plate/but blocks can be inserted from within the hull these should be glued up on the bench where they can be tightly clamped while the glue cures.
Use masking tape to make clean up of excess glue easier.
If you can’t get to it from inside, then the patch and backing supports will have to be assembled on site.
As it will be impossible to clamp the patch, through fasteners will have to be used to hold the patch tightly in contact with the butts and the butt blocks and the hull, all the way around.
Again I recommend using masking tape to make the clean up of squeezed out epoxy easier.
The fasteners can be removed once the epoxy is set and the holes filled.
Though personally, I would leave them, so long as they were not obtrusive.
When the epoxy is set, you can then begin fairing and finishing and glassing.
affiliate linksCurved areas.
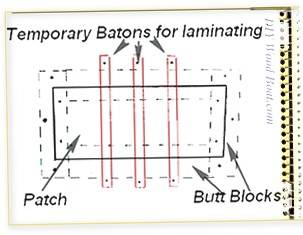 Curved Plywood Patch
The patching method described above is fine to repair plywood on a flat area.
However, on the hull of a boat you will most likely have to patch areas where the original ply has been bent.
Bending the original large sheet of ply was probably quite easy.
But bending a small replacement patch will be virtually impossible.
If you were to use solid wood you could use a piece that was thick enough to allow for fairing after installation.
Unfortunately, with ply if you try this you will cut through the plies which will substantially weaken it and open them up to possible water ingress.
The solution is to laminate the patch using several layers of thinner ply to gradually build it up to the desired thickness.
Cut out the damaged area as above.
Then fasten several vertical, temporary battens/frames behind the opening.
These will act as formers for the fiches as you lay them.
Treat the end batons as but blocks which are going to remain in position.
Any temporary batons you may wish to remove later should be coated with wax or wrapped in polythene to prevent them sticking.
Again, because of the impossibility of clamping you will have to use through fastenings to hold everything tightly in place as the glue cures.
When the patch has cured, the temporary batons can be removed and horizontal butt blocks laminated in place.
Remember that when laminating with epoxy (or for that matter any time you repair plywood) using more is not necessarily better but that applies anytime you repair plywood.
Small Boat Repair.
The following video shows how easy it is to repair small plywood boats by replacing panels on a boat which, has been built over a wooden frame.
Mark the position of the frames by drilling as described above.
Cut away the old ply then proceed as if building from new.
Previous posts
See What Others Have Posted
Marine plywood treatment
I have a plywood boat ('66 Chris Craft Cavalier) and it has been painted several times over the years.
I noticed that some of the sanding processes …
Plywood bow deck replacement - '63 Tolycraft Roustabout
I'm renovating an 18' Tollycraft Roustabout that was originally manufactured with a 1/4" marine plywood bow deck overlaid with a thin fiberglass cap that …
Where do I start...?
Hi there.
I have brought this 1975 Perryman Puck I sort of fell in love with, all the way from the Norfolk Broads to Central Greece (Pelio peninsula …
Making water tight and testing
I have an 11' wooden Gull sailing Dinghy, which I've owned for nearly 6 years.
It's probably about 40 years old, plywood, and has had some level of …
Type of Wood on a 1956 Trojan SeaQueen?
I have a 1956 it's a 16-17' Trojan SeaQueen Outboard.
It is is really great shape but there are some thin spots on the wood on the sides.
I wanted …
Patch Hole in Bottom
I am building my first boat-an optimist pram, plywood on frame.
I missed a frame and drilled a hole about 1/4 inch in diameter through the bottom. …
How do I join plywood for a small yacht cabin top?
How do I join plywood for a small yacht cabin top?
Our lengths are about 2200mm and I need another 200mm.
Do I rout a section down half the thickness …
How to Patch a Wooden Canoe?
I just got a wooden canoe at a garage sale.
I took it out and tried it out and the river was full of rocks and put a hole in it.
I was just wondering …
Making plywood water resistant
Hi,
I am in Peshawar, Pakistan- I am building a boat out of plywood- we do not have marine grade plywood, can it be made water resistant by coating …
An Old Colonial Boat
I just got this boat but don't know anything about it.
It needs to be repaired because of wood damage.
What is the best way to repair this?
…


