- Home
- Your Boats
- Stitch and Glue
Stitch and Glue Techniques.
The Stitch and
glue method of boat
construction is faster and lighter than traditional
wooden boat
building
methods.
The development of epoxy
resins and quality
marine
plywood has
revolutionized wooden boat building for the self builder.
This method of building requires very little skill.
There are only a few simple techniques which need mastering, plus some very basic woodworking knowledge.
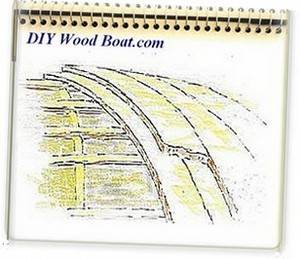
Stitching.
Basically, stitch and glue boats are constructed by gluing panels of plywood together using epoxy resin and fiberglass.
The stitching is used to hold the panels in place while the glue is applied and allowed to cure.
Stitching planks together in not a new method of boat building, it has been used for centuries, what makes it so suitable for the home builder is the use of epoxy.
While there will be variations between different stitch and glue boat designs, the basics are the same.
Firstly the planks/panels are cut to the correct size and shape, this is the most critical part.
If you are building a kit boat the panels will be either pre-cut or at least marked out, otherwise you should at least be working from a proper plan.
The planks are sewn together by drilling small holes along the edges of adjoining panels, then using short lengths of copper wire as the stitches.
The wire is threaded through the holes and twisted to pull and hold the panels tightly together until they are glued.
A wire twister tool can be used to speed up the stitching process.
Plastic cable ties can be used instead of wire.
Many stitch and glue builders are finding these ties to be very convenient and faster to tighten.
They are also easier to snip off and can be sanded or cut flush once the glue has cured.
However, they do require a larger hole than wire and once tightened cannot be adjusted.
Wire stitches can be difficult to remove completely, sometimes it is necessary to heat the wire.
But it is much easier to fine adjust with copper wire and get sufficient pressure where there are tight bends.
Stitch and Glue Fillets

The reason that stitch and glue is faster and simpler than traditional methods is that it eliminates the need for chine logs, complicated forms, and tricky clamping.
And the major factor involved is the use of epoxy fillets.
These not only glue the plywood panels but also cove out the inside corner where the panels meet.
Fillets are very easy to apply and add to the strength as well as enhancing the boat's appearance.
Fillets are made with
thickened epoxy.
There are many thickeners available commercially, such as micro balloons, talc and silica.
You can use sawdust, white wheat flour, pulverised limestone and even Portland cement.
Whatever you use the point is to produce a mixture that won't sag or run and will be easy to smooth and will sand easily when cured.
Ideally the mixture should be the consistency of smooth peanut butter.

Apart from the mixing spatulas and cups you will want one or two plastic spreaders or squeegees.
You could use an off cut of wood but thin plastic is easier clean and shape.
Radius one edge of the spreader to suit the fillet, a 2 inch radius will do for most seams in a small boat.
Once the
thickened epoxy is
mixed to the ideal consistency you need to get it onto the seam quickly
before
it begins to 'go off'.
You won't have a lot of time so make sure every ting is ready and you have decided where it is to go.
Then scoop big blobs of the thickened epoxy every foot or two along the seam.
Then start to smooth it out with the filleting spreader.
Use the flat side of your
squeegee to scrape away the
epoxy which squeezes out on either of the fillet before it can set.
The process can be a bit of a messy but try to keep the fillet as neat as possible to reduce the need for a lot of sanding once it the epoxy dries.
On the other hand don't try to do any touching up once the epoxy starts to stiffen as it will only make matters worse.
Before the stitch and glue fillet has cured it needs to be strengthened and protected with a layer of fiberglass tape saturated with un-thickened epoxy.
This is best applied onto the fillets while they are still 'wet'.
Just be careful when laying it not to mess up your carefully applied fillets.
Scarf Joints.
 Scarf Joints
The standard size of a plywood sheet is 8x4 feet, so any planks that need to be longer than that will have to be joined using a scarf joint.
Scarf joints, bonded with epoxy are incredibly strong, stronger than the surrounding wood.
Often when gluing a scarf or other joint epoxy squeezes out when it is clamped.
This then has to be sanded and scraped off once the glue has set.
One way to avoid all that sanding is to mask off around joint with some cheap electrical tape.
Then later this can be pulled off taking the excess glue with it.
Or see "Joining Plywood Sheets and Planks" John Sheen
Finishing.
Practically all stitch and glue boats are given a sheathing of fiberglass cloth soaked in epoxy resin.
This layer is used to add a high degree of protection, strength, abrasion and impact resistance.
The lower cost chopped strand mats will add bulk and stiffness but not much strength.
Unidirectional cloths will add strength along the direction of the weave.
Woven and knitted cloths will give multi-directional strength.
When all the fiber-glassing has been done and the whole surface sanded to an acceptable finish the epoxy surface must be protected from UV light.
Whether you paint or varnish and however much time and effort you put into the finishing, at least two or three coats of varnish or paint will be needed to protect the epoxy from the sun's rays.
Use the time you have saved by using the stitch and glue method to make a good job of the finishing off.
A nicely finished boat will add to the pleasure of using it.


You might like these
Boat Books for Wooden Boat Builders
Boat Books a series of boat books based on some of the 1960's, classic, Free Boat Plans that were published in magazines such as "Popular Mechanics", "Popular Science" and the "Boat Builder Handbook".
Ring Nails for Marine Fastening.
Ring Nails sometimes call Gripfast or ring shank, silicon bronze boat nails are renowned for their holding power. but how to get them out?
The Ashcroft Method of Planking a Wooden Boat
The Ashcroft method of building small wooden boats, an early from of cold moulding using thin layers of wood with the layers all running same direction.
Knotty wood, problems with boat building timber.
Knotty wood, how to avoid structural problems with knots in lumber when using softwood timber for fitting out and boat joinery
Build a Boat, tips for the DIY Wooden Boat Builder.
How to Build a Boat, Wooden Boat Building methods for the DIY, backyard, self-builders explained, carvel, lapstrake and plywood
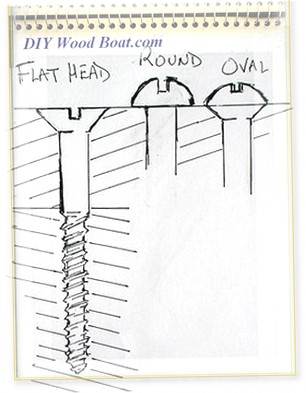
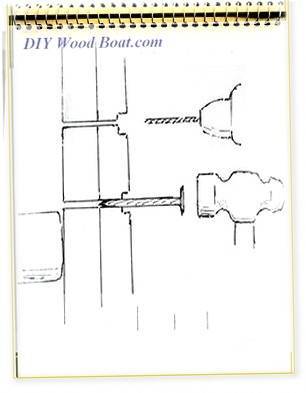
Wood Screws for Boat Building and Repair.
Wood Screws are the most widely used and versatile fasteners used on wooden boats. Which type to use and how to use them
Wood, Environmentally Friendly Boat Building Lumber.
Make sure that the Wood that you buy and use is sustainably grown and harvested.
Timber, Lumber for Boat Building.
A brief description of the most common Timber used for building Wooden Boats how to choose wood for your project boat
Timber Properties
A brief guide to timber properties and wood, characteristics such as strength, stiffness and elasticity for choosing lumber for wooden boat building and restoration.
Rivets and Copper Rove Wood Boat Fastenings.
How to use Copper Rivets and Roves construction guide to fasteners on your wooden boat.


Warning
Epoxy Resins contain Bisphenol A.
Before using epoxies you should consider the flood of new scientific evidence on adverse effects of BPA.
Recent Articles
-
Reader's Boat Photos
Aug 23, 25 09:08 AM
 Gallery of Readers uploaded Photos
 -
The Sliding Bevel
Jun 19, 25 02:52 AM
 By Robin Gates
The Sliding Bevel: A Boatbuilder’s Tool for Precision
For angles other than the perpendicular of the try-square and 45 degrees of a mitre-square, the essential measuring tool is a slidin…
-
Winter Bilge Issues
Jun 18, 25 07:34 AM
 By Adrian Morgan
Winter Bilge Issues: Can a Classic Boat Spend Too Long Ashore?
Beware the score of too long ashore, Adrian Morgan warns us…
Continue reading "Winter Bilge Issues"


This work is licensed under a Creative Commons Attribution-ShareAlike 2.0 UK: England & Wales License.
I am perfectly aware that the majority of Wooden Boat aficionados are sensible folk.
However, I need to point out that I am an amateur wooden boat enthusiast simply writing in order to try to help other amateur wooden boat enthusiasts.
And while I take every care to ensure that the information in DIY Wood Boat.com is correct, anyone acting on the information on this website does so at their own risk.