- Home
- Your Boats
- Plywood Boat
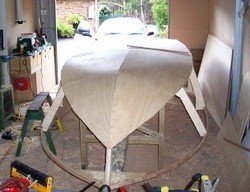
Malahini a Plywood Boat being built by Andrew in Tasmania.
Beginning to attach the planking.
Hi, this is the plywood boat that I am building from a classic design by the American designer Glen L .
My name is Andrew Peters and I am building her in Hobart, on the beautiful Australian island of Tasmania.
I own my own custom, picture framing business, Just Frames and I also custom design and make furniture at Made by Magic at 22 Main Road Moonah in Hobart.
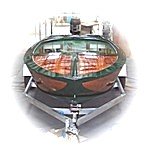
Malahini, a Plywood Boat
My decision to build Malahini was inspired by those highly lacquered Italian speed boats, the sports cars of the sea, such as the classic wooden, exemplary finished, works of art designed and built by Carlo Riva.
I chose the Malahini design for its classic looks and because it was a manageable size for my first boat building project.
I decided to power her with an outboard engine as I figured that it would be easier to install than an inboard for this my first attempt.
She will have a hard chine Vee bottom hull and will be powered by outboard motors.
It will be 15.5 feet long with a beam of 6.5foot,
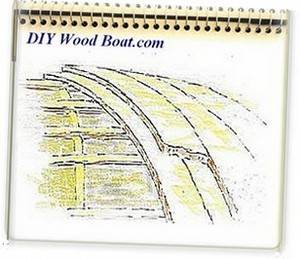
The Malahini design was developed for sheet plywood planking.
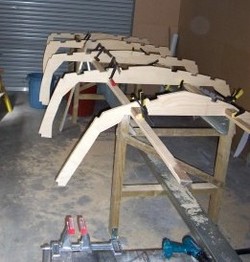
Having cut out and assembled the frames they were attached to the form.
The
batons were then attached to the frames.
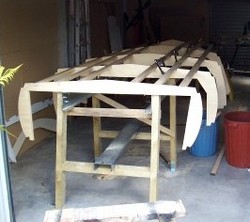
The sheer and chine are attached to the breasthook which was glued and fastened tothe stem.
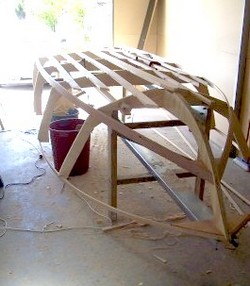
The sheer and chine
were attached at bow having been angled to butt properly to the stem
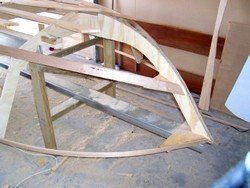
The sheer and chine attached, these were fastened and glued in position after being sprung around the frames.
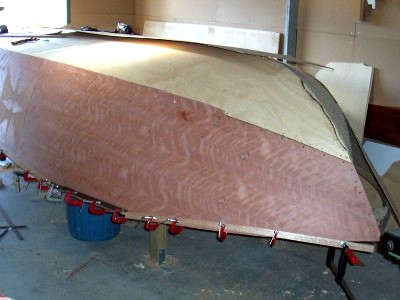
The
first of that beautiful fiddleback myrtle goes on as the transom is
attached
to my plywood boat.
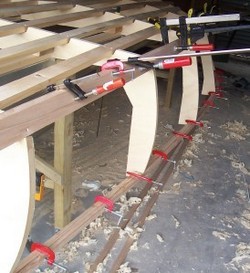
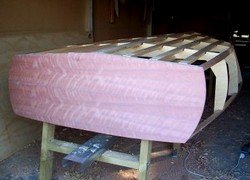
Here I'm starting to attach the underside having faired the various longitudinals. Its important to keep these lines fair for aesthetic as well as performance reasons.
The bottom plywood planks attached at bow and along the centreline of the keel.
to Top of Page.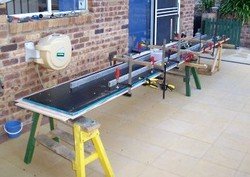
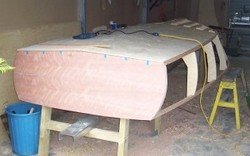
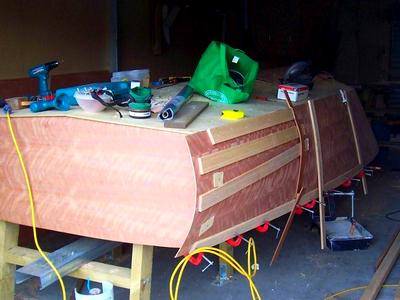
The side planking for my plywood boat being glued up.
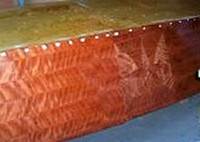
Now I'm at the stage where I can start to finish off the hull sides with decorative veneer.
As I live in Tasmania where we have some of the most beautiful timber, I am using Tasmanian Myrtle veneer.
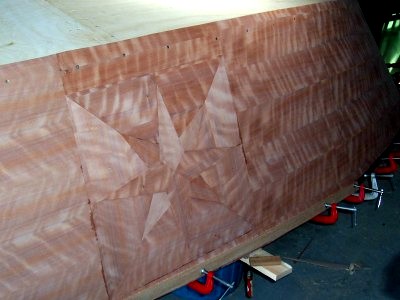
The photo shows a compass rose that have inserted into the sides.
The reason for this was to 'hide' the join between two sheets of ply.
The hull side is approx 5.2 meters long, unfortunately the myrtle veneer which I had laid up on marine ply was a special order and the sheets only came in 2.4metre lengths.
So
instead of just joining two sheets plus a bit extra I thought I would
add
some detail work and hide the join. 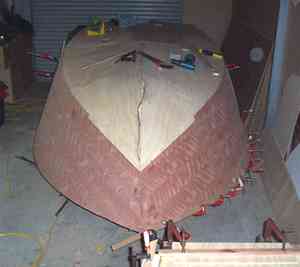
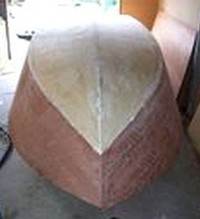
The starboard underside bow of my plywood boat is now attached.
to Top of Page.
After a long delay due to the weather being too cold to do any work on my plywood boat, finally we have had some decent weather.
So I have now glued the second layer onto the rear of the hull on both sides.
Once it has dried (overnight) I can start to Fair (plane smooth) the joins and bog (technical term) up the screw holes ready for finishing.
Once this is all done she can be painted, turned over and fitted out.
However there is still a fair bit to do to my plywood boat.
I started this project about 12 months ago (hard to believe where the time has gone).
Things I will do differently next time
1. Read the bill of materials properly so that instead of laying up 2 x 3mm marine ply on the sides I would have ordered the correct 6mm ply with the myrtle on it
2. Built a steamer so that I could steam the ply to make it more pliable when fitting especially on the stern curvy bits.
3. Sand and epoxy the myrtle as soon as i put it on to protect it. We had such a wet winter that the myrtle got and remained a bit damp. When this happens with myrtle it goes black and I had to sand out some of this blackness. This I achieved but a bit tricky as it's easy to sand through the veneer.
Apart from that it has been really enjoyable.
There is still lots to do on my plywood boat but looking forward to it.
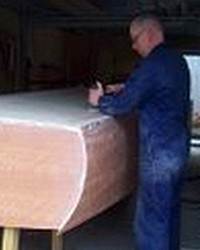
Now after 110 hours of working on her I have sanded the hull and given it a coat of epoxy.
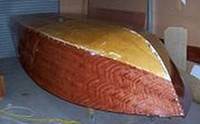

And just look how it has brought out the colour of that beautiful myrtle.
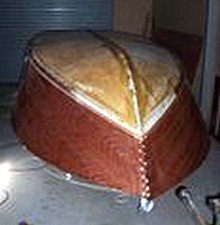
I have now fitted the splash rail and fibreglassed the joints.
I haven't done any fiberglassing before but had some good advice from Laurie.
Still wouldn't try to build a fiberglass boat though.
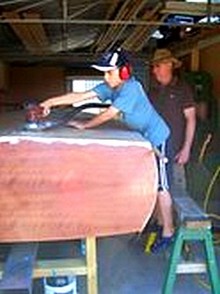
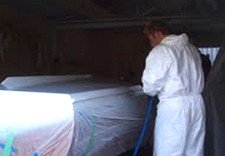
Employed a professional to help me do some sanding on my plywood boat, (and yes he was wearing a breathing mask just took it off for the photo).
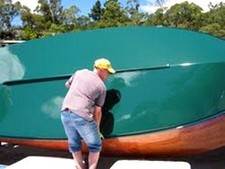
I have now primed and applied the top coat of paint to the bottom of the hull.
The primer I used is ALTEX brand No3 Epoxy primer undercoat. It’s a two part paint.
It is a high build primer and Pete sprayed on about 8 coats one after the other, which filled any small imperfections etc in my plywood boat.
I then sanded it back with 240 then 320 grit.
It sands really well and gives a very smooth finish.
Any
imperfections after the sanding I filled and re-sanded.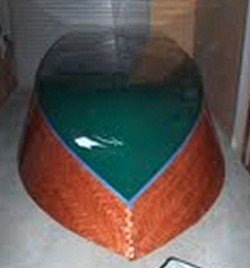
The top coat is also ALTEX brand Acryl Recoatable Polyurethane with a part A - Colour and part B - Hardener.
Pete sprayed about 6 - 8 coats gradually thinning the mixture withU20 thinner to finish with a high gloss.
I will sand this after about a week with 1000grit wet and dry and then cut and polish.
Well now her bottom has now been finished it is time to turn my plywood boat over.
Was I worried, no not me, didn't sleep for a week and then it was surprisingly easy.
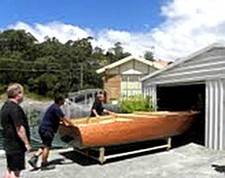
But then I did have help from seven of my mates.
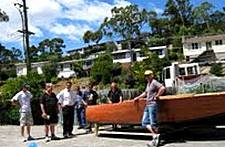
Amazing what blokes will do for free beer.


You might like these
Boat Books for Wooden Boat Builders
Boat Books a series of boat books based on some of the 1960's, classic, Free Boat Plans that were published in magazines such as "Popular Mechanics", "Popular Science" and the "Boat Builder Handbook".
Ring Nails for Marine Fastening.
Ring Nails sometimes call Gripfast or ring shank, silicon bronze boat nails are renowned for their holding power. but how to get them out?
The Ashcroft Method of Planking a Wooden Boat
The Ashcroft method of building small wooden boats, an early from of cold moulding using thin layers of wood with the layers all running same direction.

Recent Articles
-
Reader's Boat Photos
Aug 23, 25 09:08 AM
 Gallery of Readers uploaded Photos
 -
The Sliding Bevel
Jun 19, 25 02:52 AM
 By Robin Gates
The Sliding Bevel: A Boatbuilder’s Tool for Precision
For angles other than the perpendicular of the try-square and 45 degrees of a mitre-square, the essential measuring tool is a slidin…
-
Winter Bilge Issues
Jun 18, 25 07:34 AM
 By Adrian Morgan
Winter Bilge Issues: Can a Classic Boat Spend Too Long Ashore?
Beware the score of too long ashore, Adrian Morgan warns us…
Continue reading "Winter Bilge Issues"


This work is licensed under a Creative Commons Attribution-ShareAlike 2.0 UK: England & Wales License.
I am perfectly aware that the majority of Wooden Boat aficionados are sensible folk.
However, I need to point out that I am an amateur wooden boat enthusiast simply writing in order to try to help other amateur wooden boat enthusiasts.
And while I take every care to ensure that the information in DIY Wood Boat.com is correct, anyone acting on the information on this website does so at their own risk.