- Home
- Boat Building
- Restoration
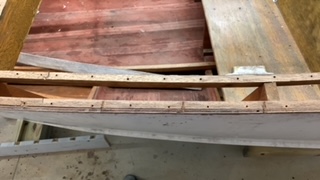
- Planking
- Sealants
- Hull Fittings
Through Hull Fittings.
Every
through hull fitting in the bottom of your boat is a potential leak
waiting to
happen.
They should be checked regularly and re-seated or replaced if there is any doubt as to their integrity.
Just imagine what would happen if your engine intake fitting were to break off.
That 50mm / 2inch hole below the water line would allow water to come squirting in at much faster rate than your bilge pumps are likely to be able to cope with.
Admittedly that sort of emergency is rare, more boats sink because they
have
been left unattended with a slow leak.
While you are on board there is the possibility of taking emergency measures to stop the leak but what can you do if arrive at the marina to find taught dock-lines disappearing down into the water.
Checking Through Hull Seacocks.
The best way to ensure the integrity of under water, through hull fittings is not to have any or at least keep them to a minimum.

The only through hull fittings left on Mignonne are the depth sounder’s transducer, the engine cooling intake and of course the propeller shaft, I’d love to get rid of them as well but they sure do come in handy at times.
However, those that you do have should be inspected on a regular basis.
It is particularly important to check the filter in the engine intake fitting, any blockage here will result in an overheating engine and damage to or even lack of a filter could result in debris blocking the cooling channels within the engine itself.
Check and grease the shut-off valve and inspect the hoses for cracks and leaks.
If your boat is out of the water, on the hard you can still check the valves for leaks.

Disconnect the hose and attach a length of spare hose, tie it vertically then fill the open end with water.
Go outside and check to see if any is leaking out when the valve is closed and that it is flowing when the valve is open.
Or connect the hose to the mains to get some pressure behind it.
And check that the hose clips are non-corrosive and in good order, these should be doubled up.
Any through hull fittings which are hard to get at are the ones less likely to have been maintained make a special point of checking these regularly.
On wooden boats pay particular attention to the wood surrounding metal fittings, galvanic corrosion and electrolysis can play havoc with the wood as well as the metal.
Tapping the wood around the through hull fitting will usually be enough to discover if you have a problem.
Check the speedometer and
depth sounder sensors, these
are usually plastic fittings which, if not protected can easily be
accidentally
broken.
Don’t forget to keep an eye on the stuffing boxes for the propeller shaft.
Packing glands need to be either tightened or the stuffing replaced and the rubber boots on stern drives checked to keep the water from entering the hull.
And don’t forget the cockpits drains.
Keep your cockpit clear of any debris which might block the drain, especially if you are leaving her in the water.
affiliate linksReseating.

If the seacocks them selves are in reasonable condition but they need re-seating your first problem is going to be removing them.
The first thing obviously is to remove the fixing bolts.
However, some fittings may prove difficult to move, especially those which were originally sealed with a polyurethane sealant.
Avoid hammering on the fitting as this could easily cause damage to the fitting and the surrounding wood, besides there might be enough room behind to get at it.
The best way, is to rig up a puller using a length of threaded studding or a bolt which will go through the fitting.
With blocks of wood off-cuts, nuts and washers on either end of the studding and some blocks of wood on the outside to hold it clear of the hull, tightening the nut should easily pull the fitting out of the hull.
With the fitting removed, clean off any old sealant or caulking from the fitting and the hole in the hull.
Pay particular attention to the backing pad, if there is any sign of rot replace it, the pad must be shaped to fit the inside curvature of the hull.
Prime the wood with paint before re-seating and allow it to dry.
Bed everything, including the backing pad with sealant and lightly coat the threads of the fixing bolts.
Tighten the assembly until it seats snugly and the caulking compound or sealant squeezes out around its full perimeter.
If using a polyurethane or polysulfide sealant don’t initially tighten the nuts very tight.
Allow the sealant to set before the final tightening but be careful when tightening bronze bolts as they can stretch if you over do it.
affiliate linksReplacement.
Replacing a damaged through hull fitting is
similar to
re-seating,
providing the replacement is the same type and size as the old one.
An
even better option if you can manage it is to do away with the
fitting and replace the it with a bung backed with a through bolted
backing plate.
The top of the list of items to jettison should be that old sea
toilet.
They can no longer be used legally in many areas and often imposable to
use underway in any kind of sea anyway. Best to replace it with a
'Porta
Potti' or something similar.
The most common type of replacement through
hull fitting has a
‘mushroom’ outer flange this requires no special tools for
installation.
The flush mounted variety however require a special counter sink tool
to
bevel the outer edge of the hole for a flush fit, so are best
avoided.
Others rely on a flange nut rather than through bolts for fixing, these are best left for the above the waterline fittings.
It is never a good
idea to have a mix of
metals on any hull below the water line and on a wooden boat in
particular it is best to stick to silicon bronze.
There
are through hull fittings available in ‘Marelon’
which is fiberglass reinforced nylon.
At first glance these seem to be the wooden boat owner’s answer to
corrosion problems.
However, I have had no dealings with this material but I have heard reports which cast doubt on their strength.
Whatever you use, don't forget to secure the hoses with dual
clamps.
And use reinforced, good quality hose that wont kink.
For underwater fittings, the safest type are the ones with shut off
valves, then if a hose comes off or is breached the water can be shut
off.
When you position the seacock make sure you can easily reach the handle and can turn it without scraping you knuckles.
A New Hole?
If you are contemplating adding a through hull fitting you need to plan its position.
So before you start to drill that hole consider;
- Will it be readily accessible from inside.
- Will there be ample room to turn the valve handle.
- Will the new fitting set up any turbulence in front of your depth sounder or speed log impeller.
- Will the hose run from the fitting be a short and straight as possible.
- On the other hand, will that stiff hose be long enough to allow it to be bent for easy fitting and replacement.
Once you have chosen the position drill a pilot hole from the inside so you can be sure that it is centered on a plank and between frames.
Then using a hole-saw to suit the size of the fitting cut the required hole from the outside of the hull.
Using the hole-saw from the outside will give more room to control it and a crisper edge to the outside of the hole.
Once you are sure the hole is the correct size clean it up with sand paper and prime it with paint or varnish.
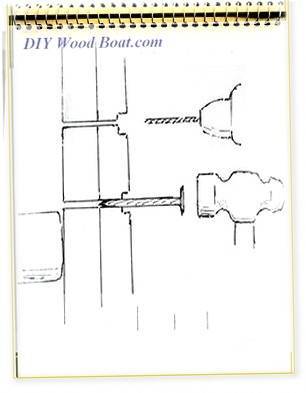
Use the same sized hole-saw to cut the aperture in a piece of hardwood for a backing plate.The backing plate wants to be 2 or 3 inches larger than the flange of the seacock and shaped to match the inside curvature of the hull.
The backing plate is to reinforce the hull around the hole and to provide a flat surface for the seacock flange to bed onto.
The backing plate will also want to be primed to prevent rot.
If it is possible to plan for the hole to coincide with a butt block joint between planks, the valve flanges and securing bolts will add to the strength of butt and the butt will do away with the need for a backing plate.
However, the need for a new hole in the hull might possibly be avoided by fitting a tee-connector to an existing inlet or discharge line.
affiliate linksElectrolysis.
While on the subject of through hull fittings it is worth taking a moment to reflect on the process of electrolysis and how it might affect your boat.
Where there are dissimilar metals on the boat hull below the water line electric current will be created.
The less ‘noble’ of the metals on your boat (the zinc anodes) will be eaten away by galvanic corrosion first as these get smaller their voltage potential is reduced to the point where they fail to protect the other metals on the boat.
However, too many zincs on a wooden boat can be counterproductive it will help save the metal, but it can raise the risk of Hydroxly ion attack on the wood.
As Bronze is one of the more noble metals it is considered reasonable not to bond bronze through hull fittings to the galvanic corrosion system.
Other precautions we can take are reducing our reliance on all those bit of electrical gadgetry.
And not leaving our boats tied into a shore-power system which could prove to be leaky.
However, that won’t protect us from voltage leaking from other boats tied up nearby.
So don’t forget the Anodes but don’t over do them.
affiliate linksEmergencies.
Regular inspection and maintenance of through hull fittings should reduce the likely hood of an emergency situation.
However, every good mariner should be prepared for the worst case scenario.
Among the items in your damage control kit there should be;
- Some tapered wooden plugs sized to fit the through hull fittings on your boat.
- An assortment of tapes such as the ubiquitous duct tape.
- Spare hose clamps these can also be used to hold patches in place.
- Nylon cable ties are useful for quick temporary fixings.
- Even some bailing or nylon twine can be handy to hold a patch securely in place.
- A small flashlight
- A good variety of hand tools.
And of course, should a through hull fitting leak that float switch and a well charged battery will help to protect your boat when you are not on board.
NATIVE ASYNC

Previous posts
See What Others Have Posted
No Discharge and Porta-Potti
Two crocks mostly.
Most (not all) no discharge zones are a crock brought on by environmental fanatics focused intently on minutiae.
Most marinas …
Frozen Stopcock on Ticon30
Does anyone have any tips to loosen up a frozen bronze stopcock on a through hull fittin?
I had two stuck in the open position.
I got one closed …
Plugs for thru hull fittings no longer needed
What is the best way to plug a hole left by a thru hull fitting that is no longer necessary?
I'm retrofitting a 20" clinker built, cedar on oak frame …

Recent Articles
-
Wooden Boat Events 2024
Apr 14, 24 05:15 AM
Wooden Boat Events 2024 calendar, traditional and classic boat festivals and regattas from around the world
You might like these
Plywood and Veneer Guide for Marine use.
A guide to plywood for boat building and why you should use the best marine grade you can afford.
DIY Woodboat Building Questions
Woodboat building questions a Forum for wooden boat building, plans, lumber, caulking compounds and other boat building problems.
Boat Books for Wooden Boat Builders
Boat Books a series of boat books based on some of the 1960's, classic, Free Boat Plans that were published in magazines such as "Popular Mechanics", "Popular Science" and the "Boat Builder Handbook".
Build a Boat, tips for the DIY Wooden Boat Builder.
How to Build a Boat, Wooden Boat Building methods for the DIY, backyard, self-builders explained, carvel, lapstrake and plywood
Clench Nails, Fastening for Small Wooden Boats.
How to use Clench Nails, these provide a fast reliable method for fastening small wooden boats.
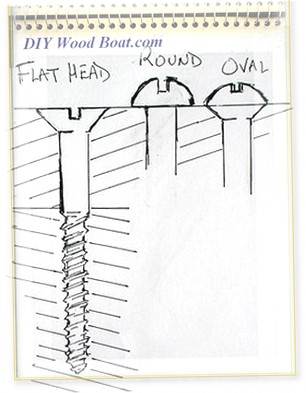
Wood Screws for Boat Building and Repair.
Wood Screws are the most widely used and versatile fasteners used on wooden boats. Which type to use and how to use them
Timber, Lumber for Boat Building.
A brief description of the most common Timber used for building Wooden Boats how to choose wood for your project boat
Timber Properties
A brief guide to timber properties and wood, characteristics such as strength, stiffness and elasticity for choosing lumber for wooden boat building and restoration.


Recent Articles
-
Wooden Boat Events 2024
Apr 14, 24 05:15 AM
Wooden Boat Events 2024 calendar, traditional and classic boat festivals and regattas from around the world -
14’ 1956 Chris Craft, side rail how should it be attached?
Apr 12, 24 03:38 AM
 Removing the old side rail most of the screws went between the top deck/skin 1/4” plywood and the side of the hull. See photo, is this correct? I would
 -
How to laminate plywood on the hull
Apr 10, 24 03:46 AM
I'm working on replacing the bottom of 18' 1969 runabout that has a deep-V plywood hull. It had a 1/2 mahogany plywood bottom that they somehow got to
You might like these
Plywood and Veneer Guide for Marine use.
A guide to plywood for boat building and why you should use the best marine grade you can afford.
DIY Woodboat Building Questions
Woodboat building questions a Forum for wooden boat building, plans, lumber, caulking compounds and other boat building problems.
Boat Books for Wooden Boat Builders
Boat Books a series of boat books based on some of the 1960's, classic, Free Boat Plans that were published in magazines such as "Popular Mechanics", "Popular Science" and the "Boat Builder Handbook".
Build a Boat, tips for the DIY Wooden Boat Builder.
How to Build a Boat, Wooden Boat Building methods for the DIY, backyard, self-builders explained, carvel, lapstrake and plywood
Clench Nails, Fastening for Small Wooden Boats.
How to use Clench Nails, these provide a fast reliable method for fastening small wooden boats.
Wood Screws for Boat Building and Repair.
Wood Screws are the most widely used and versatile fasteners used on wooden boats. Which type to use and how to use them
Timber, Lumber for Boat Building.
A brief description of the most common Timber used for building Wooden Boats how to choose wood for your project boat
Timber Properties
A brief guide to timber properties and wood, characteristics such as strength, stiffness and elasticity for choosing lumber for wooden boat building and restoration.
Rivets and Copper Rove Wood Boat Fastenings.
How to use Copper Rivets and Roves construction guide to fasteners on your wooden boat.
Ring Nails for Marine Fastening.
Ring Nails sometimes call Gripfast or ring shank, silicon bronze boat nails are renowned for their holding power. but how to get them out?
DIY Mast Boot
Mast boot, how to make your own mast skirt / coat to cover the wedges and prevent water leaking down a keel stepped mast into the cabin on a sailing yacht particularly a wooden boat.
PM 38 Club
The PM 38 Club, a celebratio of the owners and builders of the free boat plans which were published in magazines such as Popular Mechanics, Popular Science and the Boat Builder Handbook.


This work is licensed under a Creative Commons Attribution-ShareAlike 2.0 UK: England & Wales License.
I am perfectly aware that the majority of Wooden Boat aficionados are sensible folk.
However, I need to point out that I am an amateur wooden boat enthusiast simply writing in order to try to help other amateur wooden boat enthusiasts.
And while I take every care to ensure that the information in DIY Wood Boat.com is correct, anyone acting on the information on this website does so at their own risk.