- Home
- Your Boats
- Tidal Stream
Tidal Stream Vectors
The Tidal
Stream is one of the complicating
factors affecting navigating on water.
Understanding how the horizontal movement of the water will affect your navigation is necessary if you are to plot EPs and arrive safely at your destination.
Set and Drift.
One of the more interesting aspects of navigating at sea is that we are traveling on or in a medium which is itself moving in three dimensions.
Set and drift are the expressions we use to describe the effect that the horizontal movement of the tide or tidal stream, as well as currents and leeway have on a boats progress.

In this example Alice in her dinghy is travelling at 5 knots through the water against the tide, Bill is also doing 5 knots but with the tide.
Assuming that there is 2 knots of tide running then Alice will be travelling at 5-2=3 knots towards her destination so, 3 knots is her speed made good or speed over the ground.
Bill has the tidal stream with him so his speed made good will is 5+2=7 knots.
This is assuming that their progress is not being affected by other factors such as the wind.
In this instance both vessels are traveling along the direction of the tidal stream so, the calculations are straight forward.

When a boat is pointing at an angle across the tidal stream this will affect the direction that the vessel actually travels over the ground.
And the effect on the boat speed made good, will be dependent on both the angles and speeds involved.
The simplest way to work the progress made good by a vessel is by using a Vector diagram.
Drawing Tidal Stream Vectors.
Some navigators prefer to draw their tidal vectors directly on the chart.
Others prefer to keep their charts free from lots of construction lines and do the vectoring on a separate plotting sheet (this is just some plain paper).
There are certain conventions used when drawing vectors, which if kept to will help avoid any confusion.
As well as using the standard notations for Fixes, DR and Estimated positions and including the time and log reading of the time it was plotted.
The use of arrows will not only differentiate between the different track lines but also indicate the direction of travel.
The water track or course through the water of the vessel is shown with one arrow pointing in the direction of travel.
The ground track or course made good is normally shown with two arrows pointing in the direction of travel.
And the tidal vector is drawn with three arrows pointing in the direction in which the tide is setting.
Clearly all bearings and distances must use the same units of measurements.
Bearings are normally in degrees true,especially if working directly on to the chart.
Distances used on the chart must be measured against the adjacent latitude scale.
When working on a plotting sheet any convenient distance scale can be used so long as the same scale is used throughout.
And avoid confusion by always designating the top of plotting sheet as north.
Estimating a Position.
To obtain an Estimated Position (EP) from a Dead Reckoning position (DR) you will need to ascertain the appropriate tide speed and direction.
")
This information can be found in your nautical almanac or from the Tidal Diamonds on the chart.
The tidal flow and direction for the specific time and location of your passage can then be added to your DR in the form of a vector line.
In this sketch example the dead reckoning for one hour at a speed of 4 knots and a bearing of 90 deg. True was extended from the Fix at A to the DR at C.
The tidal stream for the time of the passage was running at
1.75 knot on a
bearing of 330 deg.True.
The tidal vector line was then drawn from C in the direction of the tide’s bearing.
This is where it is important to include the arrows to the line as a reminder of the set of the tidal stream.
Tide flow is always from the DR towards the EP.
As this diagram represents one hour we can now draw the tide vector along the bearing 330 deg. and mark the EP at B 1.75 units from C.
The ground track AB is not normally drawn in when plotting an EP.
However, if you wish you can draw the line AB this will represent the actual course and speed over the ground or made good.
In this case the bearing made good was 065 deg.
True and the distance covered in the hour was 3.5 nautical miles so the speed over the ground was 3.5 knots.
The same principle can be used to determine the course and speed required to reach a destination.
However as you are working the vector backwards you have to start by using an assumed speed over the ground to arrive at a speed and bearing necessary to achieve that.
The vectors are always worked out for an hour because it simplifies the calculations as all the speeds, boat and tide, are given in knots.
So, even if you want to establish an EP 45mins or even 1hour 10mins after leaving A you still work the speed and bearing out for one hour.
A sailing yacht tacking to windward can plot the water tracks for each leg then plot an aggregate tidal stream for the whole period at the end.
Remember that an Estimated Position is not a Fix but a best guess.
And the further you travel from a fix the greater will be the 'Circle of Error'.
And as well as tide set and drift you may need to add into the equation an allowance for leeway, depending on the nature of you boat Leeway will be greatest for a sailing yacht, but can also be affect motor craft depending on the wind strength direction and the hull shape.
BooksUsing Transits.
The culmination of every successful passage is the entry into a harbor or an anchorage.
During the final moment of approach to the coast the helmsman will have no time to work out tidal vectors.
Besides, tide tables and diamonds only give overall average information and cannot account for local variations close to the shore.
During the final moments of approach, allowance for the tide will have to be done by eyeball.
Many harbours and channels where there are cross currents will have Range Markers set up to make pilotage easier and safer.
However in the absence of such marks the helmsman can pick out his own markers from shore based elements.

The best transits require a marker which is as far away as possible and one which is as close as possible both markers must be fixed objects.
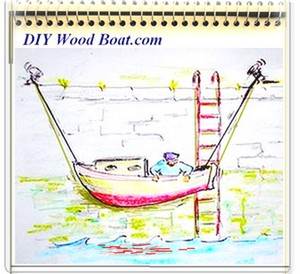
In the little sketch above it would be tempting to use one of
the colored
boats in the harbor but could you be sure that they are tied up and
unlikely to
move?
The spire in the distance is an obvious back mark that could be aligned with the center of the entrance.
Or the left hand end of the harbor wall could be lined up with the trees to the left of the spire.
The tidal stream, as I've shown it, is flowing from port to starboard, assuming we are in a boat approaching the entrance.
If we point the boat directly at the entrance the tide will push us to starboard, and if we are using the spire as our marker it will appear to move to starboard as well.
Or order to counteract the tide flow we need to point the boat more towards the port hand side.
Using the markers, when the back marker appears to move to starboard we need to steer the boat more to port.
And if the back marker seems to move to port of the front marker we need to steer more to starboard.
These are simple techniques, which once appreciated will make it easy to deal with those complicating tidal stream.
Remember in every process of navigation, be it on the sea or in life generally, to plot a successful course you need to know where you are starting from.
affiliate links


You might like these
Maritime Weather Patterns
Global weather patterns influence your local marine conditions, understanding how these work will help you to interpret forecasts, help to keep you safe and your boating enjoyable.
Digital Selective Calling (DSC)
Digital Selective Calling
Automatic Identification System AIS
Automatic Identification System AIS
Weather Sayings
Weather sayings, worth remembering, sailors use phrases, expressions and idioms for short term forecasting, many have scientific explanations.
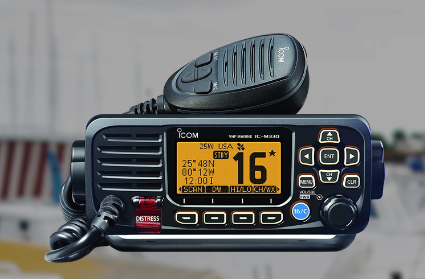
VHF Marine Radio
Description of VHF Marine Radio Equipment for the average boater, types of transceiver, range and restrictions.
Tides, how they are caused and predicted.
Tides, tidal streams, sea level predictions and marine currents and what the leisure boater should know about Tide tables, charts coastal height prediction data.
Tide Gates and Navigation.
Tide gates, currents, overfalls and tide races what to watch out for when planning coastal navigation.
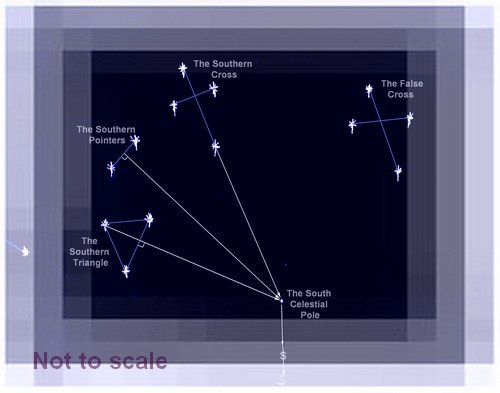
Southern Cross, Navigating by the Stars in the Southern Ocean.
How to use The Southern Cross as a pointer to find the South Celestial Pole.
Rule of Twelfths for Quick Tidal Estimates
The rule of twelfths and the rule of tenths are easy rule of thumb calculations for quickly working out the approximate tidal stream and tide height from marine tide table predictions.
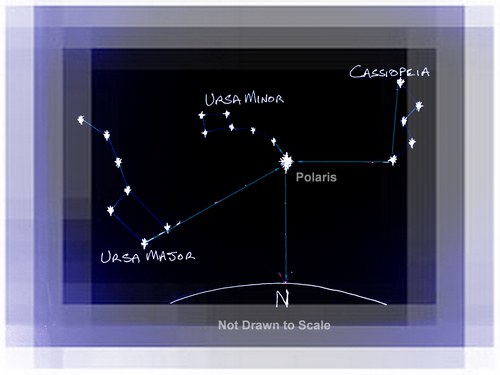
Polaris the Navigator's Star
How to use Polaris to determine the direction of north, probably the oldest form of celestial navigation in the northern hemisphere.


Recent Articles
-
Reader's Boat Photos
Aug 23, 25 09:08 AM
 Gallery of Readers uploaded Photos
 -
The Sliding Bevel
Jun 19, 25 02:52 AM
 By Robin Gates
The Sliding Bevel: A Boatbuilder’s Tool for Precision
For angles other than the perpendicular of the try-square and 45 degrees of a mitre-square, the essential measuring tool is a slidin…
-
Winter Bilge Issues
Jun 18, 25 07:34 AM
 By Adrian Morgan
Winter Bilge Issues: Can a Classic Boat Spend Too Long Ashore?
Beware the score of too long ashore, Adrian Morgan warns us…
Continue reading "Winter Bilge Issues"
You might like these
Cold Water Boating
Safety precautions for cold water boating and winter sailing
How to Mooring Your Boat.
Avoid embarrassment when Mooring and Docking, learn how to get it right safely with the correct lines and at least appear competent.
Anchor Types
Anchor types, how to choose the type, size and style of ground tackle, chain and rode to anchor your boat safely.
Anchoring Techniques
Anchoring techniques, best practices to ensure the safety of you and your boat, and how to retrieve a snagged hook.
Boat Winches
Boat Winches, sheet, anchor, halyard and trailer winches for Wooden boats


This work is licensed under a Creative Commons Attribution-ShareAlike 2.0 UK: England & Wales License.
I am perfectly aware that the majority of Wooden Boat aficionados are sensible folk.
However, I need to point out that I am an amateur wooden boat enthusiast simply writing in order to try to help other amateur wooden boat enthusiasts.
And while I take every care to ensure that the information in DIY Wood Boat.com is correct, anyone acting on the information on this website does so at their own risk.