- Home
- Your Boats
- This Page
Sea C Strider
by Robin Sales
(Victoria,BC,Canada)

Sea C Strider
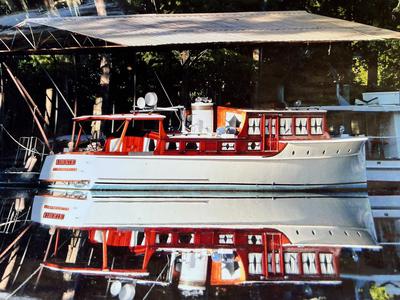
I have a 1964 Sather 36' rebuilt fishboat that I bought 6 years ago and converted to a sedan cruiser.
I took her onto the hard 2 weeks ago for new survey,insurance,bottom paint,zincs and general out of water touch up.
She passed the survey and is insured but because slings were used to take her out and in she has now developed a constant leak on the starboard rear quarter.
I want to take her out and fix the problem properly but wanted to ask if anyone may have a a temporary solution as my budget was stretched on the original survey/fix up.
I've been told about floating sawdust in the area around the leak?
Using Fisherman's Cement on the inside? Is this regular cement?
Using Roofing Tar?
And is there an epoxy that works on wet wood? I know sikaflex doesn't.
I just need a temp fix till I can get her done properly in 3 to 6 months?
The photo is last year and have added stainless steel/wood railings, removed top tarpaulin and am adding a fwd.door on starboard side for easier access to tying up.
My Thanks to any suggestions
Robin
Comments for Sea C Strider
|
||
|
||
|
||
|
||
|
||
Want to add more photos?
Photo Uploader
If you are having problems uploading Photos or would like to add more click on this link for the Upload Form.


You might like these
Your Wooden Project Boats by Proud Wooden Boat Lovers.
A showcase for Your Wooden Project Boats.
Readers Tips for Your Wood Boat.
Readers Tips advice on how to maintain and improve your Wooden Boat and save time and money
Boats and Bits Free Advertising.
The Boats and Bits Free advertising space to sell, buy or exchange Wooden Boats, Boat Bits


This work is licensed under a Creative Commons Attribution-ShareAlike 2.0 UK: England & Wales License.
I am perfectly aware that the majority of Wooden Boat aficionados are sensible folk.
However, I need to point out that I am an amateur wooden boat enthusiast simply writing in order to try to help other amateur wooden boat enthusiasts.
And while I take every care to ensure that the information in DIY Wood Boat.com is correct, anyone acting on the information on this website does so at their own risk.