- Home
- Your Boats
- This Page
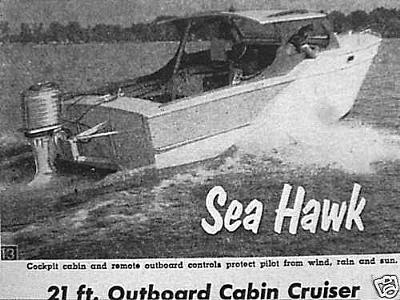
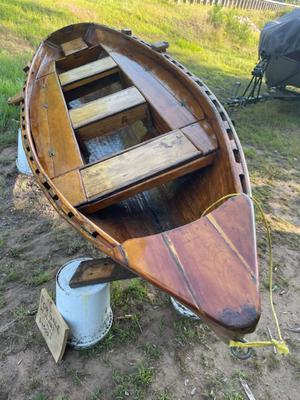
60s Sea Hawk
by Eddie Gregory
(Ireland)


|

|
Hi,
What a great site you have, a treasure to any budding boatbuilder, thanks.
I have just started building a 21-foot Sea Hawk cabin cruiser from plans freely available on the web.
So far I have built the 5 frames in oak and am just finishing off the transom.
Will not get excited until I see it laid out.
Check out my wee site at www.floatyourboat.
The plans specify 3/8 ext ply but i'm using 3/8 marine ply and fibreglassing over.
How many layers do you think I should use?
I am also going to glass the bilge area inside.
I'm having trouble using soft brass screws.
Seeing I'm glassing her do you think I should use plated steel star-head screws instead?
Thanks again.
Eddie
Comments for 60s Sea Hawk
|
||
|
||
|
||
|
||
|
||
|
||
|
||
|
||
|
||
|
||
|
||
|
||
|
||
|
||
|
||
Want to add more photos?
Photo Uploader
If you are having problems uploading Photos or would like to add more click on this link for the Upload Form.


You might like these
Your Wooden Project Boats by Proud Wooden Boat Lovers.
A showcase for Your Wooden Project Boats.
Readers Tips for Your Wood Boat.
Readers Tips advice on how to maintain and improve your Wooden Boat and save time and money
Boats and Bits Free Advertising.
The Boats and Bits Free advertising space to sell, buy or exchange Wooden Boats, Boat Bits


This work is licensed under a Creative Commons Attribution-ShareAlike 2.0 UK: England & Wales License.
I am perfectly aware that the majority of Wooden Boat aficionados are sensible folk.
However, I need to point out that I am an amateur wooden boat enthusiast simply writing in order to try to help other amateur wooden boat enthusiasts.
And while I take every care to ensure that the information in DIY Wood Boat.com is correct, anyone acting on the information on this website does so at their own risk.