- Home
- Boat Building
- Restoration
- Keel
Keel Bolts
As boats age so do the bolts securing the ballast keel.
Assessing their integrity and the risks to your boat is important to ensure the ballast doesn’t fall off.
In theory drawing the bolts to check them sounds straight forward, however as with most things with old boats it is not always so simple.
Keel Types
First thing, is to determine the material and configuration of your keel.
The most common materials are cast iron and lead, though occasionally concrete and sometimes more expensive exotic materials are used.
Concrete ballast keels although cheap and easy to cast, can cause all sorts of problems later.
 Keel Bolts
For a start because concrete is so much lighter than lead or iron, the ballast will have to be five to six times larger than a lead one.
The bolts are often cast into the concrete making replacement impossible.
And drilling for new ones is fraught by the probability that it has been filled with all sorts of scrap and reinforcing rods to increase the weight and for stiffening.
The next ting to consider, is the material the bolts are made of and how they have been inserted.
Fortunately the most common fastening method, the long, vertical, through bolt from the bottom of the ballast to top of the wood keel is also the simplest to deal with.
These will normally have a large nut with a large plate and washer on top of the wood inside and a countersunk bolt or forged head hidden behind a wood plug on the bottom.
They may also be bolted through the wooden or metal floors.
It is quite common to find them in a row along the centreline, it is however better if they are staggered.
But make sure whether or not they are vertical, if the ballast narrows towards the bottom they may be angled, this will affect how they are removed.
 Weight to Volume Ratios
Bolts which have been galleried might cause problems when it comes to removal if they are badly corroded.
While galleried bolts will be shorter, the problem is one of space to work on the lower nut and the inability to drive the bolt downwards.
Bolts which have been cast into the ballast, often found in lead and concrete, cannot be removed, however they could be sistered up by drilling new holes right through and fitting new long bolts.
That is another advantage to the cast iron ballast, the bolts won’t be cast in.
The number and size of bolts holding the ballast will depend on the it’s weight.
How the bolts are concentrated however will depend on the length of the mating surface.
The center of gravity of the ballast needs to be balanced longitudinally as well as laterally.
So, on a long keeled boat, for instance the ballast and therefore the bolts, can be spread along much of the length.
Where the forefoot is cut away the ballast will have to be concentrated nearer to the forward end of the keel, this will mean that the bolts will need to be concentrated over a smaller area.
Checking

Rather than wait for the ballast to drop off while you are sailing, it is a good idea to make a few checks occasionally.
The most obvious and easily spotted signs of trouble will be leaks around the top of the bolts.
Whenever she is out of the water examine the joint between ballast and the keel for any signs of separation or movement.
It is possible to get a rough idea but it is only an idea, of the state of the bolts by smacking them with a hammer, a sound bolt should ring whereas a corroded bolt will give a dull sound.
However, the only way to really know if a bolt is in good shape or not is to remove it.
Removing and examining one bolt should give an idea of condition of others, but it is no guarantee.
It’s possible that the huge long bolt you have removed is in perfect shape, but the one next to it has almost completely gone.
The only way to be certain is to check and or replace them all.
Fortunately replacement does not necessarily mean removing the keel, unless the bolts are cast into the ballast.
Where bolts are cast in it is possible, though very expensive to have them X-rayed, except, of course for lead keels.
Unfortunately, the only other way to check them is to remove the keel.
If there are leaks around the bolts but you are satisfied with the condition of the bolts, this can be stopped as a temporary measure, by packing below the nut and washer with caulking cotton and a sealant.
Removal.
The first job is to get the nut off the top of the keel bolt.
That is not always as easy as it sounds.
For a start the access may be restricted by the hull shape and some may even be hidden under the engine.
And they have been down there in the bilges for some time so, they are probably corroded on.
If you have any trouble at all with the nuts give them a good soaking in penetrating oil.
Build a dam around the nut with modeling clay, you could even use an old bean tin with the top and bottom removed, fill it with the penetrating oil and leave it to soak for a few days, with an bit of luck some of it might even soak down the bolt. If that fails you could try using heat but be very careful not to start a fire.
As a last resort you may have to use a small cutter, a large cold chisel and a sledge hammer, to split the nut.
With the nuts off the fun really begins, rusted bolts in hardwood can prove very difficult to shift.
The usual process with through bolts is to hammer down on the bolt with big sledge hammer.
But first making sure that there is clearance under the keel for the bolt to drop, this may mean raising the boat up on its shores or digging a pit under the bolt.
Alternatively, if you haven’t got much clearance and are sure the bolt needs replacing, you could drop it so far then chop it off then drop some more.
Don’t forget to remove any bungs or filler covering the bottom nut under the keel.
And it is best to remove and replace one bolt at a time, this will eliminate any risk of the ballast moving.
If you are just checking the state of the bolt and hope to retain it, try to avoid damaging the threads or creating a flange on the end as you hammer down.
Filing a bevel around the top of the bolt before you begin will help.
If the
bolt is badly corroded in the middle or at the joint between the
ballast, the
wood keel or the dead-wood there is a possibility that hammering might
bend the
bolt.
Or it could split allowing the top half to slide alongside the bottom part.
Either way, this will not only cause a jam but will also enlarge the hole, it could even split the wood.
So, when you begin hammering and the top begins to move down check underneath to make sure that the whole bolt is moving.
If it has broken in the middle then at least one of the ends will have to be drawn out.
Unfortunately it is difficult to apply pressure when trying to draw corroded bolts you could try a wrecking bar or block and tackle.
When the head of the bolt disappears below the surface, use a hardened steel drift to push right out.
The drift needs to he hardened steel so it is unlikely to bend and a size smaller then the bolt so it won’t jam in the hole.
An alternative to hammering the bolt down is to push it upwards but this is only possible if there is a bolt on the bottom which you can remove, it will not work if the bottom of the bolt is forged into a flange.
Using a jack to push the bolt upwards can create tremendous pressure, so be careful.
It must be kept centered on the bolt and kept in line with it so as not to damage the sides of the hole.
And be careful the big forces involved could jack the boat up off her props.
If trying to drill out the bolt take care as the ballast and the wood will be softer than the bolt so the drill will easily wander enlarging the hole and causing leaks.
Galleried bolts should, in theory be relatively easy to remove and change.
The bottom nut will be hidden behind a square or rectangular ‘window’, which will have been bunged or filled.
The window should be visible on the sides of the keel a foot or so down from the hull.
With the bung removed the exposed nut needs to be remove and the bolt drawn upwards.
Unfortunately this may not be such an easy task if it is badly corroded.
If the bolts have been cast in place they cannot be removed from the keel.
An alternative to removing the keel might be to drill right down through keel and ballast and fit new through bolts.
But this needs to be done with care as lead keels might contain lumps of pig and concrete ones certainly will have some fillers and reinforcing, these can throw the drill off center.
If the ballast has to be removed with the bolts still in place, this needs to be done gently with all the bolts sliding out in unison.
If the ballast is just allowed to drop, some of the more stubborn bolts may catch, twist and damage the wood.
So you need either jacks under the ballast to lower it under control or a method of lifting the hull slowly off the ballast such as a travel lift.
Replacing.
So,you’ve managed to remove the old bolts now what are you gong to replace them with?
First let's eliminate stainless steel, Stainless-steel can suffer from crevice corrosion over time.
Acids in wood, especially in oak will combine with salt water to cause stainless to corrode faster the iron, so forget it.
Monel-K is about the best possible material to use but it is expensive.
For use on an iron keel use plain steel or malleable iron from a blacksmith.
For use on a lead keel silicon bronze is best.
A rough guide the required size for bolts.
For every 1,500 pounds / 680.4 Kg of ballast, bronze bolts should have a cross-sectional area of not less than 1 square inch / 645.2 sq mm.
Bolts made of stronger metals such as stainless steel or monel can be correspondingly smaller.
Backing plates must be placed under each nut on top of the timbers
.Where you use bronze bolts the backing plates must also be bronze.
And iron or steel backing plates should be either hot-dip galvanized or well painted all around.
The backing plates should be as large as possible.
On a floor they should be at least equal to the floor’s width.
Coat the bolt with a bedding compound and use a canvas washer or caulking cotton under the metal one.
For protection use old fashion red-lead packing on the outside and tar on the inside.
Tighten each nut so the keel will not work, causing even more looseness and leaks.
Put some grease on the bolt to avoid the nut galling.
The goal is to tighten the nuts enough to get the bolts tight enough, but without causing the studs to stretch or cause excessive compression of the wood.
However it is unlikely that you will be able to apply enough torque to damage the bolt.
After a month or so, when everything has settled tighten the nuts again.
If you have replaced or checked just one or two bolts, make a note of which ones in your maintenance log, for future reference.
Finish off with wooden bungs or filler over the bottom of the bolts.
Knowing that your keel bolts are in good order will allow you to have many more years carefree happy sailing.
affiliate linksNATIVE ASYNC

Previous posts
See What Others Have Posted
Keel Replacement?
What are the steps for keel replacement on a 14 ft LOA wooden center board sailboat?
Rick
Wooden Keel
When you build a large timber boat, say 75 feet boat with timber keel how do you join the timber to make the keel in simple terms ?
Lene
Lene is a Nordic Folkboat.
Before preparing her for antifoulfing we notice tiny riverlets of stained water ouzing from the line between the last clinker …

Recent Articles
-
Wooden Boat Events 2024
Apr 14, 24 05:15 AM
Wooden Boat Events 2024 calendar, traditional and classic boat festivals and regattas from around the world
You might like these
Plywood and Veneer Guide for Marine use.
A guide to plywood for boat building and why you should use the best marine grade you can afford.
DIY Woodboat Building Questions
Woodboat building questions a Forum for wooden boat building, plans, lumber, caulking compounds and other boat building problems.
Boat Books for Wooden Boat Builders
Boat Books a series of boat books based on some of the 1960's, classic, Free Boat Plans that were published in magazines such as "Popular Mechanics", "Popular Science" and the "Boat Builder Handbook".
Build a Boat, tips for the DIY Wooden Boat Builder.
How to Build a Boat, Wooden Boat Building methods for the DIY, backyard, self-builders explained, carvel, lapstrake and plywood
Clench Nails, Fastening for Small Wooden Boats.
How to use Clench Nails, these provide a fast reliable method for fastening small wooden boats.
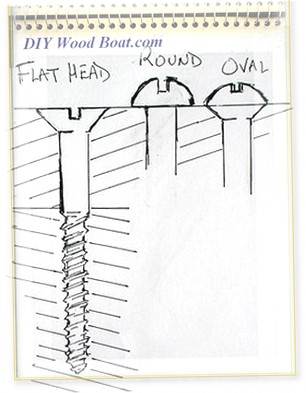
Wood Screws for Boat Building and Repair.
Wood Screws are the most widely used and versatile fasteners used on wooden boats. Which type to use and how to use them
Timber, Lumber for Boat Building.
A brief description of the most common Timber used for building Wooden Boats how to choose wood for your project boat
Timber Properties
A brief guide to timber properties and wood, characteristics such as strength, stiffness and elasticity for choosing lumber for wooden boat building and restoration.
Rivets and Copper Rove Wood Boat Fastenings.
How to use Copper Rivets and Roves construction guide to fasteners on your wooden boat.
Ring Nails for Marine Fastening.
Ring Nails sometimes call Gripfast or ring shank, silicon bronze boat nails are renowned for their holding power. but how to get them out?


Recent Articles
-
Wooden Boat Events 2024
Apr 14, 24 05:15 AM
Wooden Boat Events 2024 calendar, traditional and classic boat festivals and regattas from around the world -
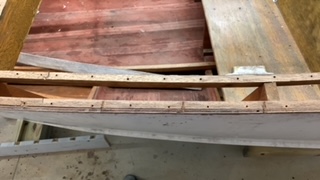
14’ 1956 Chris Craft, side rail how should it be attached?
Apr 12, 24 03:38 AM
 Removing the old side rail most of the screws went between the top deck/skin 1/4” plywood and the side of the hull. See photo, is this correct? I would
 -
How to laminate plywood on the hull
Apr 10, 24 03:46 AM
I'm working on replacing the bottom of 18' 1969 runabout that has a deep-V plywood hull. It had a 1/2 mahogany plywood bottom that they somehow got to
You might like these
Plywood and Veneer Guide for Marine use.
A guide to plywood for boat building and why you should use the best marine grade you can afford.
DIY Woodboat Building Questions
Woodboat building questions a Forum for wooden boat building, plans, lumber, caulking compounds and other boat building problems.
Boat Books for Wooden Boat Builders
Boat Books a series of boat books based on some of the 1960's, classic, Free Boat Plans that were published in magazines such as "Popular Mechanics", "Popular Science" and the "Boat Builder Handbook".
Build a Boat, tips for the DIY Wooden Boat Builder.
How to Build a Boat, Wooden Boat Building methods for the DIY, backyard, self-builders explained, carvel, lapstrake and plywood
Clench Nails, Fastening for Small Wooden Boats.
How to use Clench Nails, these provide a fast reliable method for fastening small wooden boats.
Wood Screws for Boat Building and Repair.
Wood Screws are the most widely used and versatile fasteners used on wooden boats. Which type to use and how to use them
Timber, Lumber for Boat Building.
A brief description of the most common Timber used for building Wooden Boats how to choose wood for your project boat
Timber Properties
A brief guide to timber properties and wood, characteristics such as strength, stiffness and elasticity for choosing lumber for wooden boat building and restoration.
Rivets and Copper Rove Wood Boat Fastenings.
How to use Copper Rivets and Roves construction guide to fasteners on your wooden boat.
Ring Nails for Marine Fastening.
Ring Nails sometimes call Gripfast or ring shank, silicon bronze boat nails are renowned for their holding power. but how to get them out?


This work is licensed under a Creative Commons Attribution-ShareAlike 2.0 UK: England & Wales License.
I am perfectly aware that the majority of Wooden Boat aficionados are sensible folk.
However, I need to point out that I am an amateur wooden boat enthusiast simply writing in order to try to help other amateur wooden boat enthusiasts.
And while I take every care to ensure that the information in DIY Wood Boat.com is correct, anyone acting on the information on this website does so at their own risk.