- Home
- Boat Building
- Restoration
- Planking
- Sealants
- Hull Fittings
- Bottom Replacement
Vintage Wood Boat Bottom Replacement
There
comes a time with every vintage wood boat when normal bottom
maintenance is no
longer sufficient to keep the water out.
Classic wooden runabouts can even be improved with the use of modern materials such as waterproof membrains, plywood and bedding compounds without detracting from their style or value.
Vintage wood boat Problems.
Many of the problems with vintage wood boat motorboats and runabouts
stem from planking a typical hard chine, concave bottom.
While this bottom profile is ideal for fast motoring, it isn’t
the ideal shape for wooden planks.
Fast motoring also means that the most concave area takes most of the
pounding.
As a result fasteners
become
loosened, broken, or bent, planks crack along the fastener lines,
frames
can crack
and chines get pushed out.
And that is as well as the rot which comes from water settling the
bilges and the transom area.
Then there are those boats where the layer of canvas between the inner
and outer planking is beginning to rot.
Wood is a wonderful material and there is nothing to compare with a
vintage wooed boat.
However, wood is always moving as it expands and contracts with the
changes in temperature and moisture levels.
Traditional boat building methods allowed for this movement as well as
hull flexing.
Unfortunately, many of these boats have been damaged by repairs.
In some cases over caulking has put too much strain on the fastenings and frames, and all too often hard inflexible epoxy products have been used.
affiliate linksPlanked Repair.
There comes a time when ‘fixes’ will no longer be sufficient to restore your vintage wood boat and make her water tight.
And the ‘fixes can sometimes result in even worse problems.
This is when that leaky vintage wood boat bottom will have to be replaced.
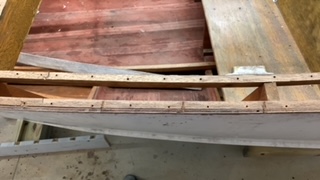
So bite the bullet and remove the old bottom.
You will now be able to see and repair any damaged frames or chines and tighten or replace the frame fastenings and don’t forget to give them a good sealing with paint.
Once that is done, before re-planking give her bottom a lining of either 4mm marine grade plywood or a flexible waterproof membrain.
Use a flexible bedding compound such as 3M 5200 and fasten to the frames with either small silicon bronze gripfast nails or stainless staples.
Now the planking can be replaced with a good layer of flexible bedding compound between it and the plywood. or the membrain.
If you have been able to save most of the original planking you may need to plane it down to compensate for the thickness of the plywood.
But even if you are planing to replace all the planking keep the old ones to use as templates.
Bed each plank as you fit it and use silicon bronze fasteners.
Excess bedding can be allowed to ooze up between the planks then scraped off and smoothed.
If you replace the inner planking with plywood it should be painted before fitting and it can also be scored so that it looks like the original planking.
This process effectively produces a double planked bottom with the added advantage of the unidirectional strength of the plywood.
Don’t forget to check and if necessary to repair or replace the lower chine and lower transom planks.
affiliate linksCold moulded Bottom.
An alternative to the planked bottom would be to replace it completely with a cold molded plywood one.
Purists might argue that this is perhaps too far from the original vintage wood boat.
However, it will give her an incredibly strong, seamless bottom.
This process is similar to that above, except that instead of finishing off with a layer of solid timber planks several layers of plywood are laminated together using that flexible bedding compound and fastened to the frames using silicon bronze fasteners.
Use three to five layers of 4mm marine plywood depending on the thickness of the original bottom.
As with the previous method all the structural elements should be inspected and repaired before replacing the bottom with new silicon bronze fasteners.
affiliate linksFinishing.
It should go without saying that while you have her stripped down all those other underwater components such as rudder assemblies, propeller shafts etc should be checked and re-seated.
Once the bedding compound has properly cured the bottom can then be sealed, primed, and painted.
This is not an easy fix, it is a major undertaking which will require a lot of hard, messy, time consuming work.
However, once done your vintage wood boat will have a bottom that will not leak for a long time to come.
And it will have the added benefit that she will not have to ‘take up’ every time you launch her.
NATIVE ASYNC

Previous posts
See What Others Have Posted
Replacing the bottom of the Trojan cruiser; by Dave S
I replaced a rotten bottom on my 32' double plank cruiser 22 years ago.
The job took me 5 months.
If you plan on such a job like this you only …

1960 Trojan Cabin Cruiser in need of a new Bottom.
I have a 1960 Trojan Cabin Cruiser due to rot I have to replace the bottom!
I was thinking about doing the whole thing with the marine plywood as I …

Recent Articles
-
Wooden Boat Events 2024
Apr 14, 24 05:15 AM
Wooden Boat Events 2024 calendar, traditional and classic boat festivals and regattas from around the world
You might like these
Woodboat Restoration questions forum
Woodboat restoration questions Forum, get advice about your Wooden Boat problems in a free, no frills, no need to sign up forum
Epoxy Resin for DIY Wooden Boat Building.
A guide to the epoxy resins and sustainable enrtopy resins to use when building wooden boats with marine plywood.
Wood Rot Repair and Treatment
Wood rot in wooden boats, how to treat, repair and replace rotten timbers in a wooden boat
Surveying a wood boat
The problem areas to look out for when surveying an old wooden boat.
Initial Boat Survey Checklist
The initial survey questions to ask when looking at a Wooden Boat with a view to restoring or renovating
Stem and Stern Post Rebuilding
Repairs to the Stem of a wooden boat can be undertaken by the amateur with a little care and attention.
Repair Plywood Boats.
How to repair plywood rot or delamination with marine ply, especially on the hull of a small boat.
Planking a Carvel Boat
How to replace damaged or unsound carvel Planking, a guide for any reasonably competent amateur.


Recent Articles
-
Wooden Boat Events 2024
Apr 14, 24 05:15 AM
Wooden Boat Events 2024 calendar, traditional and classic boat festivals and regattas from around the world -
14’ 1956 Chris Craft, side rail how should it be attached?
Apr 12, 24 03:38 AM
 Removing the old side rail most of the screws went between the top deck/skin 1/4” plywood and the side of the hull. See photo, is this correct? I would
 -
How to laminate plywood on the hull
Apr 10, 24 03:46 AM
I'm working on replacing the bottom of 18' 1969 runabout that has a deep-V plywood hull. It had a 1/2 mahogany plywood bottom that they somehow got to


This work is licensed under a Creative Commons Attribution-ShareAlike 2.0 UK: England & Wales License.
I am perfectly aware that the majority of Wooden Boat aficionados are sensible folk.
However, I need to point out that I am an amateur wooden boat enthusiast simply writing in order to try to help other amateur wooden boat enthusiasts.
And while I take every care to ensure that the information in DIY Wood Boat.com is correct, anyone acting on the information on this website does so at their own risk.