- Home
- Restoration
- Buying a Boat
- Initial Survey
- Surveying
Wooden Boat Surveying
When surveying a wooden boat be aware that a wooden hull is a complex structure.
Weakness in one area will have an effect on others.
When you are checking specific areas try to keep the overall picture in
mind.
Start by standing back, look at her from directly in front or astern,
make sure
she is symmetrical around the centreline.
Look from abeam to see that she doesn’t droop at the ends.
Every boat is different, so it’s impossible to give a definitive method
for checking.
Let’s start by considering the materials.
Then have a look at some specific component parts.
Wood
Before a tree is cut down it naturally
conducts water soluble nutrients
up along the grain.
Normally the wood does not readily absorb moisture across the
grain.
Once chopped down and cut into planks it looses much of this
ability.
So it will only absorb moisture for a short distance along from the
end, until rot sets
in and then the moisture will advance further
causing more rot, ad-infinitum.
Rot
is generally
caused by fungicidal
micro-organisms which need moisture to survive.
However
where the timber has suffered from ‘wind
shakes’ minute
splits in the fibers will make the wood more porous across the
grain.
As a result a plank can for no apparent reason rot from the
middle.
The wood of a boat is constantly being soaking in water, some areas
being alternately soaked and dried.
It is also being subjected to damage from micro-organisms, shipworms,
ants, termites as well as the normal stresses imposed on the
hull.
On top of that, all sorts of chemicals are allowed on to it, such as
spilled battery acid, diesel, detergents, and the like.
Yet despite all this there are still many old boats still afloat after many, many years.
I wonder how many plastics boats will survive for as long.
Fasteners
While most of a wooden boat is made up of timber, it is all held together with metal fasteners.
And metals are unfortunately all subject to corrosion.
Now, contrary to popular belief galvanism is rarely, really a problem with wooden boats.
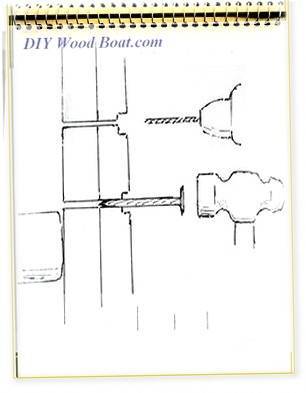
The primary cause of most corrosion to hull fasteners is oxygen starvation, sometimes known as crevice corrosion.
This is caused by water being trapped in a small, confined space where there is little oxygen.
It occurs mostly, where metal fasteners join two pieces of wood together.
This wastage or necking as it’s sometimes called, usually begins at the center of the fastener at the interface between the two pieces of wood.
This is where water will be drawn into the seam by capillary action.
Once the fastener has been wetted a few times, it begins to oxidize.
Once the oxidization process starts the capillary effect attracts more moisture accelerating the effect.
At the same time because of the lack of oxygen in the cavity a chemical reaction turns the water acidic, which naturally makes things much worse.
It is this acid corrosion which shows up as pink and black on bronze fasteners and as a very black coating on iron and steel.
The only thorough way to check fasteners for integrity when surveying is to draw them out and inspect them.
Now this might be reasonably simple to do with screws, but where a boat has been nailed or riveted it becomes almost impossible without causing damage to the planks and frames.
The safest bet is to be cautious, regardless of the age of the boat or the fastening material.
However be doubly suspicious of any form of steel fastenings.
And when in doubt be prepared to replace them.
affiliate linksKeel
Wherever you start your inspection the main areas to check are the major structural members.
And you can tell almost as much from surveying inside as you can from the outside.
Check the keelson, the floors, clamps stringers for any signs of working, such as uneven scarph joints or any rubbing or chaffing that might indicate movement.
Use your screwdriver to probe the keelson for any signs of softness.
Check visible bolts and bolt heads for any signs of corrosion or discoloration around the heads.
If the wood around the bolt heads is soft this will probably be a sign that water is getting at them causing serious corrosion.
If your boat has an external ballast keel and if there is any doubt about the Keel Bolts they must be drawn and checked thoroughly.
Check the transverse frames and floors for signs of rubbing or chaffing or softness.
Look at the mast base of a keel stepped mast for movement and softness.
Surveying Frames

While you are still surveying inside with that screwdriver in you hands, gently pry under any frames especially where they are through bolted to the floors.
Any gap between planks and frames or movement is a sign of fastener problems.
Test the wood for softness in the planks and frames near their mating surfaces, especially near the keel and along the garboards.
If the frame is cracked, the ends split or the wood is soft, they will need to be replaced or at the least ‘sistered’.
Have a special look at the frame in behind the bilge stringers for any cracks.
Surveying Planks
As well as checking planks visibly, tap then with the handle of your screwdriver or a wooden mallet, listen for any dull sounds.
Sound planks should ring, a dull thud most likely means rot or at best loose fasteners.
If you still haven’t bought this boat be careful not to cause any damage even if the plank is rotten, the owner may not be amused.
Look for discoloration around the heads of any fasteners, water stains and evidence of corrosion such as rust or green copper oxides.
On the inside, the accumulations of dried salts will also be evidence of weeping.
The two most common areas for sprung planks to occur are in the garboard and the forefoot areas.
Pay special attention to plank ends, especially butt and nib ends and the fasteners there.
‘Angle hair’ or shredded wood fibers, is caused by constant wetting with sea water and then drying. Salt crystals accumulating in the wood damage the wood cells.
However, if the damage is only on the surface this can easily be cleaned off.
Check seams for damaged caulking.
It is not uncommon for seams to show signs of cracking when a boat has dried out.
Providing the caulking compound has not become hard and brittle these should close up again when the boat is launched and the wood takes up.
Where the compound has become brittle it will be worth your while doing a complete re-caulk.
Chine Areas
Chines are areas of high stress, which are prone to leakage. Any leakage will endanger the fasteners.
Where the transom intersects with the bottom and side planking is another area where leakage and deterioration are likely to occur.
Check for any open seams and signs of rot on the corners.
When surveying, pay particular
attention to any seams
that could allow rain water in, as fresh water can be disastrous for
wood.
Bulkheads
Bulkheads are structural elements, they are not simply there to separate areas of accommodation.
Any loose, rotting or other wise damaged bulkheads must be replaced.
Surveying Decks

Walk around on deck, feel for soft or springy areas.
Pay particular attention when surveying, to the areas around fittings such as stanchions, any looseness will have allowed water to penetrate.
Look inside for signs of leaks on the deck head and under the side decks.
Tapping with that screwdriver or mallet will sow up any bad spots, you will hear the difference.
A properly laid planked deck relies on caulked seams, any leaks here may result in water penetrating the substrate and the deck beams.
Check below for any signs of weeping and rot.
Where a deck has been covered, be it painted cloth or plywood panels, pay particular attention to the edges.
Many so called teak deck are veneered panels of plywood, look out for delamination as well as seepage under the panels.
If she has a keel stepped mast, examine where it goes through the deck (the partners).
Check that the mast boot is sealing properly.
affiliate linksSurveying Sea-cocks

Through Hull Fittings and sea cocks, being metal are subject to the usual water stains and corrosion such as rust or green copper oxides, accumulations of dried salts and the like.
If they have ceased up then they need to be replaced or removed completely.
The fasteners holding the sea cocks and the sealant between the metal and wood must be checked and preferably re-seated.
And while we are on the subject of metal bits check the pintles, gudgeons and other bits associated with the rudder.
Any worn bushings will feel loose, there should be no play at all in either a wheel or a tiller.
NATIVE ASYNC


Recent Articles
-
Wooden Boat Events 2024
Apr 14, 24 05:15 AM
Wooden Boat Events 2024 calendar, traditional and classic boat festivals and regattas from around the world
You might like these
Woodboat Restoration questions forum
Woodboat restoration questions Forum, get advice about your Wooden Boat problems in a free, no frills, no need to sign up forum
Epoxy Resin for DIY Wooden Boat Building.
A guide to the epoxy resins and sustainable enrtopy resins to use when building wooden boats with marine plywood.
Wood Rot Repair and Treatment
Wood rot in wooden boats, how to treat, repair and replace rotten timbers in a wooden boat
Vintage wood Boat Bottom Replacement
The ultimate bottom repair for a vintage wood boat, when re-caulking the planking on your classic antique boat
Initial Boat Survey Checklist
The initial survey questions to ask when looking at a Wooden Boat with a view to restoring or renovating
Stem and Stern Post Rebuilding
Repairs to the Stem of a wooden boat can be undertaken by the amateur with a little care and attention.
Repair Plywood Boats.
How to repair plywood rot or delamination with marine ply, especially on the hull of a small boat.
Planking a Carvel Boat
How to replace damaged or unsound carvel Planking, a guide for any reasonably competent amateur.
Wedge Seam Construction
Wedge Seam Construction method for wooden boat building and glued wedging or ‘splining’ as a restoration technique for restoring old carvel planking seams.
Applying Glass Cloth to Wood Boats.
Some advice on applying glass cloth to wooden boats
Iron Keel Rust Removal
Keel rust, how to remove rust from an iron keel and treat it prior to repainting your wooden boat restoration project.
Wooden Bung Removal
Wooden Plug or Bung Removal, how to clear the plugs covering the fastenings when restoring or repairing a wooden boat


Recent Articles
-
Wooden Boat Events 2024
Apr 14, 24 05:15 AM
Wooden Boat Events 2024 calendar, traditional and classic boat festivals and regattas from around the world -
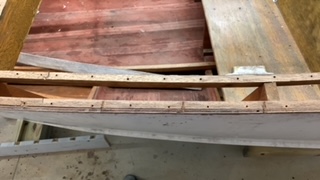
14’ 1956 Chris Craft, side rail how should it be attached?
Apr 12, 24 03:38 AM
 Removing the old side rail most of the screws went between the top deck/skin 1/4” plywood and the side of the hull. See photo, is this correct? I would
 -
How to laminate plywood on the hull
Apr 10, 24 03:46 AM
I'm working on replacing the bottom of 18' 1969 runabout that has a deep-V plywood hull. It had a 1/2 mahogany plywood bottom that they somehow got to
You might like these
Plywood and Veneer Guide for Marine use.
A guide to plywood for boat building and why you should use the best marine grade you can afford.
DIY Woodboat Building Questions
Woodboat building questions a Forum for wooden boat building, plans, lumber, caulking compounds and other boat building problems.
Boat Books for Wooden Boat Builders
Boat Books a series of boat books based on some of the 1960's, classic, Free Boat Plans that were published in magazines such as "Popular Mechanics", "Popular Science" and the "Boat Builder Handbook".
Build a Boat, tips for the DIY Wooden Boat Builder.
How to Build a Boat, Wooden Boat Building methods for the DIY, backyard, self-builders explained, carvel, lapstrake and plywood
Clench Nails, Fastening for Small Wooden Boats.
How to use Clench Nails, these provide a fast reliable method for fastening small wooden boats.
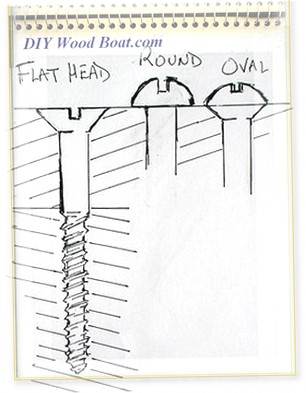
Wood Screws for Boat Building and Repair.
Wood Screws are the most widely used and versatile fasteners used on wooden boats. Which type to use and how to use them
Timber, Lumber for Boat Building.
A brief description of the most common Timber used for building Wooden Boats how to choose wood for your project boat
Timber Properties
A brief guide to timber properties and wood, characteristics such as strength, stiffness and elasticity for choosing lumber for wooden boat building and restoration.
Rivets and Copper Rove Wood Boat Fastenings.
How to use Copper Rivets and Roves construction guide to fasteners on your wooden boat.
Ring Nails for Marine Fastening.
Ring Nails sometimes call Gripfast or ring shank, silicon bronze boat nails are renowned for their holding power. but how to get them out?


This work is licensed under a Creative Commons Attribution-ShareAlike 2.0 UK: England & Wales License.
I am perfectly aware that the majority of Wooden Boat aficionados are sensible folk.
However, I need to point out that I am an amateur wooden boat enthusiast simply writing in order to try to help other amateur wooden boat enthusiasts.
And while I take every care to ensure that the information in DIY Wood Boat.com is correct, anyone acting on the information on this website does so at their own risk.