- Home
- Boat Building
- Restoration
- Planking
- Bungs
- Bung Removal
- Frames
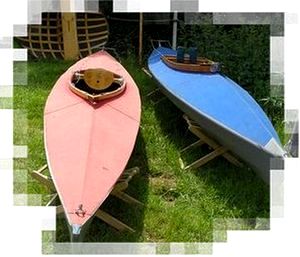
- Strip Planking
Strip
Planking Wooden Boats
The Strip
Planking method of boat building
could be described as a form of carvel
planking.
However, using strips is a form of construction which is much more suitable for the back yard builder.
Using this method a beautifully round bilged boat can be built with
less skill
and tools than with carvel.
It requires a minimum of lofting, tapering of planks, and caulking.
The Strips.

When strip planking first began to be used the strips were plane cut either square or oblong in cross section.
Nowadays most home builders use the more convenient molded strips.
The most common timber used is Cedar.
However any straight grained wood can be used although it is best if it is knot free.
Soft woods are preferable to hardwoods as they expand less and can absorb more compression.
Plane square edged strips will be the simplest to cut or cheapest if buying ready cut.
However, without any beveling this will leave open ‘grooves’ between the outer edges, especially where there are tight corners.
These ‘grooves’ can be filled with epoxy, but this will add weight to the finished boat and it doesn’t look good.
This can be overcome by planning the edges.
Beveling the edges does require a deal of skill, especially as the bevels will have to vary as the curvature of the boat alters. This may be easier to do with a sander.
With the cove and bead strips this problem is to an extent overcome.
The cove will
accept the bead even on tight curves ensuring a tight fit.
And the process will be speeded up by the ease of locating and the need
for
fewer staples.
However the molding will have to be paid for, in cash if you buy ready
cut or
in time if you make your own.
And the outer edges of the strips on those tight corners will need
quite a lot
of faring to get then smooth.
Rapid
Strip is
another molded form of strip plank which is becoming popular.
It is so called because the tongue and groove molding allows for fast
building.
Or at least it will be fast if you are prepared to fill the grooves on the tight corners with epoxy.
Length of Strips.
Using full length strips might result in a stronger construction.
However, building with shorter strips will be easier.
The ends of the strips will require some tapering and a precision fit.
It will be easier to shape the end strips separately then fit a piece in between.
Joints can be simple butts so long as the joints of successive strips are staggered.
affiliate linksThe Molds.
Unlike traditional boat building methods strip planking is done upside down on a jig.
The jig is created by erecting molds on a strong back.
The molds cut in the shape of the various sections are usually of some cheap material such as chipboard.
The forms are temporary structures so their edges should be covered in polythene to prevent the strips adhering to them.
However, internal permanent bulkheads may be erected in place of temporary molds.
These are set up on the strong back, as are the internal keel or hog and the stem and transom.
Strip Planking.
It is normal to begin the planking from the sheer and work upwards.
However, strip planking can be started from the keel depending on the particular design.
Planking which runs parallel to the sheer will look better if the boat is to be finished with the wood showing.
And even when painted the planking run off might become visible with age.
While starting at the sheer the initial planks will be easy to fit bit the bottom planks will need a lot more tapering to fit.
Fortunately the use of epoxy will help reduce the need for an exact fit.

73 page, step by step instructions for building the Redwood Canoe using modern strip planking techniques and materials
Everything you need to know from building to launching, yours to download (pdf) for
only $10

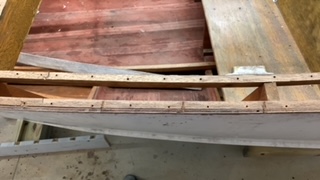
Nailing.
If you are using epoxy glue when strip planking then nailing is not necessary.
However, nailing will help to help to hold the planks in place and reduce the amount of clamping needed.
Normally nailing will be done vertically through the strips.
Thin gauge nails are countersunk and driven across three strips.
Nails should be staggered across each three strip course by about six inches.
Nailing in this way reinforces the gross grain strength and stiffness.
Beware of nails running-off as they could penetrate the surface and cause a problem when it comes to finishing.
Starting the nails with a pilot hole will help prevent run-off.
Gluing is not necessary with a nailed strip construction however some protection against water ingress is needed.
Gluing.
Whether or not you use glue between the planks will depend on the design, the type of wood and the skill of the builder.
The most hyped method of gluing is with epoxy.
However it must be remembered that epoxy is hard, unyielding and expensive.
Using a more flexible compound will allow for swelling and movement.
With so much gluing to be done, glue drip can cause problems when it comes to fairing.
This can be minimised by using a thick glue which sets quickly.
Any surfaces such as permanent bulkheads need to be protected from glue drip.
affiliate linksFinish.
Having completed the planking the business of faring will smooth out any ridges.
With woods such as Cedar you will have to be careful as it is easy to fair away too much.
Because Cedar is relatively soft it will need sheathing, other woods may not.
Sheathing with woven glass cloth and epoxy will allow the natural wood to show through.
Once the shell is finished the outer components such as the skeg and the wooden keel can be added.
affiliate linksConclusion.
There are many advantages for the backyard builder with this method of building.
However, strip planking is a relatively slow method of building despite the reduction in framing needed.
Where a hull is sheathed with glass and epoxy inside and out it effectively becomes a core construction.
Core constructions are by nature strong.
However wood is not the ideal core material as it is porous, unstable and subject to rot.
Any breaks in the protective sheathing can lead to devastating results which are difficult to rectify.
But a well built varnished strip planked hull will look wonderful.
NATIVE ASYNC

Previous posts
See What Others Have Posted
storing cedar strip boat?
I just received cedar strip row boat and it needs some refinishing.
I don't have time to do it until next year and I would like to know the best way …
A new boat builder
I'm building a strip built canoe and I'm to the point of filling staple holes and the small imperfections.
Please explain the options for making and …

Recent Articles
-
Wooden Boat Events 2024
Apr 14, 24 05:15 AM
Wooden Boat Events 2024 calendar, traditional and classic boat festivals and regattas from around the world
You might like these
Plywood and Veneer Guide for Marine use.
A guide to plywood for boat building and why you should use the best marine grade you can afford.
DIY Woodboat Building Questions
Woodboat building questions a Forum for wooden boat building, plans, lumber, caulking compounds and other boat building problems.
Boat Books for Wooden Boat Builders
Boat Books a series of boat books based on some of the 1960's, classic, Free Boat Plans that were published in magazines such as "Popular Mechanics", "Popular Science" and the "Boat Builder Handbook".
Build a Boat, tips for the DIY Wooden Boat Builder.
How to Build a Boat, Wooden Boat Building methods for the DIY, backyard, self-builders explained, carvel, lapstrake and plywood
Clench Nails, Fastening for Small Wooden Boats.
How to use Clench Nails, these provide a fast reliable method for fastening small wooden boats.
Wood Screws for Boat Building and Repair.
Wood Screws are the most widely used and versatile fasteners used on wooden boats. Which type to use and how to use them
Timber, Lumber for Boat Building.
A brief description of the most common Timber used for building Wooden Boats how to choose wood for your project boat
Timber Properties
A brief guide to timber properties and wood, characteristics such as strength, stiffness and elasticity for choosing lumber for wooden boat building and restoration.
Rivets and Copper Rove Wood Boat Fastenings.
How to use Copper Rivets and Roves construction guide to fasteners on your wooden boat.
Ring Nails for Marine Fastening.
Ring Nails sometimes call Gripfast or ring shank, silicon bronze boat nails are renowned for their holding power. but how to get them out?


Recent Articles
-
Wooden Boat Events 2024
Apr 14, 24 05:15 AM
Wooden Boat Events 2024 calendar, traditional and classic boat festivals and regattas from around the world -
14’ 1956 Chris Craft, side rail how should it be attached?
Apr 12, 24 03:38 AM
 Removing the old side rail most of the screws went between the top deck/skin 1/4” plywood and the side of the hull. See photo, is this correct? I would
 -
How to laminate plywood on the hull
Apr 10, 24 03:46 AM
I'm working on replacing the bottom of 18' 1969 runabout that has a deep-V plywood hull. It had a 1/2 mahogany plywood bottom that they somehow got to
You might like these
Free Motorboat Plans
Free Motorboat Plans for the backyard home builder, build your own speed boat, cabin cruiser, runabout or utility boat using these simple plywood designs.
Wooden Boat Kits.
Wooden boat building is easy and inexpensive with wooden boat kits. From row boats and kayaks to sailing cruisers, boat to be proud of
Supplies for Wooden Boat building and Maintenance
Supplies for Wooden Boat Building and restoration, how to choose the materials and marine chandlery for your project.
DIY Woodboat Questions
Woodboat questions and answers forum for all Wooden Boat owners, advice and opinions on all aspects of wooden boat building, restoration and maintenance.
Small Boats, Made of Wood
What Everybody ought to know about building Small Boats, guidance and tips for self-building or restoring.
Sailboat Plans
Free Sailboat Plans for the backyard home builder, build your own wooden sailboat using these simple plywood designs.
Rowing Boat Plans
Free Rowing Boat Plans for the backyard home builder, build your own rowing boat, dory, folding dinghy or pram using these simple plywood designs.


This work is licensed under a Creative Commons Attribution-ShareAlike 2.0 UK: England & Wales License.
I am perfectly aware that the majority of Wooden Boat aficionados are sensible folk.
However, I need to point out that I am an amateur wooden boat enthusiast simply writing in order to try to help other amateur wooden boat enthusiasts.
And while I take every care to ensure that the information in DIY Wood Boat.com is correct, anyone acting on the information on this website does so at their own risk.