- Home
- Boat Building
- Restoration
- Stem
Stem Repair.
The Stem of a wooden Boat must be regarded as being part of her backbone.
It is often one of the first areas to need repair as it is vulnerable to rot and damage from collisions and groundings.
However, many of the necessary repairs are well within the scope of the enthusiastic amateur.
The Damage
There are several different methods of building a stem.
They can be made in one piece, either sawn from a crook or steam bent.
Others are built up, either by laminating or the traditional method of bolting several pieces together.
All of them are susceptible to end-grain rot.
Rot at the top, where it pokes up above the deck is relatively minor and simple to repair.
Rot at the bottom end is more serious.
The fore peak is an area where ventilation is poor at the best of times and is often made worse by being enclosed with lockers, such as the chain locker.
Fastening
corrosion can affect all forms, especially where the stem meets the throat.
The type of stem which is built from bolted sections is particularly
vulnerable
to fastening corrosion which, can lead to the seams opening.
On older boats iron bolts have been used, these may have worked rather
well
during their lifetime unfortunately, their life time is fairly
short.
Initially as the joint ‘works’ and increases in size, water
penetrates along the bolts causing them to rust, the rust expands
filling the
hole until it widens some more, then more expanding rust refills the
hole,
until there isn’t enough sound metal left.
This type of construction can also suffer from opening joints as a result of the wood being allowed to shrink too often when it dries out.
affiliate linksMignonne’s Repair.

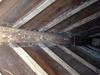
One of the major problems I had to resolve when I began work on Mignonne was the damage to her stem.
The damage had probably been compounded by the amount of time she had been out of the water allowing the wood to shrink.
Fresh rainwater had rotted the top end as well as accelerating the corrosion of the original iron bolts holding the knee.
The pressure from the expanding rust on the bolts had split the dry wood of the knee and had begun to split the ends of the stem pieces.
Before I attempted to do anything with the stem I had replaced all the frames which were damaged so the planks would be properly supported.
I had also raked out what remained of the old caulking.
I could then start to look at the damage.
The knee had split along its length, so it was easy to finish off the split with a chisel and remove the two halves.
What remained of the exposed bolts was chopped off and the ends driven out of the stem with a drift.
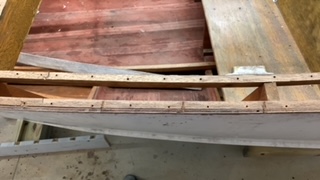
The next job was to open the hood ends (plank ends).
The planks had been fastened with copper nails, to release these I carefully drilled off the heads.
Then using wedges and shores I carefully pried the hood ends apart in the area of the damage, taking care not to damage the planks.
Fortunately none of the frames had been boxed in and the planking held its shape well enough not to need any support.
Before I removed any of the stem I took a rough pattern from the original.
The next job was to cut away the wood close to split so I could see the extent of damage, then I cut away some more until I reached sound wood.
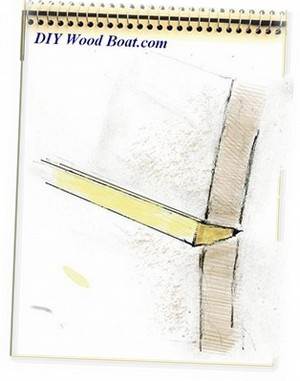
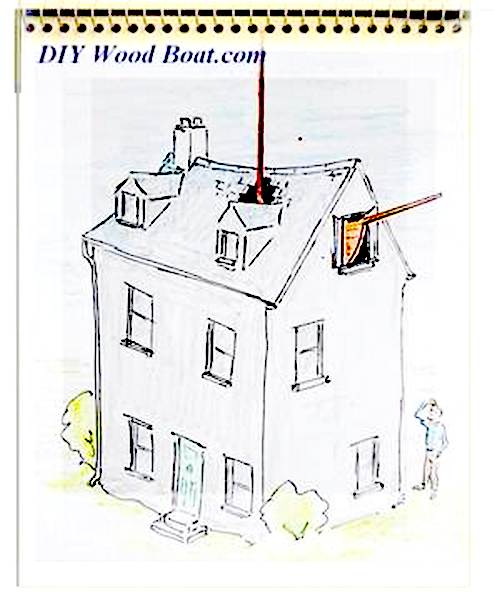
Then, when I discovered that the splits were not too long I scarfed the ends. This was rather difficult to do with the saw, due to the limited access so, some of it had to be done by chisel.
Stem Replacement.

Having cut out the damage I now took another template of the gap and scarfs using stiff card.
Then having planned the replacement timber to the width of the original I used the two templates to mark out the new shape.
This I cut out over sized.
Any subsequent adjustments to size and shape were going to have to be made to the new piece due to the lack of space between the hood ends.
From there on it was a case of holding the new piece to the gap marking trimming and trying again until the scarfs fitted.
Once I was happy with the new piece I propped it in place and took a template of the inside surface to cut the replacement knee from.
The knee was made from the same width timber as the stem piece.
When I was satisfied with the fit, both pieces were propped and wedged in place and the holes for the through bolts drilled.
Bolted together with the new silicon bronze bolts and having checked and fared all the joints I then released the hood ends and marked the rabbet line, making sure that it coincided with the existing rabbet.
With the new piece out again, I fared the line with a bendy batten.
Then, I chiseled out the rabbet, constantly checking that the angles were correct to take the plank ends.
Either end of the rabbet was left rough for final faring to the old when bolted in place.
When I was eventually happy with the fit I cut the outer shape using the original template.
The final faring was done when it was all bolted in place.
Due to the lack of space the stopwaters were drilled outside the rabbet line.
Finally, everything was soaked in creosote, the scarfs and stopwaters were bedded with a bedding compound and the whole bolted together.
The hood ends were screwed back in place using screws one size larger than original nail holes.
I also replaced all the other hood end fastenings with screws.
The final caulking was left until I had replaced the damaged planks when I re-caulked the whole hull.
affiliate linksMinor damage.

The rot in the top of Mignonne's stem fortunately did not extend below any fastenings so it was a simple job to cut back to sound wood and scarf it.
Fortunately I had a piece of timber left over from the lower repair which was quickly planed to size the scarfed to fit.

The next problem was how to shape the top.
Having enough timber to play with I carved the top in the shape of a seahorse figurehead.

Other minor repairs such as dents and chips can be repaired by graving in replacement pieces, sometimes referred to as 'Dutchmen'.
Minor leaks can be stopped by replacing or fitting new stopwaters ..
And re-caulking or even caulking along the joints might be sufficient to stop leaks in the short term.
All of these repairs are well within the scope of the enthusiastic amateur.
affiliate links
NATIVE ASYNC

Previous posts
See What Others Have Posted
Replacing Stem Post - 43' Plywood Boat
I have a 43' ply over timber Tripconny Bay Cruiser which we have fibreglassed over, only to find the lower part of Stem Post is rotten and we have had …
Stem replacment
Thank you for your instruction on the removal of the above
My boat is an old style Irish wooden boat built circa 1925,
Somewhere in the past a …
1928 WOOD DOUBLE ENDER STEM
I have some rot in my stem on a classic double ender I acquired.
Rather than letting it meet it's demise I would like to fix it.

Recent Articles
-
Wooden Boat Events 2024
Apr 14, 24 05:15 AM
Wooden Boat Events 2024 calendar, traditional and classic boat festivals and regattas from around the world
You might like these
Woodboat Restoration questions forum
Woodboat restoration questions Forum, get advice about your Wooden Boat problems in a free, no frills, no need to sign up forum
Epoxy Resin for DIY Wooden Boat Building.
A guide to the epoxy resins and sustainable enrtopy resins to use when building wooden boats with marine plywood.
Wood Rot Repair and Treatment
Wood rot in wooden boats, how to treat, repair and replace rotten timbers in a wooden boat
Vintage wood Boat Bottom Replacement
The ultimate bottom repair for a vintage wood boat, when re-caulking the planking on your classic antique boat
Surveying a wood boat
The problem areas to look out for when surveying an old wooden boat.
Initial Boat Survey Checklist
The initial survey questions to ask when looking at a Wooden Boat with a view to restoring or renovating
Repair Plywood Boats.
How to repair plywood rot or delamination with marine ply, especially on the hull of a small boat.
Planking a Carvel Boat
How to replace damaged or unsound carvel Planking, a guide for any reasonably competent amateur.
Wedge Seam Construction
Wedge Seam Construction method for wooden boat building and glued wedging or ‘splining’ as a restoration technique for restoring old carvel planking seams.
Applying Glass Cloth to Wood Boats.
Some advice on applying glass cloth to wooden boats


Recent Articles
-
Wooden Boat Events 2024
Apr 14, 24 05:15 AM
Wooden Boat Events 2024 calendar, traditional and classic boat festivals and regattas from around the world -
14’ 1956 Chris Craft, side rail how should it be attached?
Apr 12, 24 03:38 AM
 Removing the old side rail most of the screws went between the top deck/skin 1/4” plywood and the side of the hull. See photo, is this correct? I would
 -
How to laminate plywood on the hull
Apr 10, 24 03:46 AM
I'm working on replacing the bottom of 18' 1969 runabout that has a deep-V plywood hull. It had a 1/2 mahogany plywood bottom that they somehow got to
You might like these
Plywood and Veneer Guide for Marine use.
A guide to plywood for boat building and why you should use the best marine grade you can afford.
DIY Woodboat Building Questions
Woodboat building questions a Forum for wooden boat building, plans, lumber, caulking compounds and other boat building problems.
Boat Books for Wooden Boat Builders
Boat Books a series of boat books based on some of the 1960's, classic, Free Boat Plans that were published in magazines such as "Popular Mechanics", "Popular Science" and the "Boat Builder Handbook".
Build a Boat, tips for the DIY Wooden Boat Builder.
How to Build a Boat, Wooden Boat Building methods for the DIY, backyard, self-builders explained, carvel, lapstrake and plywood
Clench Nails, Fastening for Small Wooden Boats.
How to use Clench Nails, these provide a fast reliable method for fastening small wooden boats.


This work is licensed under a Creative Commons Attribution-ShareAlike 2.0 UK: England & Wales License.
I am perfectly aware that the majority of Wooden Boat aficionados are sensible folk.
However, I need to point out that I am an amateur wooden boat enthusiast simply writing in order to try to help other amateur wooden boat enthusiasts.
And while I take every care to ensure that the information in DIY Wood Boat.com is correct, anyone acting on the information on this website does so at their own risk.