Making Wooden Panels.
Wooden
Panels for bulkheads, chart tables and
transoms or rudders may
need to made using edge to edge
joints.
Admittedly plywood is a convenient material for making large sheets.
However, if it is to have a natural finish, varnished
or oiled plywood
will
never have the same look or feel as natural wood, nor
is it the best material for underwater situations.
These assemblies will normally be made up from narrow planks.
The first problem is to plane the edges both square and straight so they will butt together without gaps.
Planning square level planks can be made easier by clamping two or more
in the
vice and planning them back to back.
Another method is to use a ‘shooting board’.
While it is possible with care to butt joint the planks, a more stable
panel
should have some form of edge to edge joint.
Tongue and Groove is probably the most common edge to edge joint.
Panel Joints
 Alternating Direction of Grain
The tongues and grooves can be cut fairly simply with a Multi
Plane.
There are several other methods using dowels, biscuits, and splines.
And there are various jigs which can be bought to ensure alignment.
Long planks joined lengthwise like this have a tendency to warp and to open up at the ends of the joint.
To prevent the end of the joint opening as it dries, plane the plank slightly hollow so that the ends meet first when clamping.
To minimise warping, alternate the direction of the grain in alternate planks.
Clamping is best done with some form of Bar/Sash/Pipe Clamp.
Use a minimum of three clamps.
There are other methods for ‘clamping’, you can even use a ‘Spanish Windlass’.
However, having at least three straight edges two below and one above will help ensure that the assembly glues up level.
Shaping something such as a bulkhead that must fit closely into an odd shaped space will need a pattern.
There are some tricks that can be used to create a pattern that will take account of compound curves, bent frames, futtocks and all the other irregularities.
The Tick or Joggle Stick.
 Tick or Joggle Stick
This is without doubt the most accurate and practical method for making any odd shaped pattern.
The 'stick' can be any old scrap timber preferably a stiff piece the length will depend on the shape you want to trace, for a bulkhead perhaps about a third of the beam of the boat.
Cut a point at one end and a couple of notches along the length, these are to make it easy to relocate the concise position of the stick later.
Next you need a scrap piece of reasonably stiff plywood.
This needs to be large enough to be tacked or clamped firmly, vertically along side the proposed position of the new bulkhead, this will be you 'pattern board'.
The board also needs to have a clean surface so you can draw on it with a pencil, a coat of white undercoat will give a perfect surface.
Now that you have that set up, with the stick flat on the 'pattern board' place its point at a position on the hull that you want to record and then trace the outline of the stick onto the 'pattern board' with your pencil.
You will need to be able to put your stick on to the trace in exactly the same position and same side up later, this is where the notches come it as reference points.
Repeat this for as many points as will be needed to create a complete profile of the hull shape including frames chain-plates etc.
Now take the 'pattern board' out and lay it on the panel that you wish to cut out.
Clamp it firmly to the panel.
Now take the same tick/joggle stick and place it onto those penciled outlines on the pattern, then mark the position of the point onto the panel.
Do the same for all the positions you have marked then join the points up with a spieling baton and straight edge.
Cut it out and hope it fits but don't expect the other side of the hull to be a mirror image.
Better to slap some more white undercoat on your pattern and do another trace for the other side.
Drawing bow
 Drawing Bow
If you need to draw or work with a lot with curved parts a 'drawing bow' will allows you to lay out precise and large curves with only two hands.
This simple jig, a stick (spline) and a string, is easily made from a strip of wood that has straight grain through its thickness and width.
If the grain isn’t straight, you’ll get lumpy curves or the bow will break.
And a length of string, almost any string will do.
 Drawing Bow End
Drill a hole in one end of the drawing bow that is the same diameter as the string.
Thread the string through the hole and tie a knot in the string to secure it.
 Drawing Bow for drawing an asymmetric arc
At the other end of the bow, first drill the same-diameter hole as earlier.
Then cut a 'V' that extends down the length of the bow, use a coping saw.
Thread the string through the first hole and knot its end to keep it in place.
To use the bow, bend the stick to the desired curve, then pull the other end of the string into the “V”-notch to pinch the string and hold the shape.
It is possible to draw an asymmetric arc by evenly tapering the thickness of the strip of wood.
affiliate linksNATIVE ASYNC


Recent Articles
-
Wooden Boat Events 2024
Apr 14, 24 05:15 AM
Wooden Boat Events 2024 calendar, traditional and classic boat festivals and regattas from around the world
You might like these
Plywood and Veneer Guide for Marine use.
A guide to plywood for boat building and why you should use the best marine grade you can afford.
DIY Woodboat Building Questions
Woodboat building questions a Forum for wooden boat building, plans, lumber, caulking compounds and other boat building problems.
Boat Books for Wooden Boat Builders
Boat Books a series of boat books based on some of the 1960's, classic, Free Boat Plans that were published in magazines such as "Popular Mechanics", "Popular Science" and the "Boat Builder Handbook".
Build a Boat, tips for the DIY Wooden Boat Builder.
How to Build a Boat, Wooden Boat Building methods for the DIY, backyard, self-builders explained, carvel, lapstrake and plywood
Clench Nails, Fastening for Small Wooden Boats.
How to use Clench Nails, these provide a fast reliable method for fastening small wooden boats.
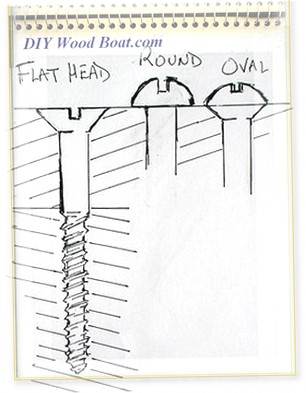
Wood Screws for Boat Building and Repair.
Wood Screws are the most widely used and versatile fasteners used on wooden boats. Which type to use and how to use them


Recent Articles
-
Wooden Boat Events 2024
Apr 14, 24 05:15 AM
Wooden Boat Events 2024 calendar, traditional and classic boat festivals and regattas from around the world -
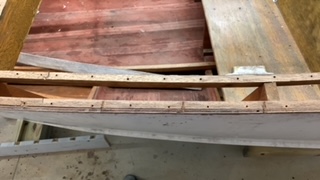
14’ 1956 Chris Craft, side rail how should it be attached?
Apr 12, 24 03:38 AM
 Removing the old side rail most of the screws went between the top deck/skin 1/4” plywood and the side of the hull. See photo, is this correct? I would
 -
How to laminate plywood on the hull
Apr 10, 24 03:46 AM
I'm working on replacing the bottom of 18' 1969 runabout that has a deep-V plywood hull. It had a 1/2 mahogany plywood bottom that they somehow got to
You might like these
Woodboat Restoration questions forum
Woodboat restoration questions Forum, get advice about your Wooden Boat problems in a free, no frills, no need to sign up forum
Epoxy Resin for DIY Wooden Boat Building.
A guide to the epoxy resins and sustainable enrtopy resins to use when building wooden boats with marine plywood.
Wood Rot Repair and Treatment
Wood rot in wooden boats, how to treat, repair and replace rotten timbers in a wooden boat
Vintage wood Boat Bottom Replacement
The ultimate bottom repair for a vintage wood boat, when re-caulking the planking on your classic antique boat
Surveying a wood boat
The problem areas to look out for when surveying an old wooden boat.
Initial Boat Survey Checklist
The initial survey questions to ask when looking at a Wooden Boat with a view to restoring or renovating


This work is licensed under a Creative Commons Attribution-ShareAlike 2.0 UK: England & Wales License.
I am perfectly aware that the majority of Wooden Boat aficionados are sensible folk.
However, I need to point out that I am an amateur wooden boat enthusiast simply writing in order to try to help other amateur wooden boat enthusiasts.
And while I take every care to ensure that the information in DIY Wood Boat.com is correct, anyone acting on the information on this website does so at their own risk.