- Home
- Boat Building
- Restoration
- Paint
Wooden Boat Paint
Practical advice on Painting wooden boats, what to look for and what to avoid.
Reasons for Painting.
There are two main reasons why we paint wooden boats.
If we were only interested
in giving the wood a protective coating we could simply do what the old
working
boats did.
Give her a good coating with
tar, pitch, goose grease or
whatever.
That would certainly preserve
her timbers but she would
look rather dull.
And let’s be honest, we all like our boats to look smart and shiny.
The problem is how to keep her looking smart and well protected from rot, pollution, and the rest.
The best solution would be to keep her locked up in a shed and not use her.
Even if we regard our boat as a work of art we also want to use her.
Any boat regardless of how experienced or careful we are will get scratched scuffed and be exposed to the elements.
So, we need to be realistic about what to expect from a painted finish.
Despite what it says on the tin, can you really expect her to look good indefinitely?
Or should you either get used to the idea of having a scruffy boat or plan to repaint regularly.
Which to use?
Choosing a paint used to be simple before the manufacturers and their advertising folk began complicating things with their hyperbole.
These days before you even start to read the tin you need to consider what your abilities and expectations are.
Where are you going to do the work, some finishes require a sheltered temperature controlled environment.
For most DIYers the simple applications are often the best.
Beware of too much clever complicated 'tec speak', it is sure to come with a high price tag.
Ok, so perhaps you do get what you pay for, just make sure that you are only paying for what you really want.
The most effective coatings for wooden boats are the conventional, oil-based type.
All those two part urethanes and the like are designed for use on metal or fiberglass that remains relatively stable, they are fine to use on glassed boats such as strip planked and cold moulded boats.
Urethanes are completely unsuitable for traditional wooden boats, they are too hard and brittle.
As the timber moves or ‘works’, as well as swells and contracts, that lovely finish will soon separate from the wood.
Single pack polyurethanes are probably OK for the topcoat.
They are cheaper and easier to use than two pack and there is plenty of choice.
However, whatever you use on wood must allow it to “breathe”, to absorb and emit moisture as conditions change.
In many types of traditional boat construction, allowing the wood to breathe is important.
Oil based marine enamels are the prime choice for wooden boats, at least that is my opinion.
However the word ‘marine’ does carry a price tag of its own regardless of the product quality.
There are some water based enamels which come with the Marine sobriquet.
These are relatively new products about which I have no personal knowledge, I’ll leave you to read the hype and make up your own mind.
Now I’m not an industrial chemist so I can’t tell if one product is better than another.
Besides, I have no problem with giving my boat a fresh coat of top gloss every so often.
So, I'm not particularly impressed with claims that a particular product will last for five ten twenty or whatever years.
For years now I have for used good quality ‘exterior’ house enamels.
They may be a bit softer than most polyurethanes and perhaps don’t have the same durability as a ‘marine’ enamel but they are certainly cheaper.
Varnish is the most commonly used clear coating for boat woodwork.
Marine grade varnishes all claim to have lots of expensive UV inhibiting chemistry.
One of the ingredients which differentiates marine varnish from non marine is Tung Oil.
Tung Oil is an extremely tough natural wood oil.
There are other wood oils on the market which will protect and enhance the look of natural wood, however, they won’t produce the glossy finish obtained with varnish.
I personally prefer the oiled finish to high gloss, and oil is much easier to apply and maintain.
affiliate linksPreparation.
The real key to producing a good finish is no secret, it’s the preparation.
Time and effort spent preparing the surface, prior to painting will have a greater effect on the finish than the quality of the top coat.
Once you have achieved a good finish the annual touch up is simply a case of giving her a good clean sanding over with 120 grit paper removing any lose bits before painting.
Any blistered or flaking patches will have to be scraped off, sanded down to bare wood, primed and fared off to the existing surface.
However, every so often it will be necessary to take her back to bare wood and start form scratch.
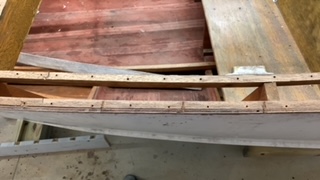
If you are renovating an old boat you really do need to cut her back to bare wood not only for the sake of the finish but also to be able to examine the state of the basic structure.
And if building from scratch, well you’re already there.
If repainting an old boat first job is to get all the old paint off.
Chemical strippers are messy dangerous and not all that effective.
Sanding will take for ever and there is a danger that when sanding stubborn patches of paint you will wear away too much of the surrounding wood.
When stripping Mignonne I used a gas blow torch and scraper, though an electric heat gun is probably the safer option.
This will also help dry the wood.
I feel that it is a sensible precaution to treat the wood with a fungi-bactericide.
However, any ‘preservative’ you use will eventually leach out, so if you are concerned about the paint not adhering don’t bother, well bonded paint will protect our wood just as well.
There are quite a number of branded bactericides available.
For my mind good old common creosote takes a lot of beating and it is the cheapest.
However, whatever ‘preservative’ you use it must be allowed to dry out completely before painting.
Paint applied over damp creosote will never dry.
I have heard of antifreeze being used.
I've also heard that it can cause all sorts of problems.
I wouldn’t recommend using it.
Filling and faring any blemishes, cracks or other imperfections should be filled with something like painter’s glazing compound.
It's best to use a filler that will dry hard but unlike epoxy can be removed later if necessary, particularly over the heads of fastenings.
Before you start priming dry and de-grease the wood and remove any dust.
If possible use a vacuum cleaner as well as brushing.
affiliate links affiliate linksPriming.
The purpose of this primer is to fill the grain of the wood.
The most recommended primer for wooden hulls is the gray metallic primer.
Apparently the microscopic flat aluminium plates suspended in the primer make it the most waterproof.
Most gray primers also contain fungi-bactericides.
But there are plenty of other oil based primers which are just as good.
However, Pink primer is much less waterproof.
And some of the so called hi build primers contain fillers which will absorb moisture and create a lot of dust when sanding.
You will need at least three coats of primer, sanding between coats until the grain is completely filled and the surface is satisfactorily smooth.
Take note of the instructions on the tin regarding over-coating times, the gray primer needs to be over coated within specified time limits or re-sanded.
affiliate linksUndercoats and Topcoats.
Under-coating is generally done to give the surface a colour similar to that of the top coat, thus maximising the coverage of the top coat.
It will also improve the adhesion of the top coat and improved the uniformity of the top coat.
There are three main methods of application.
- Spraying.
- Using a Roller.
- Brushing.
To do a proper spray job requires workshop complete with proper ventilation and a decent spray gun.
It can be done outside but you will need perfect weather and it can waste a lot.
Using a roller can quickly produce an excellent finish.
However, it does require two people working together, one to roller and the other following closely behind smoothing out any bubbles left behind by the roller and doing the edges.
Whether you are working alone or not brushing by hand can produce remarkable results.
I prefer to do it by hand as there is less paraphernalia to clean up afterward, I can cover the flat areas and get into the nooks and crannies all in one go.
And somehow it gives more of a tactile satisfaction.
If you are working out side wait for a still day when there is little dust in the air.
And when those insects land on the wet surface, which they inevitably will, don’t try to brush then off until the surface is dry.
The same goes for any runs or sags, wait until the they have fully dried then deal with them.
And don’t be tempted to apply too thick a coat.
It’s better to apply several thin coats, sanding between coats if left for more than 24 hours.
When painting the topsides continue the over the boot stripe area and into the anti-foul area.
Then apply the boot stripe over top, this will ensure that there are no gaps left.
I prefer not to use masking tape I don’t like the sharp sometimes ragged edge and the possibility of pulling any paint off with the tape and besides it is a time consuming task.
So I try to keep changes of color to natural changes in the surface direction such as the edge of the rubbing strip.
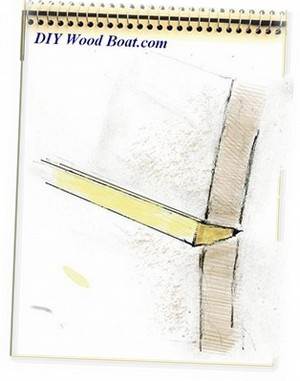
For the boot-top edges I have cut a shallow groove cut into the wood.
The brush bristles drop into the groove and quickly give a neat quick line.
To cut the line, lightly tack a thin baton along the boot top line as a guide, then use a bench or tenon saw to cut a shallow groove.
A bit of tape wrapped around the front corner of the saw will help stop it digging in.
If you do need to use masking I'm told that the bright colored electrical tape is better than traditional masking tape as it can be left on for longer.
Traditional masking tape will prove difficult to remove if left on for too long.
Before you start its handy to have a rough idea of how much paint to buy.
A very rough method which allows plenty over to compensate for wastage, is to multiply the boat length by her beam then divide by the coverage stated on the tin. Just make sure you’re using the same units of measurement.
Do you have any painting tips that you'd like to pass on?
NATIVE ASYNC

Previous posts
See What Others Have Posted
Paint Questions
After reading the Which pint to use I'm still not sure if high quality non-marine exterior paint for the waterline on our 13' yellow cedar skiff is …

Recent Articles
-
Wooden Boat Events 2024
Apr 14, 24 05:15 AM
Wooden Boat Events 2024 calendar, traditional and classic boat festivals and regattas from around the world
You might like these
DIY Woodboat Finish Questions
Woodboat Finish questions and answers to your Wooden Boat painting and varnishing problems in a free, no frills, no need to sign up Forum.
Painting Your Wooden Boat.
Painting a wood boat, advice on how to restore, repair and maintenance paint jobs on hulls and topsides to get a yacht finish.
How to remove wood stains
How to remove and clean wood stains from your wooden boat before re-varnishing using wood bleach such as oxalic acid
Non Slip Varnish, for Your Boat
A simple attractive method for making your own clear anti skid varnished areas, such as the cabin sole or hatch cover non slip.
Bottom Paint, Antifouling for Wooden Boats.
Bottom Paint, which if any antifouling do you need on your wooden boat will depend on where and how you used her, and how much you want to lessen the impact on the environment.
Boat varnish for wooden boats
Boat Varnish, how to apply to a wooden boat and varnishing advice on restoring, repairing and maintaining your bright-work.
Gilding Boat Lettering and Cove Lines.
Gilding, the finishing touch, how to apply gold leaf to your Boat name lettering and cove line


Recent Articles
-
Wooden Boat Events 2024
Apr 14, 24 05:15 AM
Wooden Boat Events 2024 calendar, traditional and classic boat festivals and regattas from around the world -
14’ 1956 Chris Craft, side rail how should it be attached?
Apr 12, 24 03:38 AM
 Removing the old side rail most of the screws went between the top deck/skin 1/4” plywood and the side of the hull. See photo, is this correct? I would
 -
How to laminate plywood on the hull
Apr 10, 24 03:46 AM
I'm working on replacing the bottom of 18' 1969 runabout that has a deep-V plywood hull. It had a 1/2 mahogany plywood bottom that they somehow got to
You might like these
Woodboat Restoration questions forum
Woodboat restoration questions Forum, get advice about your Wooden Boat problems in a free, no frills, no need to sign up forum
Epoxy Resin for DIY Wooden Boat Building.
A guide to the epoxy resins and sustainable enrtopy resins to use when building wooden boats with marine plywood.
Wood Rot Repair and Treatment
Wood rot in wooden boats, how to treat, repair and replace rotten timbers in a wooden boat
Vintage wood Boat Bottom Replacement
The ultimate bottom repair for a vintage wood boat, when re-caulking the planking on your classic antique boat
Surveying a wood boat
The problem areas to look out for when surveying an old wooden boat.
Initial Boat Survey Checklist
The initial survey questions to ask when looking at a Wooden Boat with a view to restoring or renovating
Stem and Stern Post Rebuilding
Repairs to the Stem of a wooden boat can be undertaken by the amateur with a little care and attention.
Repair Plywood Boats.
How to repair plywood rot or delamination with marine ply, especially on the hull of a small boat.
Planking a Carvel Boat
How to replace damaged or unsound carvel Planking, a guide for any reasonably competent amateur.
Wedge Seam Construction
Wedge Seam Construction method for wooden boat building and glued wedging or ‘splining’ as a restoration technique for restoring old carvel planking seams.


This work is licensed under a Creative Commons Attribution-ShareAlike 2.0 UK: England & Wales License.
I am perfectly aware that the majority of Wooden Boat aficionados are sensible folk.
However, I need to point out that I am an amateur wooden boat enthusiast simply writing in order to try to help other amateur wooden boat enthusiasts.
And while I take every care to ensure that the information in DIY Wood Boat.com is correct, anyone acting on the information on this website does so at their own risk.