- Home
- Boat Building
- Restoration
- Decks
- Deck Beams
- Covering Boards
Deck Covering Boards.
Fitting hard wood covering boards around the edge of a boat deck and a king plank are finishing details which will enhance the appearance and value or your boat.
However, apart from being decorative, their main purpose is to protect and seal the edges of the deck covering.
They can also be used to good effect around deck openings such as cabin trunks and hatches.
Why Fit Covering Boards?
There are several different methods and reasons for fitting cover boards.
While the basic concept is the same, how you go about it will depend on the deck covering.
Covering boards are an essential part of fitting a laid deck.
They are also used to frame and seal the edges of fabric covered decks.
Plywood decks can also benefit from being framed by cover boards.
The boards are made up of several shorter planks scarffed together to provide a continuous edge to the deck.
As a rule they lie on the sheer-strake and are usually the same thickness as the rest of the deck.
The covering board is also the place where all those stanchions and fairleads are sited. It is particularly important to keep the joints between the coveting board the deck material and hull planking, frames etc watertight.
This will be aided by placing caulking cotton in a V shaped track between mating surfaces.
Support.
It is essential that the edge of the deck and cover board are supported by either a batten or carline let into the deck beams, or by blocking between the beams.
In order to get the support in the correct place your first task will be to mark on the beams the position of the join between the cover board and the deck.
Use a springy fairing batten tacked to the beams with small nails allowing the batten to springs fair.
Blocking will provide better support for the cover board scarfs and deck plank nib ends.
If using a ribband this will need to be wide enough to support the nib ends of the covering board scarf and the deck planks if laying a planked deck.
The tops of the beams, breasthook, anywhere where the cover board is to sit will need to be planed flat so covering board will fit flush.
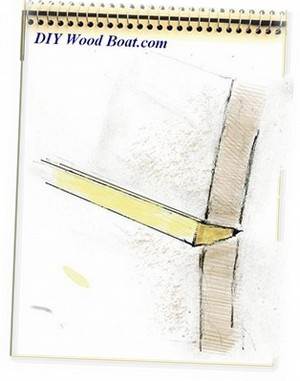
Scarf Joints.
 Scarfed Covering Boards
Due to the curvature of the hull cutting the covering boards from one piece would be very wasteful of wood.
So they are normally made up from short lengths scarfed together.
Cutting the scarfs will require some skill and patience.
You will probably have to make adjustments to the scarphs to get them to fit tightly.
So, always leave cutting the outer edges of the boards until all the scarfs are cut satisfactorily.
To facilitate the cutting of the scarfs make up plywood patterns for both sides.
Or make a jig so that they can be cut using a router, this will save a lot of time as well as producing accurate joints.
The inside corners can be cleaned up with a sharp chisel.
Once all the scarfs are cut fasten the boards in place and then mark out the inner and outer edges using the spiling batten.
To ensure that the nibs remain watertight, drill into the edge of the nib joints and fit softwood stopwaters.
The sections used to make up the covering board could be butt jointed.
While a butt joint is the easier than scarfing it will not look as good and will need more fastenings to ensure it secures it and keep it watertight.
affiliate linksTransom and Bow Corners.
 Covering Board Corner Joints
Not only is it good practice to run the cover board across the transom it is also very pleasing to the eye.
It is possible to join the transom cover board to the side board with a simple miter joint.
However, you do not want any sharp ends to extend to the outer edge.
Even the best of us can occasionally catch that back corner when leaving a dock.
It is better practice to make the corner from a separate piece.
And this will allow you to create a more pleasing radius to the inside of the corner.
Do not forget that the transom board will also need support blocking to prevent the decking and covering board from working.
The joint at the bow can also be made by setting in a separate corner piece.
Laid decks.
 Laid decks
There are two main styles of laid deck the sprung plank and the straight laid.
The sprung deck, without a doubt is the better looking however, the straight laid deck can look pretty fine too.
With both types the plank ends will need to be nibbed to avoid having vulnerable sharp corners.
Sharp points are particularly vulnerable when caulking.
The sprung deck will need nibbing where the planks end at fore and aft elements such as the king plank or cabin sides.
The straight laid deck will need to be nibbed where the plank ends meet the cover board.
 Blocking/Carline under Covering Boards
Some builders use a margin or nib plank set inside the covering board.
The nibs are then cut into the margin plank rather than the cover board.
However, nibbing is only needed on the sharper plank ends, where the angle is less than about 20 degrees.
It is probably best to cut each nib and mark and cut the covering board or king plank as you lay each plank.
A really smart way of dealing with the openings in a laid deck is to frame them with cover boards.
It does mean that you will need blocking or a carline underneath to carry the plank edges.
However where the sides of the opening run fore and aft and have little curvature this may not be needed.
Canvas covered decks.
Canvas covered decks are something of a rarity theses days.
It used to be quite a common method for sealing planked decks on small boats.
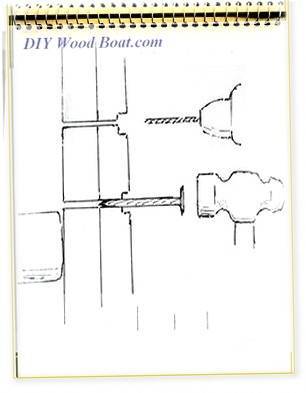
The primary purpose of the cover board on a canvassed deck was to seal and secure the edges of the canvas.
Though in some cases a hardwood spline was used to trap the edge of the fabric into a rabbet either in the covering board or in the deck with the cover boards fitted against the spline.
The idea of the spline was that it was easier to remove, if the canvas needed repair than removing the whole cover board.
The deck edge covering boards should be either flush with the deck or slightly below the deck level to allow water to drain away quickly and not be allowed to settle along the plank edge.
The king plank on the other hand being at the high point of the deck curvature could be set on top of the canvas.
affiliate linksPlywood covered decks.
 Covering Boards for Plywood Decks
The king plank on a plywood deck can also be set on top of the joint between the panels.
Hollow the underneath of the plank to allow plenty of room for sealant.
Cover boards for a plywood deck need to be organized to protect the end grain of the plywood.
The inside seam of a flush fitted cover board is particularly vulnerable to leaks, so particular care must be taken over the securing down and sealing of these edges.
If the deck is made up from laminates of plywood the covering boards can be set in line with the top laminate but on top of the lower ones.
NATIVE ASYNC


Recent Articles
-
Wooden Boat Events 2024
Apr 14, 24 05:15 AM
Wooden Boat Events 2024 calendar, traditional and classic boat festivals and regattas from around the world
"Sailors, with
their built in
sense of order, service and discipline,
should really be running the world."
(Nicholas Monsarrat)
You might like these
Plywood and Veneer Guide for Marine use.
A guide to plywood for boat building and why you should use the best marine grade you can afford.
DIY Woodboat Building Questions
Woodboat building questions a Forum for wooden boat building, plans, lumber, caulking compounds and other boat building problems.
Boat Books for Wooden Boat Builders
Boat Books a series of boat books based on some of the 1960's, classic, Free Boat Plans that were published in magazines such as "Popular Mechanics", "Popular Science" and the "Boat Builder Handbook".
Build a Boat, tips for the DIY Wooden Boat Builder.
How to Build a Boat, Wooden Boat Building methods for the DIY, backyard, self-builders explained, carvel, lapstrake and plywood
Clench Nails, Fastening for Small Wooden Boats.
How to use Clench Nails, these provide a fast reliable method for fastening small wooden boats.
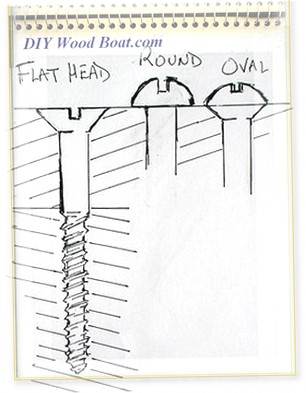
Wood Screws for Boat Building and Repair.
Wood Screws are the most widely used and versatile fasteners used on wooden boats. Which type to use and how to use them
Timber, Lumber for Boat Building.
A brief description of the most common Timber used for building Wooden Boats how to choose wood for your project boat
Timber Properties
A brief guide to timber properties and wood, characteristics such as strength, stiffness and elasticity for choosing lumber for wooden boat building and restoration.
Rivets and Copper Rove Wood Boat Fastenings.
How to use Copper Rivets and Roves construction guide to fasteners on your wooden boat.
Ring Nails for Marine Fastening.
Ring Nails sometimes call Gripfast or ring shank, silicon bronze boat nails are renowned for their holding power. but how to get them out?


Recent Articles
-
Wooden Boat Events 2024
Apr 14, 24 05:15 AM
Wooden Boat Events 2024 calendar, traditional and classic boat festivals and regattas from around the world -
14’ 1956 Chris Craft, side rail how should it be attached?
Apr 12, 24 03:38 AM
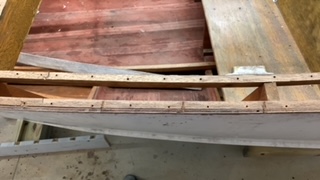
 Removing the old side rail most of the screws went between the top deck/skin 1/4” plywood and the side of the hull. See photo, is this correct? I would
 -
How to laminate plywood on the hull
Apr 10, 24 03:46 AM
I'm working on replacing the bottom of 18' 1969 runabout that has a deep-V plywood hull. It had a 1/2 mahogany plywood bottom that they somehow got to
You might like these
Woodboat Restoration questions forum
Woodboat restoration questions Forum, get advice about your Wooden Boat problems in a free, no frills, no need to sign up forum
Epoxy Resin for DIY Wooden Boat Building.
A guide to the epoxy resins and sustainable enrtopy resins to use when building wooden boats with marine plywood.
Wood Rot Repair and Treatment
Wood rot in wooden boats, how to treat, repair and replace rotten timbers in a wooden boat
Vintage wood Boat Bottom Replacement
The ultimate bottom repair for a vintage wood boat, when re-caulking the planking on your classic antique boat
Surveying a wood boat
The problem areas to look out for when surveying an old wooden boat.
Initial Boat Survey Checklist
The initial survey questions to ask when looking at a Wooden Boat with a view to restoring or renovating
Stem and Stern Post Rebuilding
Repairs to the Stem of a wooden boat can be undertaken by the amateur with a little care and attention.
Repair Plywood Boats.
How to repair plywood rot or delamination with marine ply, especially on the hull of a small boat.
Planking a Carvel Boat
How to replace damaged or unsound carvel Planking, a guide for any reasonably competent amateur.
Wedge Seam Construction
Wedge Seam Construction method for wooden boat building and glued wedging or ‘splining’ as a restoration technique for restoring old carvel planking seams.


This work is licensed under a Creative Commons Attribution-ShareAlike 2.0 UK: England & Wales License.
I am perfectly aware that the majority of Wooden Boat aficionados are sensible folk.
However, I need to point out that I am an amateur wooden boat enthusiast simply writing in order to try to help other amateur wooden boat enthusiasts.
And while I take every care to ensure that the information in DIY Wood Boat.com is correct, anyone acting on the information on this website does so at their own risk.