- Home
- Boat Building
- Restoration
- Bungs
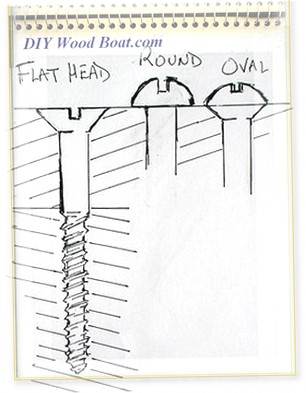
Cutting and fitting Bungs and Plugs.
Wooden Bungs or Plugs are the traditional way to cover the heads of countersunk fastenings on Wooden Boats.
Even today, with all the epoxy putties that are available there are still advantages to using wood.
The most obvious one is when the surface is to be given a natural finish, such as varnish.
However, even where the surface is to be painted, the wooden plugs have the advantage that they are less likely to fall out because they will expand when they 'take up' thus tightening their grip on the hole.
All this countersinking and plugging might seem like a lot of tedious work but it is imperative to protect those metal fasteners as much as possible.
Drilling and bunging is also an ideal way to cover up blemishes and fill knot holes.
Cutting.
It is possible to purchase ready cut plugs and they do come in a variety of woods.
However, they can work out expensive if you need a lot of them and they will not necessarily match the wood you have used.
Besides, you will most likely have lots of off cuts lying about which might as well be used up, so make your own.
Try to use off cuts of the same wood as that to be plugged and chose pieces which have a close straight grain.
It is possible to cut plugs with a hand drill and a hole-cutter , I have done it.
But, you will get a better, cleaner plug if you use a drill press and a
proper plug cutting tool.
For best results and fit, buy the cutter and countersink bit together as matching set.
Fuller 'cutters are worth the extra cost if only for the chamfer which they cut on the top end, this makes the plug easier to insert.
These cutters are not easy to sharpen.
If you plan to do a lot of plugging, it's worth spending a little extra on the extra-hard cutters that are designed for hardwood, even if you are cutting mainly softwoods, they will stay sharp longer.
If you only need a few plugs, they can be cut into any board which is thicker than the depth of the cutter.
The plugs can then be tweaked out with the blade of a screwdriver.
However if you are going to be using any appreciable quantity, then they are best cut into strips.
To make joined up strips of plugs, cut the wood into lengths along the grain.
The strip should be approximately 1/8 inch, 3mm wider then plug or the same width as the outside diameter of the cutter.
And it should be about 1 / 32inch, 1mm thicker than the full cutting depth of the cutter.
Clamp the strip onto the drill press and cut the plugs as close together as possible.
The idea is to be left with a row of bungs still attached to a thin strip of wood which, can easily be broken off as they are used.
Using this strip method will also make it easier to align the grain as you fit the plugs.
Use a fast drill speed, too slow will burn the sides of the plug but do not use too much downward force as this can leave the sides rough.
affiliate linksFitting Bungs
Before you start plugging its worth going around all the fastenings to give them a final tweak to make sure they are tight.
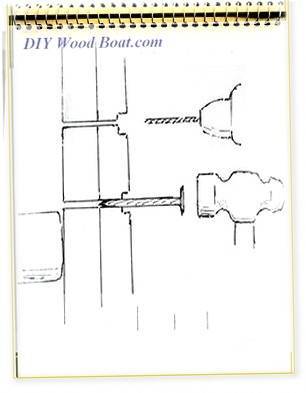
Once you start fitting the plugs, the main thing to remember is to keep the grain aligned with that of the wood being plugged.
They should be lightly tapped in place using a light wooden mallet. Don't hit it too hard as the plug may be crushed.
A well fitting plug should fit so well into the holes that it is not necessary to use glue or paint to keep it in place. And they will become even tighter when they absorb moisture and swell.
However most builders use some sort of adhesive.
Whatever you use try to keep glue to sides of bung and not on the bottom as this will end up fouling the head of the screw or bolt.
Use a small brush or piece of stick to paint on the glue rather than just dipping it into the glue.
Where the wood is to be finished off with varnish it is not uncommon to just dip the bungs in old varnish before tapping home.
And where the surface is to be painted the bungs can be set in paint of a similar color.
Shellac (de-waxed garnet grade) has been much neglected as a sealer and adhesive it is ideal for securing bungs.
It can be mixed 50-50 with red lead paint or white lead paste.
Of course you can use any waterproof glue but it is best if it is one which is not hard when set as this could cause problems when finishing.
affiliate linksFinishing.
So now you have a boat bristling with protruding bungs and the glue has had time to set.
The easiest method I have found to trim the plugs is with a fine toothed 'flush-cut' saw. If you are careful you can get them level enough to finish off with the sander.
When using a flush-cut saw keep the blade flat.
Bending the blade can damage the saw and steer the teeth off track.
Check the set of the teeth.
Some flush-cut saws have no “set” to their teeth while other saws have teeth that are set to one side only.
If your saw has set to one side then this side needs to be 'up' so it does not scratch the surface.
And keep the teeth clear of sawdust etc as this can cause the saw to wander.
You can apply some electrical type tape around the dowel to help protect the surface.
The usual method though, is to use a very sharp chisel to shave off the excess, a crank handled chisel is best.
You have to be careful and watch how the grain runs so as not to cause the plug to chip off below the plank surface.
Do not try to chisel off straight from the base but pare off progressive cuts to determine the run of the grain.
When it is time to finish and fair the hull the most common method is with a sander.
However, if the 'glue' used on the plugs is at all hard you could end up with the bung being left proud.
A better method might be with a plane with the blade set very shallow.
Some builders use an angle grinder or other electric finishing tools.
The cutting, fitting and finishing of wooden bungs is regarded by some as being a tedious and messy procedure.
But it is one of those tried and tested methods which will repay the effort in the long run.
affiliate linksNATIVE ASYNC


Recent Articles
-
Wooden Boat Events 2024
Apr 14, 24 05:15 AM
Wooden Boat Events 2024 calendar, traditional and classic boat festivals and regattas from around the world
"I start from the premise
that no object created by man is as
satisfying
to his body and soul as a proper sailing yacht."
(Arthur Beiser)
You might like these
Plywood and Veneer Guide for Marine use.
A guide to plywood for boat building and why you should use the best marine grade you can afford.
DIY Woodboat Building Questions
Woodboat building questions a Forum for wooden boat building, plans, lumber, caulking compounds and other boat building problems.
Boat Books for Wooden Boat Builders
Boat Books a series of boat books based on some of the 1960's, classic, Free Boat Plans that were published in magazines such as "Popular Mechanics", "Popular Science" and the "Boat Builder Handbook".
Build a Boat, tips for the DIY Wooden Boat Builder.
How to Build a Boat, Wooden Boat Building methods for the DIY, backyard, self-builders explained, carvel, lapstrake and plywood
Clench Nails, Fastening for Small Wooden Boats.
How to use Clench Nails, these provide a fast reliable method for fastening small wooden boats.
Wood Screws for Boat Building and Repair.
Wood Screws are the most widely used and versatile fasteners used on wooden boats. Which type to use and how to use them
Timber, Lumber for Boat Building.
A brief description of the most common Timber used for building Wooden Boats how to choose wood for your project boat
Timber Properties
A brief guide to timber properties and wood, characteristics such as strength, stiffness and elasticity for choosing lumber for wooden boat building and restoration.
Rivets and Copper Rove Wood Boat Fastenings.
How to use Copper Rivets and Roves construction guide to fasteners on your wooden boat.
Ring Nails for Marine Fastening.
Ring Nails sometimes call Gripfast or ring shank, silicon bronze boat nails are renowned for their holding power. but how to get them out?


This work is licensed under a Creative Commons Attribution-ShareAlike 2.0 UK: England & Wales License.
I am perfectly aware that the majority of Wooden Boat aficionados are sensible folk.
However, I need to point out that I am an amateur wooden boat enthusiast simply writing in order to try to help other amateur wooden boat enthusiasts.
And while I take every care to ensure that the information in DIY Wood Boat.com is correct, anyone acting on the information on this website does so at their own risk.